
Related Manuals for Scharfen HR 2035

Summary of Contents for Scharfen HR 2035
- Page 1 Technical alterations and alterations regarding accessories reserved. Operating instructions for tumbler model HR 2035 Scharfen Slicing Friedrich-Ebert-Str. 86 D - 58454 Witten Machines GmbH phone ++49-2302 – 28277-41...
-
Page 2: Table Of Contents
Contents 1. General Information 1.1. ATTENTION hint regarding pump 1.2. Notes regarding the operating instructions 1.3. Notes regarding warranty 1.4. Notes regarding security 1.5. Dimensions of the machine and technical data 1.6. Description of the machine 1.6.1. General plan of the machine 1.7. - Page 3 6. Cleaning 6.1. How to proceed with cleaning 6.1.1. Cleaning of the machineReinigung der Maschine 6.1.2. Cleaning of the drum 6.2. Cleaning of the single parts. 6.3. Reassembling the parts 7. Maintenance 7.1. Oil change at the vacuum pump 7.1.1. How to proceed the oil change 7.2.
-
Page 4: General Information
Scharfen spare parts any responsibility from our side is refused. In above cases the operator acts on his own risk and is responsible himself for damages which might occur. -
Page 5: Dimensions Of The Machine And Technical Data
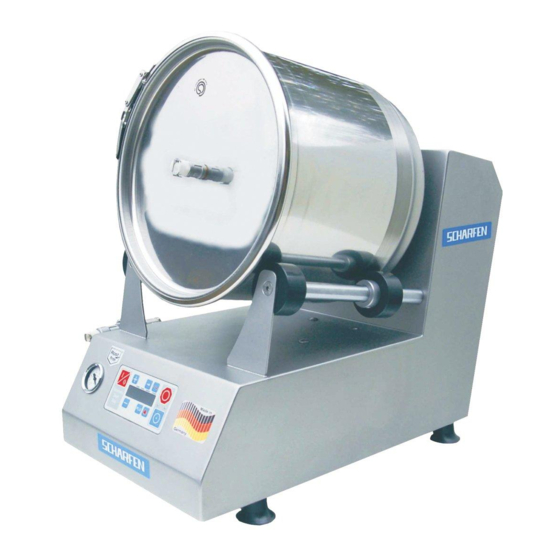
230/1/50 or 110/1/60 power requirement 0,35 kW Manufacturer: Hermann Scharfen GmbH & Co. Maschinenfabrik KG Ruhrstr. 76a, D - 58452 Witten, phone 02302/282770 1.6. Description of the machine This machine is a fully automatic tumbler with an automatic program flow. -
Page 6: General Plan Of The Machine
The protecting and security equipment as well as electrical and mechanical components correspond to regulations in force. The machine is equipped with the following security equipment: no self-starting of the machine after a voltage drop double push-button 1.6.1. General plan of the machine coupling tilting lever water separator... -
Page 7: Checking The Contents Of The Carton
these operating instructions 2.2. Installation The tumbler model HR 2035 has to be installed on a plain, horizontal, non-slip and stable surface. If necessary the machine has to be screwed tight in addition. Recommended height of the working surface about 800 mm. Pay attention to the required counter space. -
Page 8: Operation
Operation 3.1. Important notes before switching on the machine Because of security reasons pay attention to the following notes: first read this operating instructions carefully take care that the machine is placed on a stable and secure surface work with concentration never touch the drum while it is turning never touch the driving or guiding rolls while the machine is in operation 3.2. -
Page 9: Connection Of The Connecting Tube
After that mount the chicane and fill the drum. Place the lid on top of the drum and lock it as shown on the following photos. Before putting on the tube tilt the device in any case downwards. In case there should come out liquid under no circumstances put on the tube. Overfilling!!! 3.5. -
Page 10: Switching Off The Machine
The machine is now operational and can now be started. The meaning of the single digits are described in the following chapter. 3.8. Switching off the machine The machine can be switched off at any time at the main switch. Take care of the fact that probably there is still a vacuum in the drum and that you cannot take off the lid. -
Page 11: Description Of The Keyboard
5.2. Description of the keyboard Anzeigewert vergrößern Anzeige wechseln Trommeldrehen manuell Hauptschalter Aus Automatik Ein / Aus Arbeit Pause Gesamt Vorlauf Hauptschalter Ein Anzeigewert verkleinern Umschaltung Manuell - PLU Vacuumpumpe manuell Anzeigewert vergrößern increasing display value Anzeige wechseln change indication Trommeldrehen manuell turning of the drum manually Automatik Ein / Aus... -
Page 12: Working With Plu
The last three digits show the lead time. After the start of the machine this time is running minute by minute. Only when the lead time is showing 000 the machine starts with the real cycle. By means of this you have the possibility to fill the drum already in the evening and to start the program in such a way that the program will be finished when you start working in the morning. -
Page 13: Working In The Manual Mode
With the button ’change indication’ you get to the next indication. Time 1 Vac Here you adjust how much time the vacuum pump is working after having started the program and after each aerating. Indication in seconds. Adjustable between 1 – 99. There is a difference between vacuum time 1 and vacuum time 2. -
Page 14: Modifying The Condition In The Manual Mode
Never touch the turning drum. Never touch the drum before you have switched off the machine at the main switch. Never take off the drum from the machine before you have switched off the machine at the main switch. Never touch the driving and guiding rolls while the machine is in operation. 5.5.2. - Page 15 6.2. Cleaning of the single parts. Never clean detached parts or accessories in a dish washer. cleaning detergent procedure cleaning device procedure after cleaning machine warm water, manually cleaning rag, cleaning wash up with clear water, detergent, acid free brush from chlorine detached parts warm water,...
- Page 16 machine open the drain plug 1, size of key SW 14, at the lower end of the water separator. The water drains off outwardly. When the water has drained off completely close again the drain plug. In case the container should be dirty loosen the upper screw 2 with a key size SW 10, turn off the container, clean it and fix it again.
Need help?
Do you have a question about the HR 2035 and is the answer not in the manual?
Questions and answers