Table of Contents
Advertisement
Quick Links
Mediant™ 800Ci uCPE
Quick Setup Guide
Welcome
Thank you for choosing AudioCodes' Mediant 800Ci uCPE.
This document is intended to provide basic instructions for initial setup of the Mediant 800Ci uCPE (hereafter,
referred to as device) and connecting it to your network. For advanced configuration, please refer to the
device's Configuration Notes and Hardware Manual respectively, which can be downloaded from AudioCodes
Website at https://www.audiocodes.com/library/technical-documents.
Before you begin, please read the Safety Precautions on the next page and click
here
to view the Regulatory
Information document.
1 |
P a g e
Advertisement
Table of Contents

Related Manuals for AudioCodes Mediant 800Ci uCPE


Summary of Contents for AudioCodes Mediant 800Ci uCPE
- Page 1 Thank you for choosing AudioCodes’ Mediant 800Ci uCPE. This document is intended to provide basic instructions for initial setup of the Mediant 800Ci uCPE (hereafter, referred to as device) and connecting it to your network. For advanced configuration, please refer to the device's Configuration Notes and Hardware Manual respectively, which can be downloaded from AudioCodes Website at https://www.audiocodes.com/library/technical-documents.
-
Page 2: Safety Precautions
Safety Precautions ▪ This device is an indoor unit and therefore, must not be installed outdoors. ▪ Ethernet cabling must be routed only indoors and must not exit the building. ▪ Do not open or dismantle the device. ▪ Do not expose the device to water or moisture. ▪... - Page 3 Physical Description of Front Panel LED indicating power status: Green On Power received by device. No power. LED indicating operating status: Green On Device is operational. Green Flashing Initial rebooting stage or software upgrade in process. Red On Boot failure. Advanced rebooting stage.
- Page 4 Reset pinhole button for resetting the device or restoring it to factory defaults. To restore to factory defaults: with a paper clip or any other similar pointed object, press and hold down the button for at least 12 seconds (but no more than 25 seconds). S0 / WAN WAN Ethernet ports: DSL: RJ-11 port for DSL WAN interface.
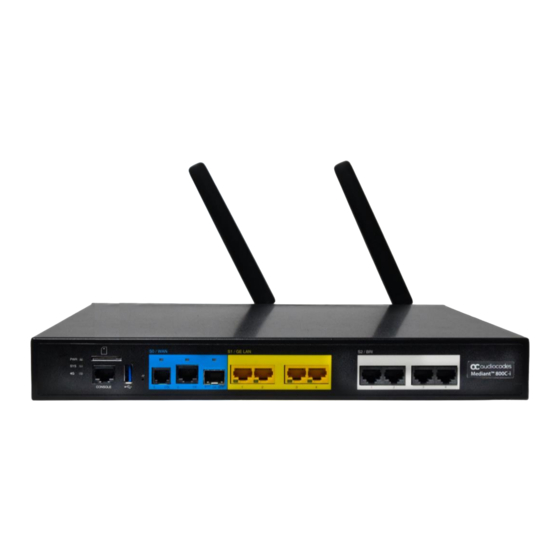
- Page 5 Physical Description of Rear Panel Two cellular antennas for 4G LTE cellular connectivity. USB 3.0 port (Standard-A type) for connecting computer peripherals (e.g., mouse and keyboard) to the OSN server. OSN PWR LED indicating power status of the OSN server. CONSOLE Micro USB port for connecting a monitor to the OSN server.
-
Page 6: Mounting The Device
Mounting the Device You can mount the device in several ways: ▪ Placing it on a desktop using the four anti-slide bumpers (supplied), which you need to stick on the grooves located on the underside of the device. The bumpers avoid involuntary movement of the unit on the desktop as well as enable better air flow for cooling the device. -
Page 7: Initial Connectivity
Initial Connectivity This section describes how to initially access the device's management interface and change its default IP address to correspond with your networking scheme. Device management can always be done through the LAN interface, but you can also enable device management through the WAN (as explained in the configuration guide). - Page 8 On your computer, start a Web browser and in the URL address field, enter the device's default IP address; the Web interface's Web Login screen appears: In the 'Username' and 'Password' fields, enter the case-sensitive, default login username (Admin) and password (Admin).
- Page 9 Configuring WAN Interface This section describes how to configure the WAN interface, which uses Gigabit Ethernet. Before configuring the WAN interface, make sure that you have all the required information from your Internet service provider. Connect the WAN port to the WAN network. For information on cabling the WAN port, refer to the Hardware Installation Manual.
-
Page 10: Cabling The Device
Cabling the Device Insert the SIM card (provided by your Service Provider) into the SIM slot. Connect the device's WAN port interface to your router. Connect the device's Gigabit Ethernet ports to your LAN network. 10 | P a g e... - Page 11 Connect the device's BRI ports to BRI phones or the ISDN network. Ground (earth) the device, using the grounding screw on the rear panel. Connect the device to your AC electrical outlet, using the power outlet on the rear panel. Connecting to OSN Server The following procedure describes how to access the device's embedded OSN server so that you can install your applications (e.g., SD-WAN).
- Page 12 ©2022 AudioCodes Ltd. All rights reserved. AudioCodes, AC, HD VoIP, HD VoIP Sounds Better, IPmedia, Mediant, MediaPack, What’s Inside Matters, OSN, SmartTAP, User Management Pack, VMAS, VoIPerfect, VoIPerfectHD, Your Gateway To VoIP, 3GX, VocaNom, AudioCodes One Voice, AudioCodes Meeting Insights, AudioCodes Room Experience and CloudBond are trademarks or registered trademarks of AudioCodes Limited.
Need help?
Do you have a question about the Mediant 800Ci uCPE and is the answer not in the manual?
Questions and answers