Table of Contents
Advertisement
Quick Links
Advertisement
Table of Contents

Related Manuals for YESKAMO Q05-3MP

Summary of Contents for YESKAMO Q05-3MP
- Page 1 Floodlight IP Camera User Manual...
-
Page 2: Table Of Contents
DIRECTORY .................. 1 I. Statement ..............2 II. Product Structure ........4 Ⅲ. Descrip�on about Floodlight Camera ............ 5 IV. Configura�on on Phone App ..............5 1. Power on camera ..............5 2. Download App ..........6 3. Create an Account and Login ................. -
Page 3: Statement
I. Statement Thank you for purchasing YESKAMO Security WIFI Camera with floodlight. The mo�on and humanoid alarm camera have floodlights, when camera catches any suspicious ac�vi�es in its detec�on area, or detect human movement you will get an alert message through the phone and siren alarm from camera side. -
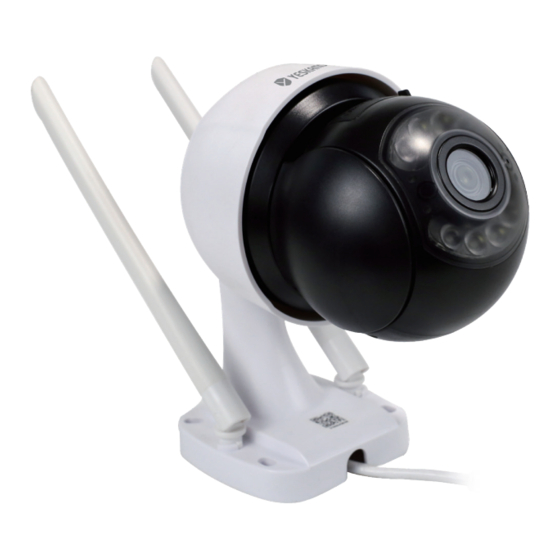
Page 4: Product Structure
II. Product Structure IP66 Weatherproof Shell WIFI Antenna TF Card Slot Floodlight LED *4 IR LED*4 4.0mm Camera Lens Microphone Mo�on Detec�on Sensor IR Cut Filter Speaker Power Cord Reset Bu�on RJ45 Port... - Page 5 Weatherproof IP66 Housing: working temperature: -20℃/ -4℉ to 60℃/140℉. RJ-45 Ethernet port: A: Add the camera to YESKAMO NVR recorder as a standard NVR kits if you want. B: Wired connect the camera to internet if you are you failed to conjugate it for wireless connec�on.
-
Page 6: Ⅲ. Descrip�On About Floodlight Camera
Wi-Fi camera, which you can view directly on the phone app ”EseeCloud”; Or you can add the floodlight camera to a YESKAMO NVR recorder as would be for a standard NVR camera kits. -
Page 7: Configura�On On Phone App
The camera has a built in IR leds and floodlight leds, IR led will automa�cally switch on when ambient light is insufficient and will create clear black/white videos, the floodlight will come on automa�cally (in the darkness) ONLY when any suspicious ac�vi�es is caught on camera and will then allow for colour video recording for the unexpected ac�vity. -
Page 8: Create An Account And Login
3. Create an Account and Login Register an account with your email address /phone number and password. A verifica�on code will be send via text. 4. Add device on phone app Reset camera: Press and hold the reset bu�on of camera about 5-10 seconds un�l hear a voice prompt “... - Page 9 Add device on phone APP Step1: Go to "Setup > Wifi" on your Phone Step2: Connect your phone to camera's hotspot with “IPC..." and input default hotspot password " 11111111"...
- Page 10 Step3: Enter APP>My Device>tap"+"lcon Step4: Click other ways to add...
- Page 11 Step5: Tap “Standalone camera” bu�on...
- Page 12 Step6: You could watch the camera video right now Please choose Remote View or Direct Connec�on. A.Remote View: Please input your router name and password (Make sure you ① input correct password of home wi-fi),then click "confirm" bu�on. -10-...
- Page 13 The device will start to connect,please wait for camera ② connec�ng to internet with voice prompt “wireless se�ng, please wait”. -11-...
- Page 14 Get the voice prompt “the wireless connec�on is successful” ③ and then click “con�nue” to finish the configura�on. -12-...
-
Page 15: Preview And Playback
B.Direct Connec�on: Set the device name,then click confirm.The camera will be added successfully. 5. Preview and playback -13-... - Page 16 Switching between playback Playback/live Video video & real-�me live video Switch Button Customize the screen to show how many Window Switch Button window at one �me Adjust video propor�on, Customize Proportion the preview video propor�on Customize the preview video defini�on between HD (high Definition Switch Button defini�on) &...
-
Page 17: Device Se�Ngs
Note: Turn on the “speaker” bu�on on phone app and you can hear the voice from camera side, push the “microphone” bu�on lets you stream your voice from phone to camera to whoever’s near your camera can hear you. 6. Device Se�ngs 6.1 Mo�on Detec�on on Recording Hit the ‘’Se�ngs’’... - Page 18 1) Humanoid se�ngs Func�on Op�on When a humanoid is detected, an alarm message is generated. Humanoid Messages help tell the movement is caused by human or other detec�on alarm objects. Humanoid detec�on sensi�vity Humanoid picture Enable to mark a red square on human mo�on. frame 2) Recording and detec�on se�ngs Func�on...
-
Page 19: Advanced Se�Ngs
6.2 Advanced se�ngs Hit the ‘’Se�ngs’’ icon on the bo�om right corner of device screen >> on ‘’Setup’’ interface scrolling down screen >> Advanced se�ngs. 1) Video screen reversal Hit the ‘’Se�ngs’’ icon on the bo�om right corner of device screen >>... - Page 20 2) Video quality se�ng The PTZ camera support setup the floodlight and IR-night vision mode, it included Infrared / full color / intelligent modes. On ‘’Setup’’ interface scrolling down screen >> Advanced se�ngs >> Video quality se�ngs >> Infrared / Full color / Intelligent. Func�on Op�on Choose Infrared mode the camera displays only black &...
-
Page 21: More Se�Ngs
3) Privacy zone se�ngs Cover the privacy zone based on needs. But due to the PTZ feature of this camera, this func�on isn’t suitable for applica�on. On ‘’Setup’’ interface scrolling down screen >> Advanced se�ngs >> Privacy zone se�ngs. 6.3 More Se�ngs 1) Device Wi-Fi On ‘’Setup’’... - Page 22 2) Device Storage Setup > Device Storage > Cloud storage / TF card storage The camera support subscribe Cloud storage and MicroSD card storage. MicroSD card support up to 128GB and FAT32 format. Please format SD card on computer into FAT32 format and make sure the camera is off...
- Page 23 3) Setup Password On ‘’Setup’’ interface scrolling down screen >> Setup Password >> User name / Password Setup or reset password for the camera so it more secure, and then others need password to be shared. -21-...
-
Page 24: Share The Device
6.4 Share the Device You can easily share the device to your families a�er you finish the configura�on of camera on phone app. Hit the Share icon > Device share permissions > hit the �ck on upper right corner to get QR code > Scanning QR code with family >... - Page 25 * There are other 2 ways to share the device to families: 1) Manually add the device via cloud ID On families’ phone Enter APP Device > click “+” Icon > choose “Other ways to add” > Hit “Add by ID/IP” > Input Cloud ID and password >...
- Page 26 ********* Cloud ID: A: Check it on the primary phone which configured the camera. B: Check the label on camera body. 2) LAN scan add the device The phone and camera must be within same Wi-Fi environ- ment if you choose “LAN scan”. On families’...
- Page 27 -25-...
- Page 28 -26-...
-
Page 29: Faq
V. FAQ Q1. How to insert TF Card for camera? Unplug camera from power source; Remove the rubber plug for TF Cart port from camera; Insert the TF Card slightly; Cover TF Card rubber plug back to camera seamlessly; Power on the camera and format the TF Card (About SD card format please referring “6.3 More se�ngs >... - Page 30 B. Hit “Se�ngs” on Device screen > Mo�on detec�on record- ing > Disable “Enable mo�on detec�on no�fica�ons” Q3.How to turn on and turn off the siren alarm from camera side? Hit “Se�ngs” on Device screen > Mo�on detec�on recording > Enable/Disable “Enable mo�on detec�on alarm siren”...
- Page 31 Q5.Why I can not playback the video? A. Please check whether you enable the Mo�on recording. Device se�ngs > Mo�on detec�on recording > Enable “Mo�on detec�on” > Enable “Mo�on recording” B. Check if you have setup full �me recording for camera. Device se�ngs >...
- Page 32 Q8.Why the floodlight doesn’t turn on when someone passby? A. The floodlight only turns on at night (IR night vision ac�vated) when camera detects people, it will not turn on at day �me. B. The �me interval for floodlight is about 2 minutes. C.
- Page 33 Q11.What to do if can NOT finish the configura�on of camera on phone app? If you click the “reset” bu�on, but failed to configure the camera on phone app, please follow below steps: 1) Connect the RJ45 port of camera to LAN port of router with Ethernet cable, the camera will connect with internet in Minutes.
- Page 34 Note: A: When connect the camera to LAN port of router, the camera will access to internet and network status of camera will be ONLINE on phone app. B: When configure wireless network for camera, the camera and your phone should be at the same network (merely, wired connect the camera to router with Ethernet cable, and you phone connect the router Wi-Fi network at same �me).
- Page 36 @Yeskamo (official) www.yeskamo.com YESKAMO Technology Co. Ltd Website: www.yeskamo.com Email: usservice@yeskamo.com (for US) ukservice@yeskamo.com (for UK) Tel: +1 830 745 5888 (US) +44 20 3807 4763 (UK)
Need help?
Do you have a question about the Q05-3MP and is the answer not in the manual?
Questions and answers