
Related Manuals for ZTOZZ HEIMA

Summary of Contents for ZTOZZ HEIMA
- Page 2 1/4" 13/16" 1/4" x 2 / " 1/4" x 2" 5/16" x 3 / " open-end wrench bolts hex bolts hex bolts bolts 1/4" x 1 / " 5/16" x 3 / " 1/4" x 2 / " 3/16" x 1 / "...
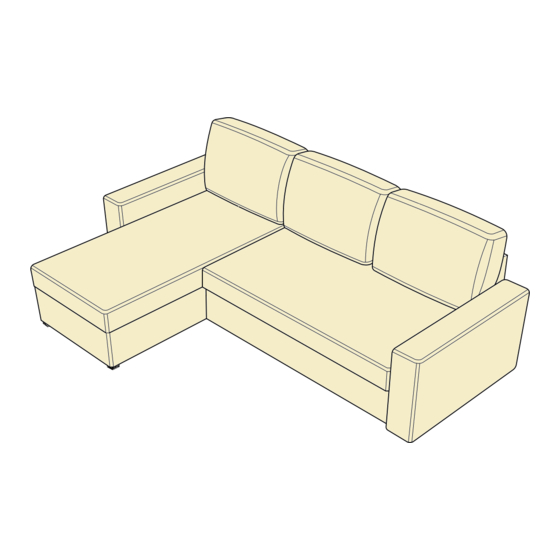
- Page 3 Before starting the assembly, please select the chaise placement – it can be installed either on the left or the right side.
- Page 4 Lay armrest 1 ( ) at onto the oor with pre-drilled holes facing upward and attach 1 x stopper rail set ( ) with 2 x bolts ( ) and 2 x metal washers ( ) using the open-end wrench ( ). Then attach 2 x stud bolts ( ) to the pre-drilled holes in the middle of the armrest 1 (as shown in the illustration, do not fully tighten).
- Page 5 Attach 1 x stopper rail set ( ) onto the chaise ( ) with 2 x bolts ( ) and secure it with 2 x metal washers ( ) and 2 x hex nuts ( ) using the open-end wrench ( ), depending on the chosen chaise placement.
- Page 6 Attach backrest 1 ( ) onto the chaise ( ) and screw in the 3 x hex bolts ( ) with 3 x metal washers ( ). Flip the armrest 1 ( ) and armrest 2 ( ) upside down and screw in the 2 x legs ( ) with 2 x self-tapping screws ( ) per armrest using the Phillips-head screwdriver ( ).
- Page 7 Attach the 2 x side mounting brackets ( ) onto the chaise ( ) with 1 x bolt ( ) per bracket using the Phillips-head screwdriver ( ).
- Page 8 Connect the sleeper cushion ( ) and the backrest 2 ( ) to each other with 3 x bolts ( ) and secure it with 3 x metal washers ( ) and 3 x hex nuts ( ) using the open-end wrench ( ). Flip the assembly so that the backrest is facing downward as pictured.
- Page 9 Flip the chaise assembly so that the backrest is facing downward as pictured, open up the chaise and support it with throw pillows. Connect the sleeper cushion assembly to the chaise using the side mounting brackets.
- Page 10 Secure the mounting plates with 2 x bolts ( ) and 3 x hex nuts ( ) using the open-end wrench ( ). Attach screws ( ) to the assembly using the Phillips-head screwdriver ( ).
- Page 11 Attach the armrest 1 ( ) , together with the stopper rail, onto the assembly. Make sure that the hook part of the stopper rail of the armrest is facing upward. Connect the sleepper cushion part to armrest with 2 x stud bolts ( ) already screwed in the armrest and secure it with 2 x metal washers ( ) and 2 x hex nuts ( ) using the open-end wrench ( ).
- Page 12 Attach the armrest 2 ( ) to the chaise using 3 x bolts ( ) along with 3 x washers ( ) and the open-end wrench ( ).
- Page 13 Flip the sofa into a regular position. Roll the sleeper ( ) into the assembly and gently lift it up to secure it to the stopper rails, you will hear a distinct click sound. Put 3 x throw pillows ( ) on the sofa and...
Need help?
Do you have a question about the HEIMA and is the answer not in the manual?
Questions and answers