Table of Contents
Advertisement
Quick Links
SparkFun RTK Facet Hookup Guide
Introduction
The RTK Facet from SparkFun is our most advanced GNSS receiver to date. It's your one stop shop for high
precision geolocation and surveying needs. For basic users, it's incredibly easy to get up and running and for
advanced users, the RTK Facet is a flexible and powerful tool.
SparkFun RTK Facet
GPS-19029
With just a few minutes of setup, the RTK Facet is one of the fastest ways to take centimeter grade
measurements.
N
O
T
O
U
C
C
A
R
U
Y
I
G
L
N
O
R
T
E
S
I
G
E
R
Advertisement
Table of Contents

Related Manuals for sparkfun RTK GPS-19029


Summary of Contents for sparkfun RTK GPS-19029
- Page 1 SparkFun RTK Facet Hookup Guide Introduction The RTK Facet from SparkFun is our most advanced GNSS receiver to date. It's your one stop shop for high precision geolocation and surveying needs. For basic users, it’s incredibly easy to get up and running and for advanced users, the RTK Facet is a flexible and powerful tool.
-
Page 2: Required Materials
Surveying with a monopod and SW Maps An RTK Fix with 14mm accuracy in SW Maps By connecting your phone to the RTK Facet over Bluetooth, your phone can act as the radio link to provide correction data as well as receive the NMEA output from the device. It’s how $10,000 surveying devices have been operating for the past decade - we just made it easier, smaller, and a lot more economical. -
Page 3: Suggested Reading
The RTK Facet has all you need built into one small unit. In addition, the RTK Facet Kit includes everything you might need as well. The only thing you need to add is your own tablet or cell phone (Android and IOS supported). Depending on your setup you may want to use your phone for RTCM correction data. -
Page 4: Hardware Overview
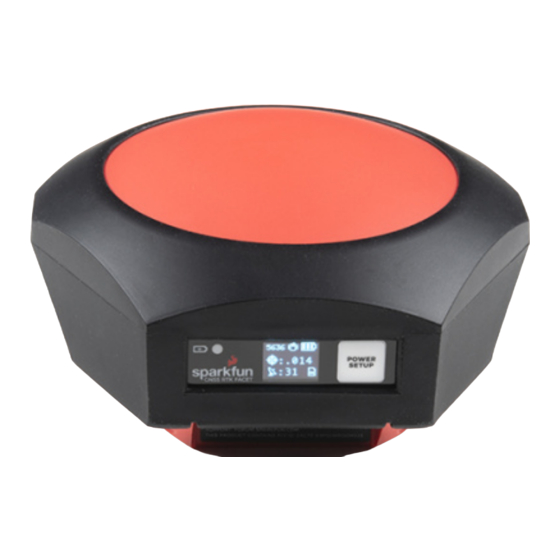
GNSS RTK is an incredible feat of engineering that has been made easy to use by powerful GNSS receivers such as the ZED-F9P by u-blox (the receiver inside RTK Facet). The process of setting up an RTK system will be covered in this tutorial but if you want to know more about RTK here are some good tutorials to brush up on: What is GPS RTK? Getting Started with U-Center for u-blox... - Page 5 The RTK Facet is a fully enclosed, preprogrammed device. There are very few things to worry about or configure but we will cover the basics. Power/Setup Button The RTK Facet has one button used for both Power and Setup for in-field configuration changes. Pressing and holding the Power button will cause it to power on or off.
-
Page 6: Charge Led
Power RTK Facet startup display with firmware version number The Power button turns on and off the unit. Press and hold the power button until the display illuminates. Press and hold the power button at any time to turn the unit off. RTK Facet showing the battery level The RTK Facet has a large, built-in 6000mAh lithium polymer battery that will enable over 25 hours of field use between charging. - Page 7 The SparkFun RTK Facet connectors shown with the dust cover removed There are a variety of connectors protected by a dust flap. USB: This USB C connector is used for three purposes: Charging the device Configuring the RTK Facet, and reprogramming the ESP32 Directly configuring and inspecting the ZED-F9P GNSS receiver There is a USB hub built into the RTK Facet.
- Page 8 This port is used when an external cellular or radio link is needed. This port is not used if you transfer RTCM from your phone to the RTK Facet over Bluetooth. This 4-pin JST connector can be used to allow RTCM correction data to flow into the device when it is acting as a rover or out of the device when it is acting as a base.
- Page 9 I2C - The TX pin operates as SCL, RX pin as SDA on the I2C bus. This allows additional sensors to be connected to the I2C bus. GPIO - The TX pin operates as a DAC capable GPIO on the ESP32. The RX pin operates as a ADC capable input on the ESP32.
- Page 10 GNSS Multi-Band L1/L2 Surveying Antenna. Its datasheet is available here. SparkFun RTK Facet Antenna Reference Points The built in antenna has an ARP of 61.4mm from the base to the measuring point of the L1 antenna and an ARP of 57.4mm to the measuring point of the L2 antenna.
- Page 11 The RTK Facet has a built in 6000mAh battery and consumes approximately 240mA worst case with Bluetooth connection active and GNSS fully tracking. This will allow for around 25 hours of use in the field. If more time is needed in the field a standard USB power bank can be attached. If a 10,000mAh bank is attached one can estimate 56 hours of run time assuming 25% is lost to efficiencies of the power bank and charge circuit within RTK Facet.
- Page 12 The Facet with three sub boards, the battery, and antenna ZED-F9P GNSS Receiver The ZED-F9P GNSS receiver is configured over I C and uses two UARTs to output NMEA (UART1) and input/output RTCM (UART2). In general, the ESP32 harvests the data from the ZED-F9Ps UART1 for Bluetooth transmission and logging to SD.
-
Page 13: Hardware Assembly
A microSD socket is situated on the ESP32 SPI bus. Any microSD up to 32GB is supported. RTK Facet supports RAWX and NMEA logging to the SD card. Max logging time can also be set (default is 24 hours) to avoid multi- gigabyte text files. - Page 14 2nd most common setup with a 915MHz Radio providing RTCM If you are receiving RTCM correction data over a radio link it’s recommended that you attach a radio to the bottom of the RTK Facet. New Radio Version Coming Soon: We are currently waiting for the new version of the 100mW and 500mW serial radios to be released by Holybro.
- Page 15 If you’re looking for maximum accuracy consider installing a static base with fixed antenna. We were able to pinpoint the antenna on the top of SparkFun with an incredible accuracy +/-2mm of accuracy using PPP! Bluetooth and NTRIP The RTK Facet transmits full NMEA sentences over Bluetooth serial port profile (SPP) at 4Hz and 115200bps.
- Page 16 SW Maps with RTK Fix The best mobile app that we’ve found is the powerful, free, and easy to use SW Maps by Softwel. You’ll need an Android phone or tablet with Bluetooth. What makes SW Maps truly powerful is its built-in NTRIP client. This is a fancy way of saying that we’ll be showing you how to get RTCM correction data over the cellular network.
- Page 17 GNSS. This will display a list of available Bluetooth devices. Select the Rover or Base you just paired with. For the Instrument Model drop down select 'SparkFun RTK Surveyor' or 'u-blox RTK' (rather than just 'u-blox'). This is important and will enable the use of NTRIP.
- Page 18 SparkFun RTK Facet Antenna Reference Point The built in antenna has an ARP of 61.4mm from the base to the measuring point of the L1 antenna and an ARP of 57.4mm to the measuring point of the L2 antenna. So if your monopod is 67 inches long fully extended, the antenna offset is 1701.8mm + 61.4mm = 1763mm.
- Page 19 This is the amazing power of RTK Facet and SW Maps. Your phone can be the radio link! From the main SW Maps menu select NTRIP Client. Not there? Be sure to select 'SparkFun RTK Surveyor' or 'u-blox RTK' instrument...
- Page 20 Connecting to an NTRIP caster Enter your NTRIP caster credentials and click connect. You will see bytes begin to transfer from your phone to the RTK Facet. Within a few seconds the RTK Facet will go from ~300mm accuracy to 14mm. Pretty nifty, no? What's an NTRIP caster? In a nutshell, it's a server that is sending out correction data every second.
-
Page 21: Power On/Off
Once you have a full RTK fix you'll notice the location bubble in SW Maps turns to green. Just for fun, rock your rover monopole back and forth on a fixed point. You'll see your location accurately reflected in SW Maps. Millimeter location precision is a truly staggering thing. - Page 22 Rover RTK Fix Rover with RTK Fix and Bluetooth connected Once NTRIP is enabled on your phone or RTCM data is being streamed into the Radio port the device will gain an RTK Fix. You should see the HPA drop to 14mm with a double circle bulls-eye as shown above. Base Survey-In RTK Facet in Survey-In Mode Pressing the Setup button will change the device to Base mode.
- Page 23 RTK Facet in Transmit Mode with NTRIP Once WiFi connects the device will attempt to connect to the NTRIP mount point. Once successful the display will show 'Casting' along with a solid WiFi icon. The number of successful RTCM transmissions will increase every second.
-
Page 24: System Configuration
The Data connector on the RTK Facet is a 4-pin locking 1.25mm JST SMD connector (part#: SM04B-GHS-TB, mating connector part#: GHR-04V-S). 3.3V is provided by this connector to power a remote device if needed. While the port is capable of sourcing up to 600mA, we do not recommend more than 300mA. This port should not be connected to a power source, so if your embedded device has its own power do not connect the red wire. - Page 25 The WiFi network RTK Config as seen from a cellphone Device ready for cellphone configuration To get into WiFi configuration follow these steps:...
- Page 26 1. Power on the RTK Facet. 2. Once the device has started press the Setup button repeatedly until the Config menu is highlighted. 3. The RTK Facet will blink a WiFi icon indicating it is waiting for incoming connections. 4. Connect to WiFi network named ‘RTK Config’. 5.
-
Page 27: Gnss Configuration
GNSS Configuration The ZED-F9P module used in the Facet is immensely configurable. The RTK Facet will, by default, put the ZED- F9P into the most common configuration for rover/base RTK for use with SW Maps. The GNSS Receiver menu allows a user to enable/disable various sentences and options for the ZED-F9P: Measurement Frequency Dynamic Model Constellation Support... -
Page 28: Base Configuration
Messages The ZED-F9P supports more than 70 different messages. Some messages, like NMEA, output location information. Other messages report the internal status of the ZED-F9P. Please see the ZED-F9P Integration Manual for more information about specific message types. Each message rate input controls which messages are disabled (0) and how often the message is reported (1 = one message reported per 1 fix, 5 = one report every 5 fixes). - Page 29 Controlling the type of Base Survey-In By default, the RTK Facet will enter 'Survey-In' mode when a user presses the POWER/SETUP button and selects 'Base'. The unit will monitor all constellations until both the observation time and required mean 3D standard deviation is met.
-
Page 30: Ports Configuration
The RTK Facet can be configured to transmit its RTCM directly over WiFi to the user's mountpoint. This eliminates the need for a radio link or a cell phone link. Once the NTRIP server is enabled you will need a handful of credentials: Local WiFi SSID and password A casting service and port such as RTK2Go or Emlid (the port is almost always 2101) A mount point and password... - Page 31 nano-second resolution. Useful for things like audio triangulation. See the Timemark section of the ZED-F9P Integration Manual for more information. I2C - The TX pin operates as SCL, RX pin as SDA on the I2C bus. This allows additional sensors to be connected to the I2C bus.
- Page 32 Advanced system settings Log to SD If a microSD card is detected, all messages will be logged. Once the max log time is achieved, logging will cease. This is useful for limiting long term, overnight, static surveys to a certain length of time. Default: 1440 minutes (24 hours).
- Page 33 Once settings are input, please press ‘Save Configuration’. This will validate any settings, show any errors that need adjustment, and send the settings to the unit. The page will remain active until the user presses ‘Exit to Rover Mode’ at which point the unit will exit WiFi configuration and return to standard Rover mode. System Configuration - Serial Terminal Main Menu To configure the RTK Facet attach a USB C cable to the USB connector.
-
Page 34: Messages Menu
GNSS menu showing measurement rates and dynamic model Measurement Frequency can be set by either Hz or by seconds between measurements. Some users need many measurements per second; the RTK Facet supports up to 20Hz with RTK enabled. Some users are doing very long static surveys that require many seconds between measurements;... - Page 35 Because of the large number of configurations possible, we provide a few common settings: Reset to Surveying Defaults (NMEAx5) Reset to PPP Logging Defaults (NMEAx5 + RXMx2) Turn off all messages Turn on all messages Reset to Surveying Defaults (NMEAx5) will turn off all messages and enable the following messages: NMEA-GGA, NMEA-SGA, NMEA-GST, NMEA-GSV, NMEA-RMC These five NMEA sentences are commonly used with SW Maps for general surveying.
- Page 36 with an antenna bolted to the side. Raw satellite signals are gathered for a few hours then processed using Precision Point Position. We have a variety of tutorials that go into depth on these subjects but all you need to know is that the RTK Facet supports both Survey-In and Fixed Base techniques.
-
Page 37: Configure Ports Menu
NTRIP is where the real fun begins. The Base needs a method for getting the correction data to the Rover. This can be done using radios but that's limited to a few kilometers at best. If you've got WiFi reception, use the internet! Enabling NTRIP will present a handful of new options seen below: Settings for the NTRIP Server... - Page 38 Baud rate configuration of Radio and Data ports By default the Radio port is set to 57600bps to match the Serial Telemetry Radios that are recommended to be used with the RTK Facet (it is a plug and play solution). This can be set from 4800bps to 921600bps. By default the Data port is set to 460800bps and can be configured from 4800bps to 921600bps.
- Page 39 The ZED-F9P module can be configured independently using the u-center software from u-blox by connecting a USB cable to the *Config u-blox’ USB C connector. Settings can be saved to the module between power cycles. For more information please see SparkFun’s Getting Started with u-center by u-blox. System Configuration - Settings File...
- Page 40 Firmware update taking place From time to time SparkFun will release new firmware for the RTK Facet to add and improve functionality. For most users, firmware can be upgraded by loading the appropriate firmware file from the binaries repo folder onto...
- Page 41 The firmware upgrade menu will only display files that have the "RTK_Surveyor_Firmware*.bin" file name format so don't change the file names once loaded onto the SD card. Select the firmware you'd like to load and the system will proceed to load the new firmware, then reboot. Note: The firmware is called even though this product is called the RTK Facet.
- Page 42 CH340 is on COM6 as shown in Device Manager If the COM port is not showing be sure the unit is turned On. If an unknown device is appearing, you’ll need to install drivers for the CH340. Once you know the COM port, open a command prompt (Windows button + r then type ‘cmd’).
-
Page 43: Troubleshooting
SPARKFUN TECHNICAL ASSISTANCE PAGE If you don't find what you need there, the SparkFun Forums are a great place to find and ask for help. If this is your first visit, you'll need to create a Forum Account to search product forums and post questions. - Page 44 ESP32 Thing Motion Shield Hookup Guide This tutorial shows how to get started with the Getting started with the ESP32 Thing Motion Shield to SparkFun GPS Shield and read and parse NMEA data detect movements using the on-board LSM9DS1 IMU with a common GPS receiver.
- Page 45 Setting up a Rover Base RTK System How to Build a DIY GNSS Reference Station Getting GNSS RTCM correction data from a base to a Learn how to affix a GNSS antenna, use PPP to get its rover is easy with a serial telemetry radio! We'll show ECEF coordinates and then broadcast your own RTCM you how to get your high precision RTK GNSS system data over the internet and cellular using NTRIP to...
Need help?
Do you have a question about the RTK GPS-19029 and is the answer not in the manual?
Questions and answers