Table of Contents
Advertisement
Available languages
Available languages
Quick Links
G EBRAUCHS AN WEISUN G
TECHNISCHE DATEN:
Typ:
Art. Nr.:
Einsatzbereich:
Anschlussleistung:
Bedienteil (HBT):
Leistungsteil (HBT):
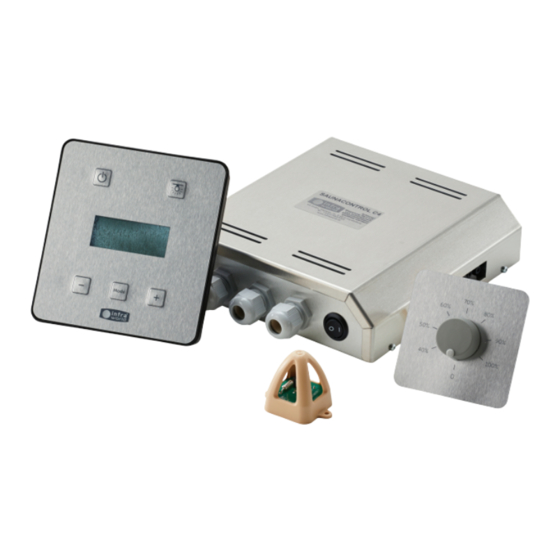
Bestehend aus:
Technische Änderungen vorbehalten
Tel.: +43 7683 5022 / E-Mail: office@tpi.co.at / Web: www.infraworld.at
MO NT AGE- UN D
D e u t sc h
1
Saunacontrol C3
B6717
Multifunktionssteuerung für Verdampfer- und Saunaofen,
Infrarot-Flächenheizungselemente sowie 2 VITALlight-
Infrarotstrahler
bis 11,0 kW
145 x 135 x 24 mm
60 x 240 x 215 mm
1
Bedienteil
2
Leistungsteil
3
Temperaturfühler mit 3,5 m Kabel
4
Regler für Infrarotstrahler
TPI GmbH, Rieglerstr. 21, 4873 Frankenburg, Austria
2
4
3
Version: 02/2022
DE
EN
FR
NL
IT
Advertisement
Chapters
Table of Contents

Related Manuals for Infraworld Saunacontrol C3

Summary of Contents for Infraworld Saunacontrol C3
- Page 1 Leistungsteil (HBT): 60 x 240 x 215 mm Bedienteil Leistungsteil Bestehend aus: Temperaturfühler mit 3,5 m Kabel Regler für Infrarotstrahler Technische Änderungen vorbehalten TPI GmbH, Rieglerstr. 21, 4873 Frankenburg, Austria Tel.: +43 7683 5022 / E-Mail: office@tpi.co.at / Web: www.infraworld.at...
-
Page 2: Table Of Contents
INHALTSVERZEICHNIS Allgemeine Sicherheitshinweise ................Stückliste ......................Technische Daten ....................Montage / Elektrische Installation ................Grundeinstellung ....................5.1. Wechseln der Display-Sprache ................5.2. Lüfter-Funktion aktivieren ................... 5.3. Kindersicherung aktivieren ................. Betrieb ........................ 6.1. Einschalten der Sauna ..................6.1.1. Saunastart ....................6.1.2. Saunastart bei aktiver Kindersicherung ............. -
Page 3: Allgemeine Sicherheitshinweise
1. ALLGEMEINE SICHERHEITSHINWEISE • Der elektrische Anschluss der Saunasteuerung darf nur von einem autorisierten Elektriker erfolgen. • Das Bedien- und Leistungsteil der Steuerung muss außerhalb der Saunakabine montiert werden. • Der Temperaturfühler muss im Radius von 1,5 Meter zum Ofen montiert werden. •... -
Page 4: Stückliste
2. STÜCKLISTE • Leistungsteil mit Alu-Gehäuse (HxBxT: 60 x 240 x 215 mm) • Bedienteil mit vierzeiliger LCD-Anzeige (H x B x T: 145 x 135 x 24 mm) und Hintergrundbeleuchtung, 3 m Verbindungskabel zum Leistungsteil • Regler für Infrarotstrahler mit 4,0 m Kabel •... - Page 5 4. MONTAGE 4.1. Leistungsteil: Das Leistungsteil wird auf das Dach der Saunakabine gelegt und mit zwei Schrauben befestigt. 4.2. Montage des Bedienteils zum Aufhängen an der Außenwand (siehe beiliegende Bohrschablone): Bohren Sie ein Loch mit einem Durchmesser von 20 mm an der Position des Kabelkanals, auf einer Höhe von ca.
-
Page 6: Montage / Elektrische Installation
4.4. Elektrische Installation: Das Bedienteil laut der nachstehenden elektrischen Installationsanleitung anschließen (Abb 6). Abb. 6 Anschluss des Verdampfers: Für den Anschluss des Verdampfers (BIO) benötigen Sie ein geeignetes Silikonkabel mit 1,5 mm². Achtung: Achten Sie auf den korrekten Anschluss der Klemme L1 (BIO) mit dem Verdampfer Wb (bei manchen Öfen auch W1 bezeichnet). - Page 7 4.5. Geräteschalter (Switch off): Auf der Rückseite des Leistungsteils befindet sich ein Geräte- schalter. Damit kann die Elektrik vom Netz getrennt werden (Abb. 7). Bei Bedarf kann der Geräteschalter abgeklemmt und anstelle dessen ein externen EIN/AUS- Schalter angeschlossen werden Abb. 7 (Abb.
-
Page 8: Grundeinstellung
5. GRUNDEINSTELLUNG 5.1. Wechseln der Display-Sprache Saunacontrol C3 ----------------------------------- Infraworld V5.2f Diese Einstellung am Display wird als Programmier-Modus bezeichnet. M=Auswahl, Licht Bei gedrückter -Taste und kurzes Drücken der -Taste kann die Sprache verändert werden (bei ausgeschalteter Sauna, Standby). ** LANGUAGE**... -
Page 9: Betrieb
6. BETRIEB Displayanzeigen im Betriebsmodus Betriebsart: Sauna Laufzeit Bio-Sauna Fläche 1:25:32 Strahler Rel.LF.: 48 % Trocknen Temp.: 50 °C (mode) Aktuelle Aktuelle Temperatur Luftfeuchtigkeit der Kabine bzw. in der Kabine Flächenheizung 6.1. Einschalten Sauna 6.1.1. Saunastart Nach Drücken der -Taste wird am Display der Startbildschirm angezeigt. 6.1.2. -
Page 10: Auswahl Der Betriebsart
6.2. Auswahl der Betriebsart: -Taste drücken Betriebsart „Sauna“ Start Sauna Eingestellte Temperatur 80 °C (80 °C) Nach 5 Sekunden ohne Tastendruck startet der Betrieb in der gewählten Betriebsart (Counteranzeige rechts oben). M = Auswahl, Licht Achtung: Ein Wechsel zu einer anderen Betriebsart ist während des Sauna Betriebes nicht möglich! Sollte dies gewünscht sein, ist die Kabine erst auszuschalten und dann neu zu starten. -
Page 11: Einschalten Saunalicht
6.3. Einschalten Saunalicht 6.3.1. Saunalicht im Betrieb Durch Drücken der -Taste wird das Sauna-Licht EIN bzw. AUS-geschaltet. 6.3.2. Saunalicht für Reinigung Mit der -Taste einschalten (es erscheint der Startbildschirm). Das Licht kann jetzt mit der -Taste EIN bzw. AUS-geschaltet werden. 6.4. -
Page 12: Anzeige Der Betriebsstatistik
6.6. Anzeigen der Betriebsstatistik Bei gedrückter -Taste und kurzes Drücken der -Taste wird die Betriebsstatistik angezeigt (bei ausgeschalteter Sauna, Standby). Betriebsstunden gesamt Betr.Std. 426:59 (Stunden, Minuten) 102:12 218:48 102:12 187:02 18:00 21:09 Betriebsart Ofen-Heizzeit Betriebsstunden Beenden durch Drücken der -Taste 7. -
Page 13: Einstellung Der Betreibsart Verdampfer
7.2. Einstellung Betriebsart Verdampfer Die Kabine ist in der Betriebsart „Bio“ eingeschaltet (siehe Punkt 6.2). Info: Zuerst die gewünschte Temperatur (z.B. 50 °C) und anschließend die Luftfeuchtigkeit (z.B. 55 %) ein- stellen. Es kann in einer Sauna, aus physikalischen Gründen, eine Summe aus beiden Werten von 110 nicht überschritten werden. -
Page 14: Einstellung Der Betreibsart Infrarot-Strahler
7.4. Einstellung Betriebsart Infrarot-Strahler Die Kabine ist in der Betriebsart „Strahler“ eingeschaltet (siehe Punkt 6.2). Raum-Temperatur: Das Display zeigt „Raum-Temp.“ – die gewünschte Raumtemperatur über die Plus- oder Minus- Taste einstellen. In Ein-Grad-Schritten können zwischen 20 und 50 °C eingestellt werden. Lüfter: [ nur bei Lüfter-Funktion = JA] (siehe Punkt 5.2). -
Page 15: Vorwahl
8. VORWAHL Die Vorwahl darf nur in Verbindung mit einem Ofen-Abdeckschutz oder Türkontaktschalter verwendet werden. Im Standby die -Taste drücken, Startbildschirm erscheint. Durch längeres Drücken der -Taste (2 Sek.) erscheint im Display „Prog. Vorwahl AUS“, mit der -Taste erfolgt der Wechsel zu „Prog. Vorwahl EIN“. Mit weiterem Drücken der -Taste erscheinen nacheinander im Display die zu verändernden Größen: 1. -
Page 16: Max. Laufzeit
9. MAXIMALE LAUFZEIT Im Standby die -Taste drücken, Startbildschirm erscheint. Durch längeres Drücken der -Taste (2 Sek.) erscheint im Display „Vorwahl AUS“ (siehe Punkt 8). -Taste drücken. Das Display zeigt „Max.Laufzeit“. Die gewünschte Laufzeit ist über die Plus- oder Minus-Taste in 10-Minuten-Schritten von 30 Minuten bis 20 Stunden einstellbar. -
Page 17: Stromausfall
4873 Frankenburg Tel.: +43 / 7683 5022 E-Mail: office@tpi.co.at Web: www.infraworld.at Damit wir Ihre Fragen schnell und kompetent beantworten können, geben Sie uns bitte immer die Typen- bezeichnung, Artikel-Nr. und Serien-Nr. sowie den Namen des Fachhändlers und das Kaufdatum bekannt. - Page 19 60 x 240 x 215 mm Operating unit Power unit Consisting of: Temperature sensor with 3.5 m cable Control for infrared radiator Subject to technical modifications TPI GmbH, Rieglerstr. 21, 4873 Frankenburg, Austria Phone: +43 7683 5022 / e-mail: office@tpi.co.at / website: www.infraworld.at...
- Page 20 CONTENTS General safety information ..................Parts list ......................Technical data ...................... Assembly/Electrical installation ................Basic settings ....................... 5.1. Change of display language ................5.2. Activate the ventilator function ................5.3. Activate the child lock function ................Operation ......................6.1. Switching on the sauna ..................6.1.1.
-
Page 21: General Safety Information
1. GENERAL SAFETY INFORMATION • Electrical connections for the sauna control system may be installed by an authorised electrician only. • The operating and power unit of the control system must be installed outside the sauna cabin. • The temperature sensor must be installed within a distance of 1.5 metres from the heater. •... -
Page 22: Parts List
2. PARTS LIST • Power unit with aluminium housing (HxWxD: 60 x 240 x 215 mm) • Operating unit with four-line LCD display (HxWxD: 145 x 135 x 24 mm) and backlighting, 3 m connecting cable to the power unit •... - Page 23 4. ASSEMBLY 4.1. Power unit: The power unit is placed on the roof of the sauna cabin and fixed with two screws. 4.2. Mounting the operating unit to hang onto outer wall: (see enclosed drilling template): Drill a hole with a diameter of 20 mm at the position of the cable duct, at a height of approx.
-
Page 24: Assembly/Electrical Installation
4.4. Electrical installation: Connect the controls according to the following instructions for electrical installation (Fig. 6). Fig. 6 Connecting the evaporator: To connect the evaporator (Bi-O) a suitable silicone cable of 1.5 mm² is required. Attention: Take care that the terminal L1 (Bi-O) is correctly connected to the evaporator Wb (also named W1 with some heaters). - Page 25 4.5. Appliance switch (Switch off): There is an appliance switch on the back of the power unit. It is provided to disconnect the electrical system from the mains supply (Fig. 7). The appliance switch can be disconnected if necessary and an external ON/OFF switch can be connected instead (see Fig.
-
Page 26: Basic Settings
5. BASIC SETTINGS 5.1. Changing display language Saunacontrol C3 ----------------------------------- Infraworld V5.2f This setting on the display is called programming mode. M=Select, Light You can change the language with the -button held down and by briefly pressing the -button (when the sauna is switched-off, standby). -
Page 27: Operation
6. OPERATION Display in the operating mode Operating mode: Sauna Term Bio-Sauna Surface 1:25:32 Radiator Rel.humid: 48 % Drying Temp.: 50 °C (mode) Current humidity Current temperature in the cabin of cabin or surface heating 6.1. Switching on the sauna 6.1.1. -
Page 28: Selecting The Operating Mode
6.2. Select the operating mode: Press the -button Operating mode “sauna” Start sauna Adjusted temperature 80 °C (80 °C) If a button is not pressed for 5 seconds, it will start operating in the selected operating mode (counter displayed on the right at the top). M = Select, light Attention: It is not possible to change from one operating mode to another during sauna operation! If this is desired, the cabin must be... -
Page 29: Switching On The Sauna Light
6.3. Switching on the sauna light 6.3.1. Sauna light during operation The sauna light is switched ON or OFF by pressing the -button. 6.3.2. Sauna light for cleaning Switch on with the -button (the start screen appears). The light can now be switched ON or OFF with the -button. -
Page 30: Displaying Operating Statistics
6.6. Displaying operating statistics Operating statistics are shown by holding down the -button and by briefly pressing the -button (when the sauna is off, standby). Total operating hours oper. hrs: 426:59 (hrs., minutes) 102:12 218:48 102:12 187:02 18:00 21:09 Heater Heating time Operating hours Exit by pressing the... -
Page 31: Adjusting The Operating Mode Evaporator
7.2. Adjusting the operating mode evaporator The cabin is active in the operating mode “evaporator” (see section 6.2). Information: First, set the desired temperature (e.g. 50 °C) and then the humidity (e.g. 55%). For physical reasons, the sum from both values cannot exceed 110 °C. Temperature: The display shows “Raum-Temp.”... -
Page 32: Adjusting The Operating Mode Infrared Radiator
7.4. Adjusting the operating mode infrared radiator The cabin is active in the operating mode “infrared radiator” (see section 6.2). Cabin temperature: The display shows “Raum-Temp.” (cabin temp.) - the desired cabin temperature is adjusted by the Plus- or Minus-button. Temperature adjustment is made in one degree steps between 20 and 50 °C. Blower: [ only with blower function = YES] (see section 5.2). -
Page 33: Preselection
8. PRESELECTION MODE Preselection may only be used with a cover protection system for the heater or door contact switch. Press the -button in standby mode and the start screen will appear. Hold the button for longer (2 sec.), the display shows “prog. pre-select OFF”, with the -button you can change to “prog. -
Page 34: Max. Operating Time
9. MAXIMUM OPERATING TIME Press the -button in standby mode and the start screen will appear. Hold the -button for longer (2 sec.), the display shows “prog. pre-select OFF” (see section 8). Press the -button once. The display shows “max. operat time”. The operating time can be adjusted with the Plus- or Minus-button from 30 minutes to 20 hours in 10-minute steps. -
Page 35: Power Failure
Tel.: +43 / 7683 5022 E-Mail: office@tpi.co.at Web: www.infraworld.at Please always indicate the model name, item no. and serial no., as well as the name of the specialised dealer and the date of purchase, so that we are able to answer your questions quickly and properly. - Page 37 Composé de : Capteur de température équipé d’un câble de 3,5 m Régulateur pour radiateur infrarouge Sous réserve de modifications techniques TPI GmbH, Rieglerstr. 21, 4873 Frankenburg, Autriche Tél. : +43 7683 5022 / Courriel : office@tpi.co.at / Internet : www.infraworld.at...
- Page 38 TABLE DES MATIÈRES Consignes générales de sécurité ................Liste de colisage ....................Données techniques ....................Montage / Installation électrique ................Réglage de base ....................5.1. Changement de la langue d’affichage ..............5.2. Activer la fonction ventilateur ................5.3. Activer la fonction sécurité enfant ................ Utilisation ......................
-
Page 39: Consignes Générales De Sécurité
1. CONSIGNES GÉNÉRALES DE SÉCURITÉ • Le raccordement électrique de la commande de sauna doit être effectué par un électricien qualifié. • L’unité de commande et de puissance de la commande doit être montée à l’extérieur de la cabine de sauna. •... -
Page 40: Liste De Colisage
2. LISTE DE COLISAGE • Unité de puissance avec boîtier en aluminium (H x L x P : 60 x 240 x 215 mm) • Unité de commande avec l’écran LCD de quatre vers (H x L x P : 145 x 135 x 24 mm), avec éclairage du fond d’écran, câble de raccordement vers l’unité... - Page 41 4. MONTAGE 4.1. Unité de puissance : Posez l’unité de puissance sur le toit de la cabine de sauna et fixez-la avec deux vis. 4.2. Montage de l’unité de commande à suspendre sur la cloison extérieure : (voir le gabarit de perçage ci-joint) : Percez un trou d’un diamètre de 20 mm au niveau de la goulotte de câbles, à...
-
Page 42: Montage / Installation Électrique
4.4. Installation électrique : Raccorder la commande selon les instructions d’installation électrique suivantes (fig. 6). Fig. 6 Connexion de l’évaporateur : Pour raccorder l’évaporateur (Bi-O) vous avez besoin d’un câble silicone de 1,5 mm² Attention : Veillez au raccordement correct de la borne L1 (Bi-O) avec l’évaporateur Wb (également dénommé... - Page 43 Appliance switch (Switch off): Sur la face arrière de l’unité de puissance se trouve l’interrupteur de l’appareil. Il permet de déconnecter le circuit électrique du secteur (fig. 7). Si besoin, l’interrupteur de l’appareil peut être ponté et être remplacé par un interrupteur MARCHE/ARRÊT externe (fig. 6). Fig.
-
Page 44: Réglage De Base
5. RÉGLAGE DE BASE 5.1. Changement de la langue d’affichage Saunacontrol C3 ----------------------------------- Infraworld V5.2f Ce réglage sur l’écran est dénommé mode de programmation. M=Select, lumiere Vous pouvez changer la langue en appuyant sur la touche tout en maintenant enfoncée la touche (lorsque le sauna est éteint, en veille). -
Page 45: Utilisation
6. UTILISATION Écran dans le mode opérationnel Mode de fonctionnement: Sauna Durée Sauna bio Surface 1:25:32 Radiateur Humidite: 48 % Séchage Temp.: 50 °C (mode) Humidité Température actuelle actuelle dans la de la cabine ou du cabine chauffage de surface 6.1. -
Page 46: Choix Du Mode De Fonctionnement
6.2. Choix du mode de fonctionnement : Appuyez sur la touche Mode de fonctionnement « Sauna » Sauna marche Réglage de la température à 80 °C (80 °C) Après un délai de 5 secondes sans avoir appuyé sur une touche, la mise en marche se fait dans le mode de fonctionnement sélectionné... -
Page 47: Allumer L'éclairage Du Sauna
6.3. Allumer l’éclairage du sauna 6.3.1. Éclairage durant l’utilisation En appuyant sur la touche , vous pouvez allumer ou éteindre l’éclairage du sauna. 6.3.2. Éclairage du sauna durant le nettoyage Mettez en marche avec la touche (l’écran de démarrage apparaît). Vous pouvez maintenant allumer ou éteindre l’éclairage avec la touche 6.4. -
Page 48: Affichage Des Statistiques D'utilisation
6.6. Affichage des statistiques d’utilisation Pour afficher les statistiques d’utilisation (lorsque le sauna est à l’arrêt, en veille), maintenez la touche enfoncée et appuyez brièvement sur la touch Total des heures de fonctionnement H. marche: 426:59 (heures, minutes) 102:12 218:48 102:12 187:02 18:00... -
Page 49: Réglage Du Mode De Fonctionnement Évaporateur
7.2. Réglage mode de fonctionnement évaporateur La cabine est allumée dans le mode de fonctionnement « Sauna bio » (voir point 6.2.). Info : Réglez d’abord la température désirée (p.ex. 50 °C) et ensuite l’humidité (p.ex. 55 %). Pour des raisons physiques, il n’est pas possible que les deux valeurs additionnées excèdent un total de 110 dans un sauna. -
Page 50: Réglage Du Mode De Fonctionnement Radiateur Infrarouge
7.4. Réglage du mode de fonctionnement radiateur infrarouge La cabine est allumée dans le mode de fonctionnement « radiateur infrarouge » (voir point 6.2.). Température ambiante : L’écran affiche « temp. amb. » - réglez la température ambiante désirée de la cabine au moyen des touches plus ou moins. -
Page 51: 8. Présélection
8. PRÉSÉLECTION La présélection ne peut être utilisée qu’en combinaison avec un capot de protection du poêle ou une contacteur de porte. En veille, appuyez sur la touche , l’écran de démarrage apparaît. En appuyant plus longtemps sur la touche (2 s) «... -
Page 52: Durée De Fonctionnement Max
9. DURÉE DE FONCTIONNEMENT MAXIMALE En veille, appuyez sur la touche , l’écran de démarrage apparaît. En appuyant plus longtemps sur la touche (2 s) « Presel. prog. Arret » apparaît à l’écran (voir Point 8). Appuyez 1 x sur la touche . -
Page 53: Coupure De Courant
Tél. : +43 / 7683 5022 Adresse courrier électronique : office@tpi.co.at Internet : www.infraworld.at Afin que nous puissions répondre rapidement et en toute connaissance de cause à vos questions, veuillez toujours nous indiquer la désignation du type, le numéro d’article et le numéro de série ainsi que le nom du revendeur... - Page 55 60 x 240 x 215 mm Bedieningspaneel Vermogenseenheid Bestaande uit: Temperatuursensor met 3,5 m kabel Regelaar voor infraroodstralers Onder voorbehoud van technische wijzigingen TPI GmbH, Rieglerstr. 21, 4873 Frankenburg, Oostenrijk Tel.: +43 7683 5022 / e-mail: office@tpi.co.at / Internet: www.infraworld.at...
- Page 56 INHOUDSOPGAVE Algemene veiligheidsaanwijzingen ................Stuklijst......................... Technische gegevens .................... Montage / Elektrische installatie ................Basisinstelling ...................... 5.1. Wijzigen van de beeldscherm-taal ................ 5.2. Ventilator-functie....................5.3. Functie kinderveiligheid ..................Gebruik ....................... 6.1. Inschakelen van de sauna .................. 6.1.1. Starten van de sauna ..................6.1.2.
-
Page 57: Algemene Veiligheidsaanwijzingen
1. ALGEMENE VEILIGHEIDSAANWIJZINGEN • De elektrische aansluiting van de saunabesturing mag alleen door een geautoriseerde elektricien uitgevoerd worden. • De bedieningspaneel een de vermogenseenheid van de besturing moet buiten de saunacabine gemonteerd worden. • De temperatuursensor moet binnen een straal van 1,5 meter van de kachel gemonteerd worden. •... -
Page 58: Stuklijst
2. STUKLIJST • Vermogenseenheid met aluminium behuizing (HxBxD: 60 x 240 x 215 mm) • Bedieningspaneel met 4-regelig LCD display (HxBxD: 145 x 135 x 24 mm) met achtergrondbelichting, 3 m verbindingskabel naar de vermogenseenheid • Regelaar voor infraroodstralers met 4,0 m kabel •... - Page 59 4. MONTAGE 4.1. Vermogenseenheid: De vermogenseenheid wordt op het dak van de saunacabine gelegd en met twee schroeven bevestigd. 4.2. Montage van het bedieningspaneel voor ophangen aan de buitenwand: (zie meegeleverde boorsjabloon): Boor een gat met een diameter van 20 mm op de positie van de kabelgoot, op een hoogte van ca.
-
Page 60: Montage / Elektrische Installatie
4.4. Elektrische installatie: Sluit het bedieningspaneel aan volgens de hieronder afgebeelde elektrische installatie-instructie (afb. 6). Afb. 6 Aansluiten van de verdamper: Voor het aansluiten van de verdamper (Bi-O) heeft u een geschikte siliconenkabel met 1,5 mm² nodig Attentie: Let op de correcte aansluiting van de klem L1 (Bi-O) met de verdamper Wb (bij sommige kachels ook met W1 gekenmerkt). - Page 61 4.5. Apparaatschakelaar (Switch off): Aan de achterkant van de vermogenseenheid bevindt zich een apparaatschakelaar. Hiermee kan het elektrische gedeelte van het stroomnet gescheiden worden (afb. 7). Indien nodig, kan de apparaatschakelaar overbrugd worden en door een externe AAN/UIT schakelaar vervangen worden (afb. 6). Afb.
-
Page 62: Basisinstelling
5. BASISINSTELLING 5.1. Wijzigen van de beeldscherm-taal Saunacontrol C3 ----------------------------------- Infraworld V5.2f Deze instelling op het beeldscherm wordt de programmeermodus genoemd. M=Keuze, Licht Met ingedrukte drukknop en een korte druk op de drukknop kan de taal gewijzigd worden (met uitgeschakeld sauna, stand-by). -
Page 63: Gebruik
6. GEBRUIK Beeldschermweergave in de gebruiksmodus Gebruiksmodus: Sauna Looptijd Bio-Sauna Oppervlakte 1:25:32 Stralers Rel. vocht: 48 % Drogen Temp.: 50 °C (modus) Actuele Actuele temperatuur luchtvochtigheid van de cabine of de in de cabine oppervlakteverwarming 6.1. Inschakelen sauna 6.1.1. Starten van de sauna Na indrukken van de -toets verschijnt het startbeeldscherm. -
Page 64: Keuze Van De Gebruiksmodus
6.2. Selectie gebruiksmodus: -Toets indrukken Gebruiksmodus “Sauna” Start Sauna Ingestelde temperatuur 80 °C (80 °C) Na 5 seconden zonder indrukken van een toets start het gebruik in de geselecteerde gebruiksmodus (afteltijd rechtsboven). M=Keuze, Licht Attentie: Het overschakelen naar een andere gebruiksmodus is in de sauna modus niet mogelijk! Mocht dit gewenst zijn, dan moet de cabine eerst uitgeschakeld en dan opnieuw gestart worden. -
Page 65: Inschakelen Saunaverlichting
6.3. Inschakelen saunaverlichting 6.3.1. Saunaverlichting bij gebruik Door indrukken van de -toets wordt de saunaverlichting IN- resp. UIT-geschakeld. 6.3.2. Saunaverlichting bij reiniging Met de -toets inschakelen (het startbeeldscherm verschijnt). De verlichting kan nu met de -toets IN- resp. UIT-geschakeld worden. 6.4. -
Page 66: Weergave Van De Gebruiksstatistiek
6.6. Weergave van de gebruiksstatistiek Met ingedrukte -toets en het korte indrukken van de -toets wordt de gebruiksstatistiek weergegeven (met uitgeschakelde sauna, stand-by). Gebruiksuren totaal Bedr. Uren: 426:59 (uren, minuten) 102:12 218:48 102:12 187:02 18:00 21:09 Gebruiksmodus Verwarmingstijd Bedrijfsuren kachel Beëindigen door indrukken van de -toets 7. -
Page 67: Instelling Van De Gebruiksmodus Van De Verdamper
7.2. Instelling gebruiksmodus Verdamper De cabine is in de gebruiksmodus “Verdamper” ingeschakeld (zie punt 6.2). Informatie: Eerst de gewenste temperatuur (bijv. 50 °C) en aansluitend de luchtvochtigheid (bijv. 55 %) instellen. Om fysieke redenen, kan in de sauna een som van beide waarden van 110 niet overschreden worden. Temperatuur: Op het beeldscherm staat “Cabinetemp.”... -
Page 68: Instelling Van De Gebruiksmodus Van De Infraroodstralers
7.4. Instelling van de gebruiksmodus Infraroodstralers De cabine is in de gebruiksmodus “Infrarood stralers” ingeschakeld (zie punt 6.2). Cabinetemperatuur: Op het beeldscherm staat “Cabinetemp.” – de gewenste cabinetemperatuur met de Plus of de Min drukknop instellen. Met stappen van een graad kan er tussen 20 en 50 °C ingesteld worden. Ventilator: [ alleen bij Ventilatorfunctie = JA] (zie punt 5.2). -
Page 69: Voorselectie
8. VOORSELECTIE De voorselectie mag alleen in verbinding met een kachel-beschermkap of deurcontactschakelaar gebruikt worden. In Stand-by de -toets indrukken, het startbeeldscherm verschijnt. Door langer indrukken van de -toets (2 s) verschijnt op het beeldscherm “Voorselectie UIT”, met de -toets kan naar “Voorselectie AAN” gewisseld worden. Door nogmaals indrukken van de -toets verschijnen de te wijzigen waarden één voor één op het beeld- scherm:... -
Page 70: Max. Looptijd
9. MAXIMALE LOOPTIJD In Stand-by de -toets indrukken, het startbeeldscherm verschijnt. Door langer indrukken van de -toets (2 s) verschijnt op het beeldscherm “Voorselectie UIT”, (zie punt 8). -toets indrukken. Op het beeldscherm verschijnt “Max.looptijd”. De gewenste looptijd is met de Plus of Minus-toets in stappen van 10 minuten van 30 minuten tot 20 uren instelbaar. -
Page 71: Stroomuitval
Tel.: +43 / 7683 5022 E-Mail: office@tpi.co.at Internet: www.infraworld.at Om uw vragen snel en vakkundig te kunnen beantwoorden, verzoeken wij u ons altijd de typeaanduiding, het artikel- en serienummer, alsmede de naam van de leverancier en de datum van aankoop te vermelden. - Page 73 Unità composta da: sensore della temperatura con cavo di 3,5 m regolatore per radiatore a infrarossi Salvo modifiche tecniche TPI GmbH, Rieglerstr. 21, 4873 Frankenburg, Austria Tel: +43 7683 5022 / E-mail: office@tpi.co.at / Web: www.infraworld.at...
- Page 74 INDICE Avvertenze generali di sicurezza ................Lista dei componenti ..................... Dati tecnici ......................Montaggio / Allacciamento elettrico ................. Impostazioni iniziali ....................5.1. Modificare la lingua dello schermo ................ 5.2. Attivazione funzione Ventola ................5.3. Attivazione funzione Blocco bambini ..............Funzionamento ..................... 6.1.
-
Page 75: Avvertenze Generali Di Sicurezza
1. AVVERTENZE GENERALI DI SICUREZZA • L‘allacciamento elettrico della centralina deve essere eseguito esclusivamente da elettricista autorizzato. • L‘unità di comande e di potenza della centralina deve essere installata all‘esterno della sauna. • Il sensore della temperatura deve essere installato a una distanza di 1,5 m dalla stufa. •... -
Page 76: Lista Dei Componenti
2. LISTA DEI COMPONENTI • Unità di potenza con struttura in alluminio (AxLxP: 60 x 240 x 215 mm) • Unità di comando con schermo lcd a quattro righe con retroilluminazione (AxLxP: 145 x 135 x 24 mm), cavo 3 m per il collegamento all‘unità di potenza •... - Page 77 4. MONTAGGIO 4.1. Unità di potenza: L‘unità di potenza viene posizionata sul tetto della sauna ed assicurata mediante due viti. 4.2. Montaggio dell‘unità di comando, installazione sulla parete esterna: (cfr. dima di foratura allegata): A un‘altezza di circa 1500 – 1700 mm, praticare un foro di 20 mm di diametro nel punto in cui viene posizionata la canaletta (fig.
-
Page 78: Montaggio / Allacciamento Elettrico
4.4. Allacciamento elettrico: Collegare l‘unità di comando in base al seguente schema di installazione (fig 6). fig. 6 Collegamento dell‘evaporatore: Per realizzare il collegamento dell‘evaporatore (Bi-O) è necessario disporre di un cavo in silicone idoneo di 1,5 mm² Attenzione: fare attenzione a collegare correttamente il morsetto L1 (Bi-O) con l‘evaporatore Wb (in alcune stufe identificato anche con W1). - Page 79 4.5. Interruttore del dispositivo (switch off): Sul lato posteriore dell‘unità di potenza è presente un interruttore che consente di scollegare l‘alimentazione dell‘elettricità dalla rete (fig. 7). In caso di necessità, l‘interruttore può essere scollegato per utilizzare al suo posto un interruttore ON/OFF esterno (fig. 6). fig.
-
Page 80: Impostazioni Iniziali
5. IMPOSTAZIONI INIZIALI 5.1. Modificare la lingua Saunacontrol C3 ----------------------------------- Questa impostazione sullo schermo viene definita come Infraworld V5.0 Modalità di programmazione. M=Scelta, luce Tenendo premuto il pulsante e premendo brevemente il pulsante si accede al menù delle impostazioni iniziali (standby, schermo scuro). -
Page 81: Funzionamento
6. FUNZIONAMENTO Visualizzazione schermo in modalità di funzionamento Modalità di funzionamento: Sauna Durata Bio-Sauna Infrarossi 1:25:32 Radiante Umid. rel: 48 % Asciugare Temp.: 50 °C (mode) Umidità dell’aria Temperatura attuale attuale della cabina della cabina o del riscaldamento a superficie 6.1. -
Page 82: Selezionare La Modalità Di Funzionamento
6.2. Selezionare la modalità di funzionamento: Premere il pulsante Modalità di funzionamento „Sauna“ Avvia Sauna Temperatura impostata 80 °C (80 °C) Se entro 5 secondi non viene premuto nessun pulsante, la sauna sarà avviata nella modalità di funzionamento selezionata (conto alla M = Scelta, luce rovescia in alto a destra). -
Page 83: Accensione Della Lampada Della Sauna
6.3. Accensione della lampada della sauna 6.3.1. Lampada in funzionamento Premendo il pulsante è possibile accendere e spegnere la lampada della sauna. 6.3.2. Pulizia della lampada della sauna Avviare la sauna utilizzando il pulsante (viene visualizzata la schermata iniziale). È possibile accendere e spegnere in qualsiasi la lampada della sauna utilizzando il pulsante 6.4. -
Page 84: Visualizzare Le Statistiche Di Funzionamento
6.6. Visualizzare le statistiche di funzionamento Tenere premuto il pulsante e premere brevemente il pulsante per visualizzare le statistiche di funzionamento (in modalità di funzionamento OFF, standby). ore complessive di funzionamento Ore funz: 426:59 (ore, minuti) 102:12 218:48 102:12 187:02 18:00 21:09 Modalità... -
Page 85: Impostare La Modalità Di Funzionamento Evaporatore
7.2. Impostare la modalità di funzionamento Evaporatore Accendere la cabina in modalità di funzionamento „Evaporatore“ (vedi punto 6.2). Info: impostare prima la temperatura desiderata (es. 50 °C) e quindi l‘umidità dell‘aria (es. 55 %). Per ragioni fisiche, all‘interno della sauna la somma dei due valori non può essere superiore a 110. Temperatura: Impostare la temperatura desiderata utilizzando i pulsanti + e -. -
Page 86: Impostare La Modalità Di Funzionamento Radiatore A Infrarossi
7.4. Impostare la modalità di funzionamento Radiatore a infrarossi Accendere la cabina in modalità di funzionamento „Radiatore a infrarossi“ (vedi punto 6.2). Temperatura ambiente: Impostare la temperatura desiderata utilizzando i pulsanti + e -. È possibile impostare un valore compreso tra 20 e 50 °C aumentando o riducendo il valore di un grado alla volta. Aeratore: [ solo con funzione aeratore = SÌ] (vedi punto 5.2). -
Page 87: Preselezione
8. PRESELEZIONE La funzione di preselezione può essere utilizzata solo in abbinamento alla copertura protettiva della stufa o alla soluzione die sicurezza. In standby, premere il pulsante per visualizzare la schermata iniziale. Tenendo premuto il pulsante per due secondi, sullo schermo viene visualizzata la dicitura „Preselezione Spento“, utilizzando il pulsante è... -
Page 88: Durata Massima In Funzionamento
9. DURATA MASSIMA IN FUNZIONAMENTO In standby, premere il pulsante per visualizzare la schermata iniziale. Tenendo premuto il pulsante per due secondi, sullo schermo viene visualizzata la dicitura „Prog. Preselez. Spento“, (vedi punto 8). Premere una volta il pulsante , sullo schermo viene visualizzata la dicitura „Tempo max.“. È... -
Page 89: Interruzione Dell'alimentazione Di Corrente
Tel.: +43 / 7683 5022 E-Mail: office@tpi.co.at Web: www.infraworld.at Per consentirci di rispondere alle vostre domande in maniera rapida e professionale, vi preghiamo di indicare sempre tipologia dell‘articolo, numero dell‘articolo e numero di serie, come anche nome del rivenditore e data...
Need help?
Do you have a question about the Saunacontrol C3 and is the answer not in the manual?
Questions and answers