STERILUX SterOx V Series Instructions For Use Manual
Ozone sterilizer
Hide thumbs
Also See for SterOx V Series:
- Instructions for use manual (35 pages) ,
- Short user manual (9 pages)

Related Manuals for STERILUX SterOx V Series


Summary of Contents for STERILUX SterOx V Series
- Page 1 SterOx System V-Series Ozone Sterilizer Instruction for Use SFT-0034-V03-IFU_SterOx_System_V-Series Release date: 12 Nov. 2021...
- Page 3 SteriLux SA. Information in this manual is subject to change without any warning or prior notice by SteriLux SA. SteriLux SA Chemin du Viaduc 12 1008 Prilly – Switzerland T: +41 (0) 21 546 43 33 | E: info@sterilux.ch | www.sterilux.ch...
-
Page 4: Table Of Contents
Table of contents Introduction.......................................... 5 Symbols ..........................................6 Important information ..................................... 7 Disclaimers ................................................. 7 Declaration of Conformity ..........................................7 Field of application ............................................7 Warning ................................................8 Products overview ......................................9 SteriBase V-Series (SKU-0006) ........................................9 SteriBox V-Series (SKU-0007) ........................................10 Principles of operation ....................................11 Setting up your SteriBase V-Series ................................ -
Page 5: Introduction
The processing of such loads may result in incomplete sterilization and / or damage to the load and / or to the sterilizer. For more information about instruments compatibility with ozone sterilization, please contact SteriLux SA directly. -
Page 6: Symbols
Symbols The following table displays the different symbols used in the margins of this manual and/or on the product and summarizes their meaning. Serial number Catalogue number Batch code Date of manufacture Manufacturer Use-by date CE marking Consult instructions for use Caution, consult the instructions for use for important cautionary information Keep away from sunlight Keep dry... -
Page 7: Important Information
Do not permit any person other than certified personnel to supply parts for service or maintain your SterOx System V-Series. SteriLux SA shall not be liable for incidental, special or consequential damages caused by any maintenance or services... -
Page 8: Warning
Warning Careful monitoring of the shelf-life and/or the maximum allowable number of cycles of the different components of the SterOx System V-Series is essential to ensure the required sterility assurance level (SAL) at the end of the cycle. Never use components that have an expired shelf-life or exceeded the allowable number of cycles. -
Page 9: Products Overview
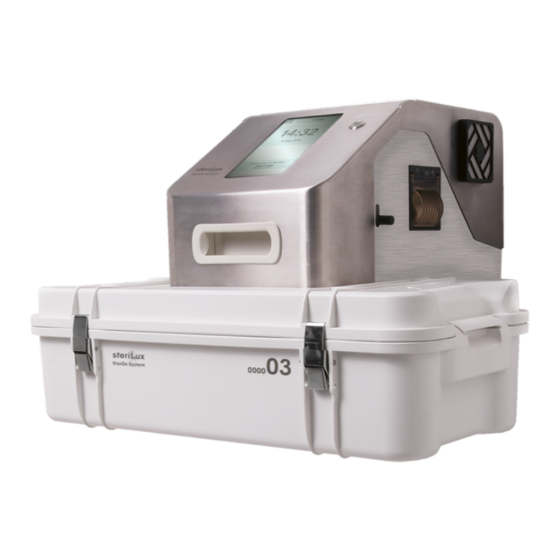
Products overview 4.1 SteriBase V-Series (SKU-0006) Touchscreen Start button Handle Manual levers (of the Lamp Unit) Cooling fan Thermal printer Nitrogen plug Power switch Power cable port When you receive your SteriBase V-Series, the items listed below should be included. If any of the items are missing or damaged, contact your supplier immediately. -
Page 10: Steribox V-Series (Sku-0007)
4.2 SteriBox V-Series (SKU-0007) Quartz window Incorporated RFID tag Module and clip Bottom Locks When you receive your SteriBox V-Series, the items listed below should be included. If any of the items are missing, contact your supplier immediately. • SteriBox V-Series Lid •... -
Page 11: Principles Of Operation
Principles of operation The SterOx System V-Series is an ozone-based sterilizer. 172 nm UV lamps contained in the Lamp Unit inside the SteriBase V-Series [1] transform oxygen (O ) from ambient air into ozone (O ) [2]. Ozone further reacts with water (H O) to form hydroxyl and hydroperoxyl radicals [3] which are responsible for the inactivation of micro-organisms causing infections and disease transmissions [4]. -
Page 12: Setting Up Your Steribase V-Series
Setting up your SteriBase V-Series 6.1 Installing your device There are several factors that may affect the performance of your SteriBase V-Series. Please review these factors and select a suitable location in which to install the device. After each relocation of the sterilizer, installation must be carried out according to the protocol. Safety of any system incorporating the device is the responsibility of the assembler of the system. -
Page 13: Powering Your Device
Note: It is possible to use other commercially available nitrogen supply cylinders. However, if you decide to go with another alternative, you must have SteriLux SA written approval prior to installing it on your SteriBase V-Series. -
Page 14: Setting The Nitrogen Flow
Select Wi-Fi, enter login details and press OK Note: Connecting your device to a Wireless Network is essential for quick troubleshooting from SteriLux and enables regular software updates. 6.7 Setting the time and date From the menu PARAMETERS click on Date and time... -
Page 15: Managing Email Addresses
6.10 Managing email addresses Provided the device is connected to a stable Wi-Fi network, you can inform one or more email addresses to which the device will send a detailed PDF report at the end of each cycle. In the menu PARAMETERS click on Email addresses Enter new email address by clicking on Add email address Edit existing email address by clicking on the email address you want to modify... -
Page 16: Using The Steribox V-Series And Preparing Instruments
Using the SteriBox V-Series and preparing instruments 7.1 Using the SteriBox V-Series Opening the SteriBox V-Series in a sterile manner Disengage both locks Stand behind the SteriBox V-Series and grab the handles on both sides of the lid Pull the lid towards yourself Rest the lid on its outer surface Take the module out with sterile gloves and place it inside the lid Closing the SteriBox V-Series... -
Page 17: Preparing And Loading Instruments In The Steribox V-Series
For effective sterilization, it is mandatory to add 5mL of distilled water on the HUMIDIFY Blotting Paper provided by SteriLux. If there is any doubt about the amount of water added, remove the HUMIDIFY Blotting Paper and dispose of it. Dry the module and repeat the operation with a new HUMIDIFY Blotting Paper. - Page 18 Familial Insomnia, Scrapie, Feline spongiform encephalopathy). Complete destruction of all prions cannot be guaranteed. Routine Monitoring SteriLux SA provides two types of chemical indicators to monitor the sterilization process: • Ozone Strip type 1 Chemical indicator – to be used in all cycles (Speed, Standard and...
- Page 19 Note for hollow instruments SteriLux SA cannot guarantee that the inside of hollow instruments can be sterilized by the SterOx System V-Series. Overall, channels with greater length than 10 cm and smaller inner diameter than 3 mm of material different than stainless steel have not been cleared to be...
-
Page 20: Using Your Sterox System V-Series
Using your SterOx System V-Series 8.1 Preparing device for use Once the device is installed and before any cycle is launched, clean the lid, bottom and module of the SteriBox V-Series (see chapter 11 for further details). Pay special attention to thoroughly clean the quartz windows, both on the SteriBox V-Series and the SteriBase V- Series, using any commercially-available glass cleaner and a clean soft cloth. -
Page 21: Interrupting A Cycle
Every cycle will display three different phases: GENERATION – Build-up of biocide gas (ozone, O ) generated from air and slow increase of relative humidity EXPOSURE – Maintaining high biocide gas concentration and high humidity – monitoring of the ozone concentration to guarantee process efficiency VALIDATION –... -
Page 22: Storing And Retrieving Cycle Information
Storing and retrieving cycle information The SteriBase V-Series has an internal Data Logger capable of storing all cycle data of every past cycle, whether successful or incomplete, for the lifetime of the device. You can access this information through the touchscreen or using a USB storage device. 9.1 Retrieving cycle information from the history Go to the menu HISTORY Scroll down using your finger to display older cycles... -
Page 23: Maintaining Your Sterox System V-Series
Keeping the SteriBox V-Series clean is good clinical practice and assists good functioning of the device. SteriLux SA recommends that the interior surface be cleaned regularly. Use a soap compatible with materials embedded in the SteriBox V-Series and its components to scrub the inside of the SteriBox V-Series with a cleaning pad to remove all traces of residues, dust, organic materials, lubricant, etc. -
Page 24: Troubleshooting Your Sterox System V-Series
221 – 222 – 224 able to relaunch a new cycle. Lamp Unit moved up during If the error occurred during phase 3, you can contact SteriLux to check Phase 1/2/3 whether or not the content is sterile. If the Lamp Unit was not manually moved up, contact SteriLux for assistance. - Page 25 Solution Follow the emergency shutdown process described in chapter 10.2 Repeated malfunction and switch back on. If the problem persists, contact SteriLux SA for assistance. The temperature sensor in the Lamp Unit has detected a temperature higher than 38°C. Verify that the device is installed in a suitable Touchscreen displays location as described in chapter 6.
-
Page 26: Spare Parts
13 Spare parts SterOx System V-Series SterOx System V-Series Spares Consumables and Components INT-0050 Lamp Unit SKU-0004 Ozone Strip type 4 RAM-00104 172 nm UV Lamp SKU-0005 Humidify RAM-00105 254 nm UV Lamp SKU-0007 SteriBox V-Series RAM-00111 Quartz Window SKU-0018 N2 Gas cylinders RAM-00039 DC Power Supply... -
Page 27: Warranty
SteriLux SA’s option and without charge, of any defected part(s), provided SteriLux SA is notified in writing within seven (7) days of the date of such a failure and further provided that the defective part(s) are returned to SteriLux SA prepaid. -
Page 28: Specifications
16 Specifications SteriBase V-Series dimensions: Length: 518 mm Width: 296 mm Height: 437 mm SteriBase V-Series weight: 18.5 kg SteriBox V-Series size (External): Length: 630 mm Width: 318 mm Height: 194 mm SteriBox V-Series size (Internal): Length: 554 mm Width: 260 mm Height: 104 mm... -
Page 29: Appendix
17 Appendix 17.1 Electromagnetic compatibility – Environment The equipment under test is intended for industrial electromagnetic environment. In a domestic environment this product may cause radio interference in which case the user may be required to take adequate measures. Verification of all devices in simultaneous operation are required to ensure the electromagnetic compatibility and co-existence of all other devices prior to use of SteriBase V-Series. -
Page 30: Electromagnetic Compatibility - Performance Levels
Applicable Emission Test Limits Standards Quasi-peak Average value Frequency value (dBμV) (dBμV) Limits for conducted disturbance at mains ports 150kHz-30MHz 150-500MHz EN 61326-1 (2013) 0.5-30MHz EN 55011 (2009) and A1 (2010) Quasi-peak value (dBμV) Frequency @ 10 meters Radiated emissions 30-230 MHz 30MHz-1GHz 230MHz-1GHz... -
Page 31: Accessories Replacement
Function/Item Success criterions- Parameter(s) Success criterions-B Success criterions-C to be tested State of Generation State of Generation 172 nm UV State of Generation Control Pin must be Control Pin must be Lamp Control Pins LOW for at least LOW for at least 50% 99% of time of time State of Destruction...
Need help?
Do you have a question about the SterOx V Series and is the answer not in the manual?
Questions and answers