Torso Electronics T-1 User Manual
Hide thumbs
Also See for T-1:
- User manual (29 pages) ,
- Manual (114 pages) ,
- Quick reference manual (5 pages)
Table of Contents
Advertisement
Quick Links
Advertisement
Table of Contents

Related Manuals for Torso Electronics T-1


Summary of Contents for Torso Electronics T-1
- Page 1 user manual v1.2.0...
-
Page 2: Table Of Contents
T-1 for clock conversions ........ - Page 3 SETUP EXAMPLES � � � � � � � � � � � � � � � � � � � � � � � � � � � � � � � � � � � � � � � � � � � � � � � � � � � � � � � � � � � � � 34 midi gear .
-
Page 4: Introduction
T-1 is our first product, and we’re happy that you want to take part in our journey. We welcome discussion and appreciate all kinds of feedback and ideas for improving T-1. -
Page 5: First Steps With T-1
FIRST STEPS WITH T-1 getting started Power up by connecting the T-1 to a computer with the supplied USB-C cable or connecting it to a standard USB power supply. All buttons light up ORANGE while T-1 is powering up, after which it is ready to use. -
Page 6: Panel Layout And Rear Connections
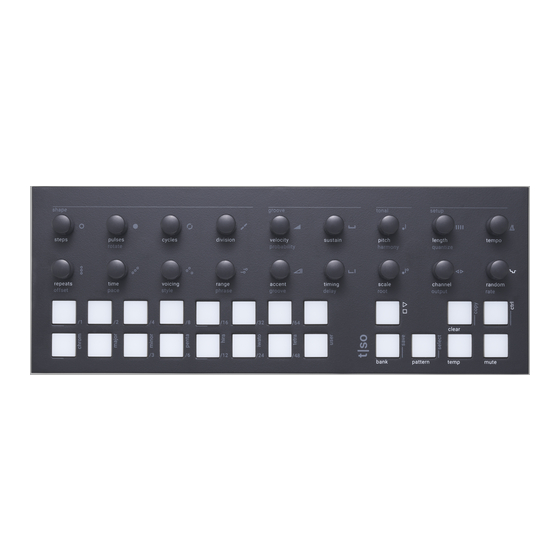
PANEL LAYOUT AND REAR CONNECTIONS panel layout SHAPE section offers a variety of knobs for shaping the composition. The first row of knobs lets you build multiple Euclidean cycles that play one after another. The second row adds echo notes to the Euclidean puls- es, adjusts chord voicing, and applies melodic movements. -
Page 7: The User Interface
The T-1 has a total of 18 endless push encoders and 23 multicolor push buttons that are used for operating the unit. The multicolored light in the buttons are used to display information that will help you in interacting with the machine. -
Page 8: Tracks
Starts playback of the T-1. When T-1 is playing, the [ PLAY ] button flashes in WHITE at every quarter note, indicating playback. When T-1 has joined a Link session, the flashing light turns ORANGE – indicating that T-1 is synchronized with other peers in the Link session. -
Page 9: Multi Track Editing
The T-1 allows for editing a pattern without playing it. This makes it possible to prepare new patterns on the fly without interruptions in playback. This feature requires the user to differentiate between the selected pattern, i.e. - Page 10 The pattern menu behaves differently depending on whether the T-1 is currently playing: • If playback is stopped, pressing [ PATTERN ] + [ VALUE ] selects the pattern. • If playback is started, pressing [ PATTERN ] + [ VALUE ] queues the pattern to play next.
-
Page 11: Banks
The bank menu allows for selecting, saving, and reloading banks. T-1 does not automatically save it’s state, so this is the only way to save the state of patterns. T-1 will reset to the saved banks upon restarting the unit. -
Page 12: Shape Section
SHAPE SECTION The shape section lets you generate and shape rhythmic and melodic structures in different ways. There is a shape section dedicated to each of the 16 tracks in the pattern. euclidean rhythms (steps, pulses, division) The first two knobs in the top left in the shape section let you control the Euclidean rhythm generator. The Eu- clidean algorithm distributes a determined number of pulses as evenly as possible across a determined number of steps. - Page 13 Steps and pulses share the same visualization on the [ VALUE ] buttons. • ORANGE indicates the pulses of the Euclidean rhythm. • DARK BLUE indicates the number of steps. Steps Pulses • WHITE indicates the playhead. Offset Repeats steps pulses steps pulses...
-
Page 14: Automation (Cycles)
Cycles allows for creating parameter-lock style automations. On a default track, the T-1 plays 4 identical Euclidean cycles after each other but up to 16 cycles can be created. Each cycle contain settings for every parameter on the T-1. They are identical at first, but can be changed individu- ally to create progressions and other musical variations. - Page 15 clear cycles on parameter Clearing a parameter knob will delete all automation made on the parameter. Hold [ CLEAR ] and press ( KNOB ). arrange cycles COPY cycle: [ CTRL ] + [ COPY ] + [ VALUE 1-16 ] CLEAR cycle: [ CLEAR ] + [ VALUE 1-16 ] reset cycles...
-
Page 16: Note Repeater (Repeats, Time)
note repeater (repeats, time) The note repeater is a note echo machine that lets you add repeat notes after each pulse. All modulations that applies to pulses are applied to repeat notes as well. Repeat notes are choked whenever a new pulse is triggered. •... - Page 17 offset Adds a velocity offset to each repeat. Turning ( OFFSET ) will make the repeats either rise or fall in velocity. This is a handy feature to make the repeats sound more echo-like. time Adjusts the note value of each repeat. When the knob is pressed, the [ VALUE ] buttons will represent different note divisions.
-
Page 18: Tonal Shaper (Voicing, Range)
• Phrase Lets you select the shape used for pitch modulation. Link to tutorial video: torsoelectronics.com/t-1-tutorials/tonal-shaper voicing The voicing parameter changes the order of the inserted notes in the pitch menu. This happens in different ways according to the selected style. -
Page 19: Range
range The range parameter makes it possible to add pitch variation to the notes within the chosen scale. Range increases the amount of variation applied from one of the eight phrases. The two modifier buttons in lets you change the rate of the phrases. •... -
Page 20: Groove Section
GROOVE SECTION The groove section applies timing and velocity characteristics to the sequence. This is a fast way of applying musical groove and feel to your composition. You can modify the groove behavior by adjusting the parameters. • Velocity controls the base velocity of notes. •... -
Page 21: Probability
probability Adjust how likely it is for notes to be silenced. This is a useful feature for making space in the composition and exploring rests. ( PROBABILITY ) is a bipolar function: • Turned clockwise will increase the chance of any note being silenced. •... -
Page 22: Groove
groove There are 8 different grooves with different velocity characteristics. The last groove on [ VALUE ] button 16 en- ables timing and velocity variations from the CV input. [ TRACK 1 ] [ TRACK 2 ] [ TRACK 3 ] [ TRACK 4 ] Agogo Timbales... -
Page 23: Tonal Section
TONAL SECTION The tonal section controls the source tonal content for the track. Each track can contain up to 8 pitches which can be quantized into both a preset- or user customizable scale. • Pitch Lets you insert the track pitches in a piano layout. Turning the knob transposes the pitches. •... -
Page 24: Pitch
pitch Turning ( PITCH ) transposes all notes in the active track by the same amount within the selected scale. When the knob is pressed, the keyboard menu is active, and the [ VALUE ] buttons will turn into a chromatic key- board. ... -
Page 25: Scale
scale The scale parameter lets you select between 8 different scales on the lower row of the [ VALUE ] buttons. • [ VALUE 9 ] Chromatic • [ VALUE 10 ] Major • [ VALUE 11 ] Minor • [ VALUE 12 ] Pentatonic •... -
Page 26: Randomness
RANDOMNESS T-1 can add randomness to all of the primary parameters (white label on frontpanel) i.e. everything from steps, pulses, and division to MIDI channel and length. The randomness is based on a 16 step modulation sequence. Each parameter for every track generates its own sequence when T-1 is started. The sequence can be changed over time using a random walk algorithm, where each step changes randomly and gradually. -
Page 27: Sequence Variation
• The button in WHITE represents the selected division. modulation rates When adding randomness to parameters on the T-1, the modulation changes in two different ways: • Cycles controlled: The modulation changes at each cycle. The length of a cycle is determined by ( STEPS ) and ( DIVISION ) •... - Page 28 • ( VELOCITY ) • ( PITCH ) • ( SCALE ) Rate controlled • ( SUSTAIN ) • ( REPEATS ) • ( TIME ) • ( VOICING ) • ( RANGE ) • ( ACCENT ) • ( TIMING ) •...
-
Page 29: Setup Section
SETUP SECTION The setup section offers setup related adjustments. Additional MIDI, CV, and WIFI settings are available with the T-1 Config software. Make sure to visit: torsoelectronics.com/resources Link to tutorial video: torsoelectronics.com/tutorials/t1/setup-section length The Length parameter can reduce the length of the current track and create loops. The length of the loop can be set from 1/64th of a bar to infinite. -
Page 30: Quantize
quantize The quantize parameter determines the quantization of the current pattern relative to the global transport. This means that the pattern will stay in sync according to this quantization value. The quantization also determines how long the current pattern will play before a new pattern will start playback. This means that if the current pattern has a quantization setting of 4 bars, the next pattern in the queue will play at the next multiple of 4 bars on the timeline. -
Page 31: Performance Buttons
PERFORMANCE BUTTONS T-1 is designed to be a tool for improvisation and performance. The performance buttons can be used in combination with each other to make progressions and changes to the compositions in creative ways. The [ MUTE ] button makes it possible to mute and unmute multiple tracks simul- taneously. - Page 32 saving temp to pattern While holding [ TEMP ] + [ PATTERN ], it is possible to save the temporary parameter changes to a pattern. Selecting the currently playing pattern will override it. Selecting a new pattern will save the state and start playback of the pattern. [ TEMP ] + [ PATTERN ] + [ VALUE ] Be aware that saving a temporary tempo change to a pattern will also set the current playing bank’s tempo.
-
Page 33: Clear And Copy
CLEAR AND COPY clear This section explains how to clear tracks, patterns, and parameters. A flashing light on the [ VALUE ] buttons indicates that a track, pattern, or parameter has been cleared. clear track Press and hold [ CLEAR ] and press the desired [ VALUE ] buttons to reset the tracks to their default state. clear pattern Press and hold [ CLEAR ] + [ PATTERN ], and press the desired [ VALUE ] buttons to reset the patterns to their default state. - Page 34 copy parameter • Press and [ CTRL ] + [ COPY ] and press a ( KNOB ) to copy the parameter. Both the primary, secondary, and random parameter on the knob is copied. • The track that the parameter was copied is GREEN. •...
-
Page 35: Synchronization
Learn more about Link at Ableton’s website: ableton.com/en/link/ midi sync T-1 can send and receive MIDI clock and transport via USB and the TRS MIDI ports. synchronizing external midi devices from T-1 T-1 can synchronize external sequencers, clocks, or other devices via MIDI clock. -
Page 36: Analog Sync
Analog clock > MIDI clock > Link If T-1 receives MIDI clock from USB and TRS and at the same time, the two clocks are combined resulting in a faster tempo. To avoid this make sure to only send one MIDI clock to the T-1. -
Page 37: Setup Examples
SETUP EXAMPLES The T-1 can control a wide variety of new and old devices, making it a great addition to hardware & computer setups. Below are some examples of how T-1 can be used in different setups. T-1 sequencing MIDI gear... -
Page 38: Modular/Analog Setup
T-1 in a modular/analog setup modular/analog setup sync cv mod cv/gates sync cv mod cv/gates T-1 synced from external sequencer synced from external sequencer T-1 synced from external sequencer MIDI out (clock) MIDI In MIDI out (clock) MIDI In MIDI In (clock) -
Page 39: Program Change
T-1 can send and receive MIDI program change messages to control pattern playback. Incoming MIDI program change messages can be used to queue patterns on the T-1, and outgoing program change messages can be used to control external devices, for instance change patterns on a secondary se- quencer. -
Page 40: Configuration Software
Ableton Link. See below. In the Wi-Fi tab, you will see a list of all available networks that the T-1 can connect to. To connect a new network select it on the list, type the password and press connect. T-1 Config will prompt you when the network is con- nected. -
Page 41: Sync
The MIDI i/o tab lets you configure the MIDI input and outputs on your T-1. The MIDI i/o tab lets you configure whether the T-1 should send or receive MIDI clock, start/stop, and program change to and from the USB and MIDI TRS ports. Additionally, a note filter can be enabled on each of the MIDI outputs, to prevent MIDI notes from being sent on TRS out/out 2 or USB. -
Page 42: Misc
In the miscellaneous tab, you can set the brightness of the LEDs on the buttons. It is also possible to change the LED brightness on the T-1. Press and hold [ CTRL ] and turn the ( TEMPO ) knob. - Page 43 • The script will now erase the file system on your T-1. • After the process is completed the T-1 will reformat with the LEDs lit in orange. This can take up to 1 minute before the reformatting is completed.
-
Page 44: Summary Of Button Combinations
SUMMARY OF BUTTON COMBINATIONS secondary functions Press [ CTRL ] + [ BUTTONS ] Press [ CTRL ] + ( KNOBS ) multi track selection hold [ VALUE ] + [ VALUE ] buttons mute track Press [ MUTE ] + [ VALUE ] buttons mute track instantly Press [ MUTE ] + [ CTRL ] + [ VALUE ] buttons value changes in parameter menu (value buttons) - Page 45 clear parameter Press [ CLEAR ] + press ( KNOB ) refresh random modulation Press [ CLEAR ] + press ( RANDOM ) clear to single pulse/pitch Press and hold ( PULSES/PITCH ) + press [ CLEAR ] + [ VALUE ] buttons copy track Press [ CTRL ] + [ COPY ] + [ VALUE ] buttons copy parameter...
-
Page 46: Technical Specifications
Analog Clock + Reset output: 5V Analog Clock + Reset input: tolerates between 1 - 10V Analog clock rates: 2, 4, 8, 12, 16, and 24 PPQN Included in the box 1 x T-1 1 x USB cable 1 x MIDI adapter (type A) -
Page 47: Revision History
• Sustain is relative to division. • Note filter is added to the T-1 Config. • Added tip on how to play pattern chains from other banks. • Added analog/MIDI clock to Link conversion. • Added info about new Sync tab in T-1 Config. - Page 48 channel output CREDITS AND CONTACT INFORMATION product design and development Mathias Bredholt Mathias Kirkegaard Lars Buchholtz Jonas Kenton contact contact@torsoelectronics.com...
Need help?
Do you have a question about the T-1 and is the answer not in the manual?
Questions and answers