Table of Contents
Advertisement
Advertisement
Table of Contents

Subscribe to Our Youtube Channel
Related Manuals for Tactile Medical Flexitouch Plus PD32-G3


Summary of Contents for Tactile Medical Flexitouch Plus PD32-G3
- Page 1 Flexitouch Plus User Guide ® Model PD32-G3...
-
Page 2: Table Of Contents
Trunk–Thigh Garment ........45 How to Contact Tactile Medical ......1... -
Page 3: Determine Which Garment Style You Have And Follow Directions For
Determine which garment style you have and follow directions for healthcare provider. that garment: Do NOT Dispose with General Household Waste ƒ Flexitouch Plus with ComfortEase Tactile Medical complies with the Waste Electric and Electronic 500421-004-00 500421-004-00 (See Figure 1.a.). Equipment Directive (WEEE) 2002/96/EC. Contact Tactile Medical at 612.355.5100 or toll-free at 833.382.2845 (833.3TACTILE) (U.S. -
Page 4: Indications For Use
Return it to and diabetic leg ulcers sports injuries Tactile Medical for inspection and/or replacement. Do not modify the cord or plug. ƒ Lipedema ƒ Keep the power cord away from heated surfaces. -
Page 5: Contraindications
Contraindications ƒ Facial or head and neck dermal metastasis ƒ Acute facial infection (e.g., facial or parotid gland abscess) The Flexitouch Plus system should not be used if you have one or more of the following conditions: ƒ Any condition in which increased venous and lymphatic return is undesirable ƒ... -
Page 6: Chapter 2 The Flexitouch Plus System
Upper Extremity Treatment ————————————— C H A P T E R 2 ————————————— The garments and accessories needed for upper extremity treatment The Flexitouch Plus System may include the following: ƒ Arm–shoulder garment The Flexitouch Plus system is an advanced pneumatic compression device clinically proven to stimulate the lymphatic system. -
Page 7: Programmed Pressure Levels
Garments Refer to Appendix A: Clinician-Directed Manual Pressure Adjustment for additional information on how to change pressures for the various The air-chambered garments are made of soft pliable fabric. They treatment segments. are designed to fit the contours of your body by wrapping around the limb(s) and attaching with hook and loop fasteners. -
Page 8: Treating The Lower Extremity
Treating the Lower Extremity Table 1: Treatment Programs and Therapy Times Program Program Body Regions Treatment Available Treatment Program L1: Full Leg and Core Display Treated Time (min.) Cycles This treatment option provides the ability to deliver therapy to both Lower Extremity—Primary Treatment Programs the leg and trunk regions when clinically appropriate. -
Page 9: Treating The Upper Extremity
Treatment Program L4: Full Leg Plus Treating the Upper Extremity This treatment option provides the ability to deliver therapy to the Treatment Program U1: Full Arm and Core leg when clinically appropriate. Incremental proximal clearing of This treatment option provides the ability to deliver therapy to the lymphatic fluid in the thigh, calf and... -
Page 10: Treating The Head And Neck
Treatment Program U4: Arm–Shoulder Treating the Head and Neck This treatment option provides the ability to deliver therapy to Treatment Program H1: Head, Neck and Vest the arm and chest regions when clinically appropriate. Incremental This treatment option provides the ability to deliver therapy to proximal clearing of lymphatic fluid in the chest, biceps,... -
Page 11: Chapter 3 Controller Unit Setup
————————————— C H A P T E R 3 ————————————— Controller Unit Setup The Flexitouch Plus system consists of a controller unit, a garment A plug adapter may be necessary for use set and accessories to treat your condition. In this chapter you will outside the U.S. - Page 12 2800_Control_Panel_KL.pdf 12/9/16 1:50 PM Selecting or programming a new treatment. 3. On the home screen, press the arrow button until the On/Off CHOOSE A NEW TREATMENT option is highlighted in blue. Once Back highlighted, select the button. Using the arrow buttons, and by pressing the button when the appropriate Down...
-
Page 13: Chapter 4 Connecting The Hoses To The Controller Unit
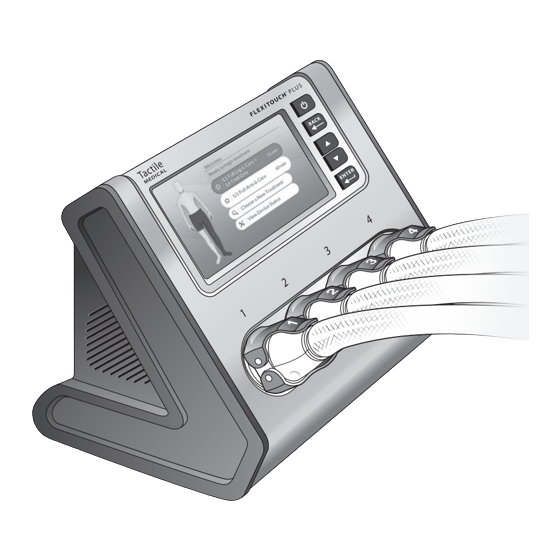
————————————— C H A P T E R 4 ————————————— Ensure paddles are Connecting the Hoses to the perpendicular to the adapter before attaching the bilateral port Controller Unit adapter to the controller unit The next step is connecting the hoses to the controller unit. The hose latches and the ports on the controller unit/bilateral port adapter are numbered 1 through 4, so when connected properly, latch number 1 will connect to port number 1, and so on. -
Page 14: Connecting Your Flexitouch Plus Lock/Unlock Style Connectors To The Controller Unit
FLEXITOUCH PLUS with ComfortEase Connecting Your Flexitouch Plus Lock/Unlock Style 2. Line up the numbered latch with the port on the corresponding Connectors to the Controller Unit controller unit (Figure 4.2.d.) 3. Push the numbered latch forward onto the controller unit until The Flexitouch Plus with ComfortEase has you hear a “click”. -
Page 15: Connecting Your Flexitouch Plus Hoses To The Controller Unit - Ridged Style
FLEXITOUCH PLUS with ComfortEase Connecting your Flexitouch Plus Hoses to the 4. Repeat these steps for all connectors required for your Controller Unit – Ridged Style prescribed treatment. The Flexitouch Plus has ridges on the connectors (Figure 4.3.a.) 4.3.a. Flexitouch Plus Connector: Ridged Style Do not remove port cap(s) - Page 16 4. Reposition your hand so your thumb and fingers are positioned on the top and bottom latch ridges. This enables you to slide the latch (#4 in Figure 4.3.d.) Do not remove port cap(s) Reposition your hand so it is now pushing forward with the collar Figure 4.3.f.
-
Page 17: Chapter 5 Trunk Garment Application
FLEXITOUCH PLUS with ComfortEase Applying Your Flexitouch Plus with ComfortEase ————————————— C H A P T E R 5 ————————————— Trunk Garment Trunk Garment Application These instructions apply to the trunk garment that looks like this (Figure 5.1.a.) Prior to starting therapy, it is important to: 1. - Page 18 FLEXITOUCH PLUS with ComfortEase Applying Your Trunk Garment for Daily Treatment 2. Open the pocket closure labeled 1. Sit down and slide your trunk garment on as you would a pair of shorts. 7. Sit down and open the zipper on your trunk garment. Slide your 3.
-
Page 19: Applying Your Flexitouch Plus Trunk Garment
Applying Your Flexitouch Plus Trunk Garment Applying Your Trunk Garment for Daily Treatment 2. Sit down, then open the pocket closure and slide your garment These instructions apply to the trunk garment that looks like this: on as you would a pair of shorts. Bring the inside flap of your trunk garment across your waist . -
Page 20: Chapter 6 Lower Extremity Garment Application
FLEXITOUCH PLUS with ComfortEase Flexitouch Plus with ComfortEase Full Leg Garment ————————————— C H A P T E R 6 ————————————— These instructions apply to the full leg garments that looks like this: Lower Extremity Garment Application (Figures 6.1.a., 6.1.b., 6.1.c.) Prior to starting therapy, it is important to: 1. - Page 21 FLEXITOUCH PLUS with ComfortEase 3. Next, center your heel in the heel cup area where the foot section bends. Align the hoses along the back of your leg. Zip up your full leg garment (Figure 6.1.d.) 4. Adjust the numbered tabs 1 through 7 as necessary to get the desired fit, while being careful to minimize bunches and folding as best you can.
-
Page 22: Flexitouch Plus Full Leg Garment
FLEXITOUCH PLUS with ComfortEase Flexitouch Plus Full Leg Garment 1. Apply your full leg garment by laying it out on a bed, couch, or recliner so the foot section is at the bottom and the tubing cover These instructions apply to the full leg garments that looks like this: runs along the back of your leg (Figure 6.1.h.) (Figure 6.2.a.) - Page 23 5. Continue to contour your garment using the hook fasteners for a secure fit up the calf and thigh . When wrapping, (#5 in Figure 6.2.b.) try to minimize any bunches or folds in the fabric and adjust the hook fastener tabs as necessary to get a well-contoured fit. 6.
-
Page 24: Flexitouch Plus Half Leg Garment
Flexitouch Plus Half Leg Garment When wrapping, try to minimize any bunches or folds in the fabric and adjust the hook fastener tabs as necessary to get a Half Leg Garment Preparation: well-contoured fit. 1. Unfold and place your half leg garment on the bed or sofa, 6. -
Page 25: Flexitouch Plus Ext Half Leg Garment And Trunk-Thigh Garment
Flexitouch Plus EXT Half Leg Garment and 7. If necessary, readjust the fasteners to obtain a well-contoured Trunk–Thigh Garment and comfortable fit. 8. Place a couple of pillows under your calf and foot to elevate them EXT Half Leg Garment and Trunk–Thigh Garment Preparation: just above your hips for optimal treatment (#8 in Figure 6.4.b.) 1. -
Page 26: Chapter 7 Upper Extremity Garment Application
Trunk–Thigh Garment Application: ————————————— C H A P T E R 7 ————————————— 9. Check to make sure the U-shaped notch on your trunk-thigh Upper Extremity Garment garment will be centered on the groin area when fully applied Application (#9 in Figure 6.4.b.) 10. -
Page 27: Flexitouch Plus Arm-Shoulder Garment
5. Ensure the chest flap attached to the arm piece crosses the center CAUTION line of your chest and is flat against your chest (#5 in Figure 7.1.a.) ƒ The Flexitouch Plus garments should not be placed in direct contact with an 6. -
Page 28: Chapter 8 Head And Neck Garment Application
Fully Applied Arm–Shoulder Garment: ————————————— C H A P T E R 8 ————————————— 8. Properly applied, your garment and accessories will follow the Head and Neck Garment contours of your body and fit snugly, yet comfortably (Figure 7.1.d.) Application Make any necessary adjustments after you lie down to ensure a well-contoured fit. -
Page 29: Flexitouch Plus Head Garment And The Vest For Head And Neck
4. Conform the nose piece across the bridge of your nose and attach CAUTION the free hook fasteners to the side of your head garment to ensure good contact of garment to the cheeks. Adjust your garment so it ƒ The Flexitouch Plus garments should not be placed in direct contact with an open wound. - Page 30 Vest for Head and Neck Preparation: 12. To tighten the vest garment around the waist, rotate the round closure dials on the waist flaps of the garment (#12 in Figure 8.1.f. 7. Unfold your vest garment so the zipper is facing up. This is the and 8.1.g.) front of the vest garment.
-
Page 31: Chapter 9 Conducting A Therapy Session
14. Pull the vest collar tabs straight down and attach the hook fastener ————————————— C H A P T E R 9 ————————————— pads to the chest of the vest garment . The collar tabs (Figure 8.1.i.) Conducting a Therapy Session should not cross over the zipper, and are designed to help the neck chamber of the garment maintain good contact with your Now you are ready for your therapy session with the Flexitouch Plus... -
Page 32: Pausing The Therapy Session
Pausing the Therapy Session 3. Store the controller unit, garments and accessories in a cool, dry place. Keep them out of excessive heat or cold. Store them away You may PAUSE TREATMENT for up to 15 minutes at any point during from children and pets. -
Page 33: Chapter 10 Troubleshooting And Specifications
Disinfecting the Flexitouch Plus System ————————————— C H A P T E R 10 ————————————— DisCide® Ultra Spray Disinfectant has been demonstrated to Troubleshooting and Specifications effectively disinfect the Flexitouch Plus system. Use DisCide Ultra Spray or similar disinfectant compliant with OSHA’s Bloodborne If you experience a problem with the Flexitouch Plus system, Pathogen Standard (29 CFR 1910.1030) and/or registered with the EPA. - Page 34 3. Check to be sure the latches are firmly in place and attached to the correctly numbered port. * Tactile Medical Customer Service can be contacted at 833.382.2845 Chambers It is normal for a small amount of air to remain in the chambers (833.3TACTILE), 7 a.m.
-
Page 35: Limited Warranty And Service For Home Use
R3 (A6). This means a specific 2. If you discover leaking air, disconnect and of two (2) years from the date of shipment. Tactile Medical’s sole garment chamber timed out reconnect the hose(s) to the controller unit. -
Page 36: Limited Warranty And Service For Facility Use
Chambers (max) 10.5 Return Policy Mode of Operation Continuous Tactile Medical does not accept returns or provide refunds for any Recalibration not required for the Calibration medical equipment dispensed to patients, including garments/ Flexitouch Plus system sleeves, controller unit or any accessories once the original packaging... -
Page 37: Device Label
20 inches (50 cm) to 40 inches (100 cm) with an illumination of 500 lx minimum. If label reading issues remain, please call Tactile Medical Customer Service at 833.382.2845 (833.3TACTILE) 7 a.m. to 7 p.m. CT, Monday–Friday. -
Page 38: Clinician-Directed Manual Pressure Adjustment
————————————— A P P E N D I X A ————————————— 3. Press the button so the PRESSURE option is highlighted in blue to select the DECREASED, NORMAL or INCREASED options. Clinician-Directed To manually adjust treatment pressure(s) for individual segment(s) Manual Pressure Adjustment in different areas of the body, press the arrow buttons... -
Page 39: For Additional Questions
Press the button to select. contact: • By mail: Tactile Medical, 3701 Wayzata Blvd, Suite 300 Minneapolis, MN 55416 U.S. • By phone: Toll free: 833.382.2845 (833.3TACTILE) (U.S. only) Hours: 7 a.m. to 7 p.m. CT, Monday–Friday •... - Page 40 Customer Service Toll Free: 833.382.2845 (833.3TACTILE)
- Page 41 F: 612.355.5101 tactilemedical.com Tactile Medical and Flexitouch are registered trademarks, and Healing Right at Home is a trademark of Tactile Medical. DisCide® is a registered trademark of Palmero Health Care Corporation. No part of the contents of this user guide may be reproduced or transmitted in any way, form or by any means without the written permission of Tactile Medical.
Need help?
Do you have a question about the Flexitouch Plus PD32-G3 and is the answer not in the manual?
Questions and answers