Table of Contents
Advertisement
TENNIS TOWER
Don't use new tennis balls during break-in period - see page 2
questions about your Tennis Tower ball machine.
In tro duc tion
This manual con tains im por tant in for ma tion con cern ing the pro per use and care of your Tennis
Tower. Please read completely before operating your Tennis Tower.
Check for shipping damage
Even though your machine may appear un -
da ma ged, it is pos sible for inter nal parts to be
dama ged even if the exter nal case is un da ma-
ged. If your machine is dama ged, con tact Sports
Tutor im me diately at 1-800-448-8867.
Attaching the Ball Hopper
Set the ball hopper on top of the Tennis Tower
body. It should fit snugly inside the raised rim.
Attach the hopper at each corner with the four
screws provided, which screw directly into the
threaded holes of the Tennis Tower body.
OWNER'S MANUAL
QUICK TIP
Please call us at 800-448-8867 if you have any
What's Inside
Page
2
2
2
2
2
3
4
4
5
6
6
6
7
Advertisement
Table of Contents

Related Manuals for Sports Tutor Tennis Tower


Summary of Contents for Sports Tutor Tennis Tower
-
Page 1: Table Of Contents
Attaching the Ball Hopper Control Panel Player Model Control Panel Reset Button Set the ball hopper on top of the Tennis Tower Match Play Mode body. It should fit snugly inside the raised rim. Remote Control Attach the hopper at each corner with the four... -
Page 2: Power Cord Requirements
Operat ing Tennis Tower Posi tion Tennis Tower along the centerline of the court. Place it at the base line for throw ing faster shots, and nearer the serv ice line for slower shots. Step on the caster locks on the rear casters to lock the Tennis Tower in place. -
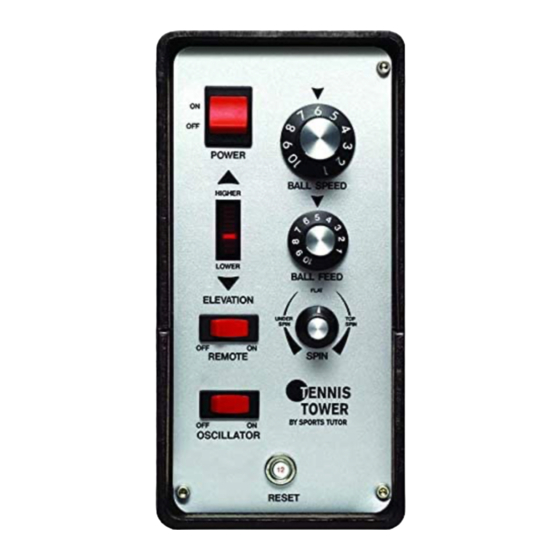
Page 3: Control Panel
Control Panel 1) POWER - Push ing to the ON posi tion begins a start-up time delay period of about 10 seconds before ten nis balls are thrown. 2) BALL SPEED - Turn ing clock wise, from ‘1’ to ‘10’ in creases the speed at which balls are thrown. 3) ELE VA TION - Push ing the UP arrow raises the ball tra jec tory, and push ing the DOWN arrow lowers the tra jec tory. -
Page 4: Player Model Control Panel
Player Model Control Panel 1) POWER SWITCH - Push ing to the ON posi tion begins a start-up time delay period of about 10 seconds before ten nis balls are thrown. 2) BALL SPEED - Pushing the UP arrow increases speed. -
Page 5: Match Play Mode
MATCH PLAY MODE™ Match Play Mode Instructions Set the Tennis Tower at the center of the baseline. Before initiating MATCH PLAY MODE™ it is best to stop shooting balls by pressing the START/STOP button of the INTERVAL control. Make sure the machine is set to move evenly to both the forehand and backhand sides. Push the OFF/[CENTER] button. -
Page 6: Remote Control
Tennis Tower will only accept commands from the remote transmitter when the Remote Switch on the control panel is ON. Tennis Tower will beep each time it receives a com mand from the remote trans mit ter. The remote transmitter controls two functions: Ball Feed - Press the ball feed switch to alter nately start and stop the ball feed. -
Page 7: Warranty
Limi tation of in ci den tal or con se quen tial damages Sports Tutor is not res pon sible for any in ci den tal or con se quen tial damages of any kind. Our lia bi lity is limi- ted to the repair or replace ment, at our option, of a defec tive pro duct. - Page 8 TENNIS TOWER 2-YEAR EXTENDED WARRANTY What it covers The Tennis Tower extended warranty covers both parts and labor under the same terms as the original Tennis Tower warranty. Length of Extended Warranty The extended warranty will cover the Tennis Tower for an additional two years at a cost of $150.00.
Need help?
Do you have a question about the Tennis Tower and is the answer not in the manual?
Questions and answers