Table of Contents
Advertisement
Advertisement
Table of Contents

Related Manuals for ACCUR8 DWS5100


Summary of Contents for ACCUR8 DWS5100
- Page 1 User Manual ACCUR8 DWS5100 Weather Station...
- Page 2 (www.metoffice.gov.uk). ACCUR8 products are tested for operation and functionality but have not been independently tested by a UKAS accredited laboratory. As part of our ongoing policy to improve the design and specification of our products, we reserve the right to change any detail given without prior notice.
-
Page 3: Table Of Contents
Contents Introduction ............................... 3 General Safety Instructions ........................3 Getting Started ............................5 Weather Station Installation ........................14 Display Console Operation ........................19 Registration with Weather Server Websites ...................24 Wi-Fi Setup (Connect your Device to the Console’s Wi-Fi) ..............35 Upgrade firmware ...........................41 Other Console Features .........................43 Specifications ............................47 Maintenance ............................48... -
Page 4: Introduction
® Thank you for purchasing the ACCUR8 DWS5100 Wi-Fi Weather Station with 5-in-1 Outdoor Sensor. The following user manual provides step-by-step instructions for installation, operation and troubleshooting. This user manual is to be considered a component of the device. Read carefully before using the device. - Page 5 • Never disassemble the device. In the event of a fault, please contact your retailer. • Do not expose this device to high temperatures and protect it from water and high humidity. • Do not immerse the unit in water. •...
-
Page 6: Getting Started
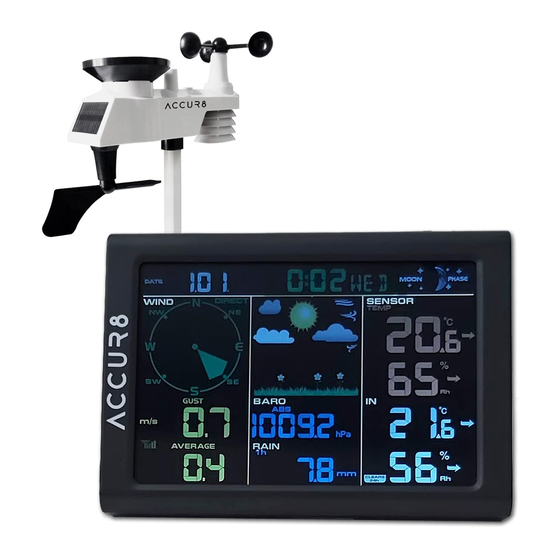
3. Getting Started The DWS5100 weather station consists of a display console (receiver), a sensor array with integrated outdoor transmitter, and mounting hardware. 3.1 Parts List The DWS5100 weather station consists of the following parts (as referenced in Figure 1 below). - Page 7 Item Image Mounting pole Dimensions: 76 x 76 x 25mm Pole mounting nuts (M3) / bolts Ø3) Pole mounting nuts (M5) / bolts (Ø5) Tapping screws User manual UK Power adaptor Figure 1...
- Page 8 3.2 Recommended Tools ● Phillips screwdriver ● Compass or GPS (for wind direction calibration) ● Adjustable spanner ● Hammer and nail for foot mounting. 3.3 Sensor Assembly Set Up Figure 2 shows the sensors included in the Integrated Outdoor Transmitter. Figure 2 Insert batteries into the transmitter.
- Page 9 Figure 3 Remove the battery door on the back of the sensor by removing the set screw, as shown in Figure 4. Figure 4 Insert 3 x AA batteries in the battery compartment, as show in Figure 5.
- Page 10 Figure 5 Close the battery door. Make sure the gasket (around the battery compartment) is properly seated prior to closing the door. Tighten the set screw. Note: Do not install the batteries backwards. You can permanently damage the sensors. The solar panel does not charge the batteries, so rechargeable batteries are not needed or recommended.
- Page 11 3.4 Display Console Display Console Layout The display console layout is shown in Figure 7. Note: The following illustration shows the full LCD display for description purposes only; it will not appear like this during normal operation. Figure 7 1. Indoor humidity change indication 16.
- Page 12 Display Console Set Up It is recommended to plug in the power supply to reduce the battery consumption and extend the service life. Note: The sensor array must be powered and updating before powering up the console, or the console will time-out searching for the sensors. Power up the console last. Make certain the weather station sensor array is at least 3m away from the console and within 30m of the console.
- Page 13 Figure 9 Figure 10 2: Insert the DC plug correctly; as shown in Figure 11. Figure 11 3: If you want to place it on a table or cabinet, open the desk stand and rotate the DC plug upwards 90 degrees;...
- Page 14 Figure 12 4: If you want to hang on the wall, rotate the DC plug down flat and close the desk stand; as shown in Figure 13. Figure 13 Note: If the power adaptor is plugged in, BL ON will display in the time area for three seconds when powered up.
-
Page 15: Weather Station Installation
4. Verify proper operation of the indoor and outdoor humidity sensors. Verify the indoor and outdoor humidity readings match closely with the console and sensor array in the same location (about 3m apart). The sensors should be within 10% (the accuracy is ± 5%). Allow about 30 minutes for both sensors to stabilise. 4. - Page 16 Metal 90-100% 4.4 Installation of Integrated Outdoor Transmitter The DWS5100 can be used in both the Northern and Southern Hemispheres. Prior to installation, you will need to calibrate the wind direction as shown below. Northern Hemispheres (NOR) The cardinal directions (N, S, E, W) moulded on the body of the outdoor sensor are indicators for the Northern Hemisphere only.
- Page 17 Northern Hemispheres Southern Hemispheres Figure 14 Southern Hemispheres (SOU) For Southern Hemisphere installations, ignore these (N, S, E, W) and face the solar panel to the North (and in a sunny position) when it comes to installing the Integrated outdoor transmitter. Step 1: Install the Integrated outdoor transmitter and face the solar panel North.
- Page 18 Figure 15 Attach the included mounting pole to your existing mounting pole with the four¢5 bolts and M5 nuts assembly, or fix on the wall with four tapping screws, as shown in Figure16.
- Page 19 Figure 16...
-
Page 20: Display Console Operation
4.5 Low Battery Icon A low battery indicator icon is shown in the display window of the Integrated outdoor transmitter. When the low battery icon appears (the battery voltage is lower than 3.6V), replace the batteries in the sensor with fresh batteries. - Page 21 5. Change Month. Press the SET button again to set the calendar month. Press the [+] button or [-] button to adjust the calendar month. 6. Change Day. Press the SET button again to set the calendar day. Press the [+] button or [-] button to adjust the calendar day.
- Page 22 5.7 Alarm Mode The DWS5100 includes the following alarms: • Time (There are two alarms for time: Alarm 1 and Alarm 2) •...
- Page 23 Viewing the High and Low Alarms To view the current alarm settings, press the ALARM button to enter the alarm mode. HI will be displayed in the time area. At the same time Alarm time parameters of out/indoor temperature/humidity, rain, feels like, wind gust, wind average, and dew point are displayed.
- Page 24 22. Indoor temperature low alarm 23. Indoor humidity high alarm 24. Indoor humidity low alarm Note: To prevent repetitive alarming of humidity, there is a 4% tolerance band. For example, if you set the high alarm to 60% and silence the alarm, the alarm icon will continue to flash until the humidity falls below 56%, at which point, the alarm will reset and must increase above 60% to activate again.
-
Page 25: Registration With Weather Server Websites
6. Registration with Weather Server Websites Register with WeatherCloud.net Note: This is best done on a desktop computer or laptop. Visit https://weathercloud.net/ and enter a username, email address and password (This is your Login password for the website, not your email account password. So, no private information will be exposed). - Page 26 Figure 19 4) As shown below, go to your email inbox and log in to the web address in the email you will have received. Figure 20 5) As shown below, click “here” to enter the homepage of the Weathercloud website. Figure 21...
- Page 27 6) As shown below, enter the email address and password you just registered to enter the Weathercloud website. Figure 22 Add a weather station device (it may take a few minutes). Figure 23 1) After signing up you will be prompted to add a device/ Select “Create device” and enter your station’s information: Boxes with red * must be filled in.
- Page 28 Figure 24 Note: You can select any Model number and Link type in the above boxes. 2) As shown below, click Get coordinates to identify your location of on the map, then click Done to confirm. Figure 25 3) As shown below, click Create.
- Page 29 Figure 26 4) As shown below, after registering successfully, please record the Weathercloud ID and Key information for later use. Figure 27 6.2 Register with Wunderground.com (Weather Underground) Note: The Weather Underground website is subject to change. Visit: https://Wunderground.com, and select the ‘Join’ link in the upper right and corner and create a Free Account.
- Page 30 Figure 28 2) As shown below, enter a username, email address and a password (this is your Login password for the website, not your email password. So, no private information will be exposed). Click ‘Sign up for free’. Figure 29 3) As shown below, registration has been successfully completed.
- Page 31 Figure 30 4) As shown below, click Log in and enter the email address and password you just registered. Figure 31 5) As shown below, click ‘My Profile’. Then enter Member Settings.
- Page 32 Figure 32 6) As shown below, click ‘Update home location’. Figure 33 7) As shown below, you will then be prompted to add a device/ Select ‘Add New Device’ Figure 34 8) As shown below, click ‘Personal Weather Station’.
- Page 33 Figure 35 9) As shown below, select Address by inputting an address or select Manual to position your address automatically. Then click Next:...
- Page 34 Figure 36 10) As shown below, you will then be prompted to add more information about your device. Complete the appropriate information then click ‘I Accept’ and ‘Next’: Boxes with red (Required) must be filled in. Note: You can select any Wi-Fi weather station model in the Device Hardware box; we recommend ‘AcuRite 5-in-1 Weather Station with Wi-Fi’.
- Page 35 Figure 37 11) As shown below, after registering the host successfully, please record Station ID and Station Key information for use later. These details will be needed when you configure your console for Wi-Fi access. Figure 38 12) As shown below, registration is done successfully. Figure 39...
-
Page 36: Wi-Fi Setup (Connect Your Device To The Console's Wi-Fi)
7. Wi-Fi Setup (Connect your Device to the Console’s Wi-Fi) Note: If you own a dual band router (2.4 GHz and 5.0 GHz), make sure you connect to the 2.4 GHz band, otherwise it will fail to connect the weather station to Wi-Fi. You may need to check your router documentation regarding how to do this. - Page 37 Example 2. Connect to the console Wi-Fi server with a Mac. Choose the Settings icon Network. Connect to the WeatherHome------ Wi-Fi network, as shown in Figure 41 (your Wi-Fi network name may be slightly different, but will always begin with WeatherHome------ Figure 41 Example 3.
- Page 38 Figure 42 Example 4. Connect to the console Wi-Fi server with an Android device. From the Apps icon, choose the Settings icon and Wi-Fi. Connect to the WeatherHome------ Wi-Fi network, as shown in Figure 43 (your Wi-Fi network name may be slightly different, but will always begin with WeatherHome------).
- Page 39 Once connected, enter the following IP address into any web browser: http://192.168.5.1 to access the console’s web interface. Note: Some browsers will treat 192.168.5.1 as a search, so make sure you include the header http://, i.e.: http://192.168.5.1, not 192.168.5.1 Enter the following information into the web interface (Figure 44). Make sure all of the information is entered prior to selecting Save.
- Page 40 The following table provides times zones throughout the world. Locations in the eastern hemisphere are positive, and locations in the western hemisphere are negative. Hours from Time Zone Cities IDLW: International Date Line West NT: Nome Nome, AK AHST: Alaska-Hawaii Standard Honolulu, HI CAT: Central Alaska HST: Hawaii Standard...
- Page 41 Hours from Time Zone Cities JST: Japan Standard Tokyo GST: Guam Standard Sydney Magadan IDLE: International Date Line East Wellington, New Zealand NZST: New Zealand Standard If all of the information you entered is correct, press save to confirm (Figure 45). If it does not, check your web interface information again.
-
Page 42: Upgrade Firmware
NOTE: When the console successfully connects to any weather server websites, the data signal icon will appear on the LCD display (In front of the Indoor Temperature). If the data signal icon is flashing, the console is currently uploading to the server. If the icon disappears, the console has not connected to the weather server for more than 30 minutes. - Page 43 Once connected, enter the following IP address into the browser’s address bar: http://192.168.5.1/upgrade.html Figure 48 Once connection is successful, it will jump to the ‘Upload Setting’ screen automatically. Figure 49 Press Select File button to select the upgraded firmware as shown in figure 50 below. Figure 50 Press the Upgrade button.
-
Page 44: Other Console Features
Figure 51 NOTE: In this upgrade, only Wi-Fi firmware is updated. The console does not reset. Once the upgrade is completed, the console will automatically exit WAP mode. 9. Other Console Features The following section describes additional features and display icons. Weather Forecasting Note: The weather forecast or pressure tendency is based on the rate of change of barometric pressure. - Page 45 Weather Icons Condition Icon Description Sunny Pressure is rising and the previous condition is partly cloudy. Partly Cloudy Pressure is falling and the previous condition is sunny or Pressure is rising and the previous condition is cloudy. Cloudy Pressure is falling and the previous condition is partly cloudy or Pressure is rising and the...
- Page 46 Moon Phase The following moon phases are displayed, based on the calendar date. Pressure Threshold Setting The pressure threshold (the negative or positive rate of change of pressure signifying a change in the weather) can be adjusted from 2 mbar/hour to 4 mbar/hour (default level 2 mbar/hour). The lower the level pressure threshold setting, the higher sensitivity for weather forecast changes.
- Page 47 At temperatures greater than 26.7°C (80°F), the heat index is displayed, as shown in the National Weather Service Heat Index Table below: When the temperature is between 4.4°C (40°F) and 26.7°C (80°F), the OUT temperature is displayed (‘Feels Like’ temperature is the same as OUT temperature).
-
Page 48: Specifications
10. Specifications 10.1 Wireless Specifications • Line of sight wireless transmission (in open air): 100m • Frequency: 433 MHz • Integrated Outdoor Transmitter interval: 16 seconds. 10.2 Measurement Specifications The following table provides specifications for the measured parameters. Measurement Range Accuracy Resolution Indoor Temperature... -
Page 49: Maintenance
climates less than -20 °C). The primary power source is the solar panel. The batteries provide backup power when there is limited solar energy. 10.4 Wi-Fi Specifications • Wi-Fi Standard: 802.11 b/g/n • Wi-Fi Console RF Frequency: 2.4 GHz • Recommended device to support setup: Smart device with built-in Wi-Fi with WAP mode, including laptops, computers, smart phones and smart pads. -
Page 50: Troubleshooting Guide
12. Troubleshooting Guide Problem Solution Wireless transmitter not reporting into If signal from the transmitter is lost, dashes (--.-) will be console. displayed on the screen. To reacquire the signal, press and hold the CHANNEL/+ button for 3 seconds, choose the lost sensor and the remote search icon There are dashes (--.-) on the display will be constantly displayed. - Page 51 Problem Solution Indoor and Outdoor Humidity do not Allow up to one hour for the sensors to stabilise due to agree signal filtering. The indoor and outdoor humidity sensors should agree within 10 % (the sensor accuracy is ± 5 %). Use the calibration feature to match the indoor and outdoor humidity to a known source.
-
Page 52: Adjustment Or Calibration
Problem Solution Confirm your password or key is correct. It is Data not reporting to the password you registered on www.wunderground.com Wunderground.com. Your Wunderground.com password cannot begin with a non- www.weathercloud.net alphanumeric character (a limitation of Wundeground.com, not the station). Example, $worknet is not a valid password, but worknet$ is valid. - Page 53 Press the ALARM button to reset to the current value. Press the SET button to switch between indoor, outdoor and temperature channels 1 through 8. To exit the calibration mode at any time, press the SNOOZE/LIGHT button on the top of the display console. If no operation is performed, the calibration mode will timeout in 30 seconds.
- Page 54 2. Step by Step Guide In normal mode, press and hold the SET and ALARM buttons at the same time for five seconds to enter the barometer, wind speed, rainfall and calibration mode. To skip over a parameter, press (do not hold) the SET button.
- Page 55 Press and hold the [+] or [-] button for three seconds to increase or decrease rapidly. Press the ALARM button to reset current value. Note: The wind gust is also affected by the wind speed calibration factor. Discussion: Wind speed and wind gust are adversely affected by installation constraints. The rule of thumb is to install the weather station four times the distance of the height of the tallest obstruction (For example, if the building is 20ft tall, and the mounting pole is 6ft tall, install 4 x (20 –...
-
Page 56: Service
14. Service Please contact us for any questions regarding the product or claims, preferably by email. ACCUR8 Ford Lane Business Park Ford West Sussex BN18 0UZ Email: info@accur8tech.com Phone: 01243 558 280 15. EC Declaration of Conformity Tempcon Instrumentation Ltd has issued a declaration of conformity in accordance with applicable guidelines and corresponding standards.
Need help?
Do you have a question about the DWS5100 and is the answer not in the manual?
Questions and answers
How do I set the time
To set the time on the ACCUR8 DWS5100:
1. While in Normal Mode, press and hold the SET button for at least 3 seconds to enter Set Mode.
2. The 12/24-hour format will flash. Use the [+] or [-] button to select 12-hour or 24-hour format.
3. Press the SET button again to move to the hour setting. Use [+] or [-] to adjust the hour.
4. Press the SET button again to move to the minute setting. Use [+] or [-] to adjust the minutes.
5. Continue pressing SET to move through any additional settings or press the SNOOZE button to exit Set Mode at any time.
If connected to the internet, the device will automatically sync time with an internet time server each hour. When synced, the SYNC icon appears on the display.
This answer is automatically generated