
Related Manuals for HeatSeal HSE-100


Summary of Contents for HeatSeal HSE-100
- Page 1 OPERATING MANUAL HSE-100 COMBINATION SHRINK SYSTEM READ ALL INSTRUCTIONS CAREFULLY BEFORE OPERATING EQUIPMENT Revised 2019...
-
Page 2: Table Of Contents
TABLE OF CONTENTS Electrical Requirements & Setup ................. 3 Unpacking the System Standard Features ......................4 Machine Features & Specifications Shrink Tunnel Air Venting Magnetic Hold Down Preliminary Setup & Adjustments ................6 Threading the Film Adjusting the Sealing Platform Operating Procedures .................... -
Page 3: Electrical Requirements & Setup
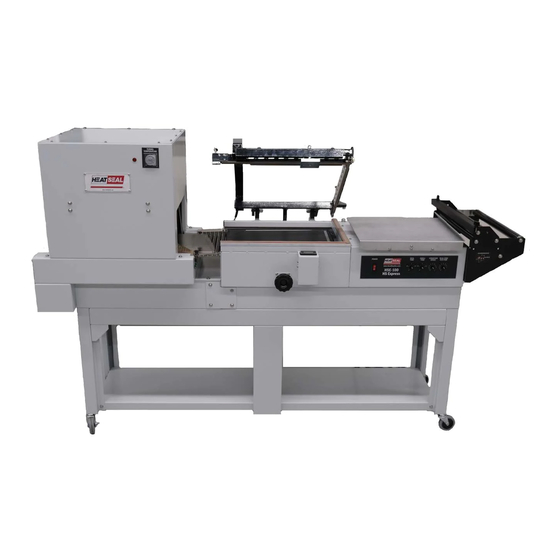
UNPACKING THE SYSTEM The HSE-100 system is a unitized shrink wrapping machine that combines an L Bar Sealer with a Shrink Tunnel. Your system is shipped fully assembled with leg kit, or as a tabletop on a pallet with the L Sealer and Shrink Tunnel in separate boxes. -
Page 4: Standard Features
STANDARD FEATURES MACHINE FEATURES Tunnel Temperature Control L Bar Sealer Shrink Tunnel Sealing Platform & Seal Pads Package Platform Non-Stick Mesh Tunnel Conveyor Film Cradle Express Control Panel Seal Conveyor Balanced Platform Adjustment Magnetic Hold Down Casters Console Base BASIC SPECIFICATIONS Film Capacity: 17”... -
Page 5: Shrink Tunnel
STANDARD FEATURES SHRINK TUNNEL The Non-Stick Mesh conveyor belt (1) is an integral part of the shrink wrapping unit. Heat is circulated to the underside of the belt, and adds positive shrink on the bottom for a more attractive package. -
Page 6: Preliminary Setup & Adjustments
PRELIMINARY SETUP & ADJUSTMENTS THREADING THE FILM Place a roll of center folded film on the rollers with the open side of the film toward the operator (1). The cradle is adjustable to accommodate various size packages with the same width of film up to 17 inches wide. -
Page 7: Adjusting The Sealing Platform
PRELIMINARY SETUP & ADJUSTMENTS ADJUSTING THE SEALING PLATFORM To insure a neat looking finished package, the sealing platform (1) can be adjusted so the seal made by the L Bar will be at the center of the vertical (profile) dimension of the package to be sealed. The system is available with two styles of sealing platforms: static or Silicone Fabric seal conveyor (2). -
Page 8: Operating Procedures
OPERATING PROCEDURES L SEALER OPERATION Due to the various types and gauges of shrink films, the sealing temperature control will require adjustment to obtain the optimum setting for the film being sealed. Always use the minimum setting that will provide a satisfactory seal to achieve maximum sealing wire and/or knife blade life and minimize replacement of Non-Stick tape and sealing pads. -
Page 9: Machine Controls
There is two controllers for the operation of your machine. The Main Control Panel (1) will control Seal Time, Dwell Time, and Conveyor Speed. It will also control Seal Conveyor Run Time if the HSE-100 is equipped with a Seal Conveyor. The Tunnel Temperature Controller is located on the top right portion of the tunnel. - Page 10 OPERATING & SHRINK PROCEDURE There are three steps in creating the package on the shrink wrapping system: wrap, seal and shrink. WRAPPING The operator places the product to be wrapped on the package platform (1) inserting it between the center fold film (2). Holding the product firmly with the right hand (3) and the corner of the film with the other hand (4), move the product onto the sealing area.
-
Page 11: Recommended Cleaning & Maintenance
MAINTENANCE & CLEANING RECOMMENDED CLEANING L BAR SEALER SEALING WIRES Clean daily. Use a soft, brass wire brush. SEALING PADS Clean daily. Wipe clean with a cloth and then spray silicone to help keep clean. PRODUCT TRAY Wipe down daily. PTA CONVEYOR Clean periodically. - Page 12 MAINTENANCE & CLEANING SERVICING THE SEALING WIRES TO REMOVE WIRES Tighten the knob (1) on the tension block (2) to relieve the sealing wire tension. Using a small screwdriver, loosen the screw (3) in the side of the tension block and pull out the sealing wire. ...
-
Page 13: Troubleshooting Guide
TROUBLESHOOTING GUIDE PROBLEM: FILM SPLITS ALONG CENTER FOLD SOLUTION: CHECK FOR DAMAGE TO FILM ROLL. MAKE SURE PRODUCT TRAY IS POSITIONED CORRECTLY PROBLEM: FILM SPLITS AT HOLE PUNCH SOLUTION: CHECK HOLE PUNCH FOR PROPER ALIGNMENT. CHECK THE CONDITION OF THE PUNCHED HOLES. PROBLEM: FILM SPLITS AT TOP OF PACKAGE SOLUTION: CHECK HOLE PUNCH FOR PROPER ALIGNMENT. - Page 14 TROUBLESHOOTING GUIDE PROBLEM: ANGEL HAIR SOLUTION: CHECK AND CLEAN WIRE, WIRE INSULATION OR KNIFE BLADES. CHECK CONDITION OF SEALING PADS AND NON-STICK TAPE. CHECK FOR EVEN ARM AND MAGNET PRESSURE. CHECK THE MINIMUM SEALING TEMPERATURES. CHECK THE SEAL CYCLE IS COMPLETE. MAKE SURE THE MAGNETS RELEASE AT THE SAME TIME.
- Page 15 Revised 2019...
Need help?
Do you have a question about the HSE-100 and is the answer not in the manual?
Questions and answers