Table of Contents
Advertisement
Quick Links
Operation Manual / Power2 650-M / Low-pressure stage
Table of contents
Power2 650-M / Low-pressure stage
1
Introduction............................................................................................................ 4
1.1
Purpose of the manual................................................................................................. 4
1.2
Contact information..................................................................................................... 4
1.3
Essential information.................................................................................................... 5
1.4
Power2 layout and function ......................................................................................... 7
1.5
Layout and function of the low-pressure stage ..................................................... 8
1.6
Symbols, definitions.................................................................................................... 10
1.7
Registered trademarks ............................................................................................... 11
1.8
Storage of new low-pressure and high-pressure stages..................................... 12
2
Safety .................................................................................................................... 14
2.1
Introduction .................................................................................................................. 14
2.2
CE conformity ............................................................................................................... 14
2.3
Definition of mandatory signs .................................................................................. 15
2.4
Definition of safety instructions .............................................................................. 15
2.5
Intended use ................................................................................................................. 16
2.6
Deflagration on gas engines ..................................................................................... 17
2.7
Warning plates on the low-pressure stage............................................................. 18
2.8
Rating plate of the low-pressure stage................................................................... 19
2.9
Periodic check of the pressure vessels................................................................... 20
2.10
Lifting of loads ............................................................................................................. 21
2.11
Prerequisites for operation and maintenance....................................................... 22
2.12
Hazards during operation and maintenance ......................................................... 23
2.13
Safe operation ............................................................................................................. 25
2.14
Safe maintenance ....................................................................................................... 26
3
Removal and installation.................................................................................... 30
3.1
Transport / weight ..................................................................................................... 30
3.2
Removing the low-pressure stage............................................................................ 31
3.3
Installing the low-pressure stage ............................................................................. 32
4
Commissioning .................................................................................................... 33
4.1
Oil supply ...................................................................................................................... 33
4.2
Inspection procedures ............................................................................................... 35
4.3
Commissioning after taking out of operation....................................................... 37
5
Monitoring during operation.............................................................................. 38
5.1
Lubricating oil pressure............................................................................................. 38
5.2
Lubricating oil temperature ..................................................................................... 39
5.3
Speed measurement .................................................................................................. 40
6
Operation and service ......................................................................................... 45
6.1
Noise emission ............................................................................................................ 45
© Copyright 2022 ABB. All rights reserved.
HZTL4065_EN
Rev.E
March 2022
Advertisement
Chapters
Table of Contents

Related Manuals for ABB Power2 650-M


Summary of Contents for ABB Power2 650-M
-
Page 1: Table Of Contents
Operation Manual / Power2 650-M / Low-pressure stage Table of contents Power2 650-M / Low-pressure stage Introduction......................4 Purpose of the manual....................4 Contact information..................... 4 Essential information....................5 Power2 layout and function ..................7 Layout and function of the low-pressure stage ............. 8 Symbols, definitions.................... - Page 2 Operation Manual / Power2 650-M / Low-pressure stage Table of contents Service work ......................... 46 Expected replacement intervals ................48 Stopping the engine....................49 Periodic maintenance..................50 Foreword to maintenance..................50 Cleaning the compressor during operation ............51 Cleaning turbine and nozzle ring during operation ..........54 Cleaning the filter silencer ..................
- Page 3 Operation Manual / Power2 650-M / Low-pressure stage Table of contents Spare parts ......................97 13.1 Ordering spare parts....................97 13.2 Spare part – Illustrations ................... 99 Tools ........................111 Gas piping (option) .................... 112 15.1 Commissioning and operating ................112 15.2...
-
Page 4: Introduction
Operation Manual / Power2 650-M / Low-pressure stage 1 Introduction / 1.1 Purpose of the manual Introduction Purpose of the manual Operation Manual The Operation Manual explains the two-stage turbocharging (Power2) from Turbo Systems and contains instructions for safe operation. -
Page 5: Essential Information
Operation Manual / Power2 650-M / Low-pressure stage 1 Introduction / 1.3 Essential information Essential information Design variants This document is valid for different design variants of Power2 high-pressure stages. This may result in sections and descriptions of components that are not relevant for a specific Power2 high-pressure stage. - Page 6 Operation Manual / Power2 650-M / Low-pressure stage 1 Introduction / 1.3 Essential information © Copyright 2022 ABB. All rights reserved. HZTL4065_EN Rev.E March 2022...
-
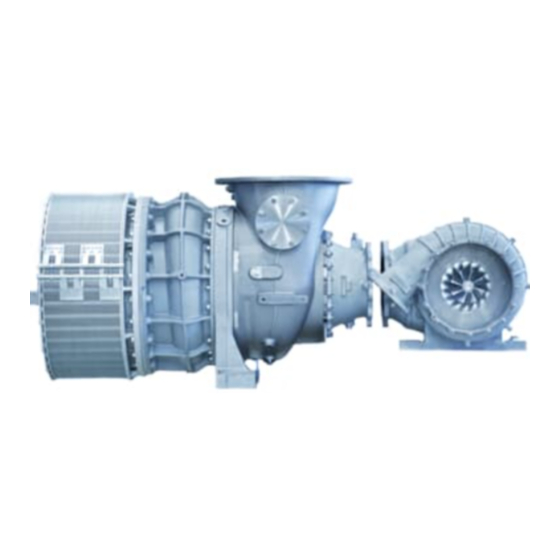
Page 7: Power2 Layout And Function
Operation Manual / Power2 650-M / Low-pressure stage 1 Introduction / 1.4 Power2 layout and function Power2 layout and function Fig. 1: Power2 with bellows layout and function Power2 Two-stage turbocharging HP compressor Power2 LP Low-pressure stage HP turbine Power2 HP High-pressure stage... -
Page 8: Layout And Function Of The Low-Pressure Stage
Operation Manual / Power2 650-M / Low-pressure stage 1 Introduction / 1.5 Layout and function of the low-pressure stage Layout and function of the low-pressure stage Fig. 2: Layout and function of the low-pressure stage 01 Air suction branch Radial plain bearing... -
Page 9: Fig. 3: Function Of The Low-Pressure Stage
Operation Manual / Power2 650-M / Low-pressure stage 1 Introduction / 1.5 Layout and function of the low-pressure stage Mode of operation of the low-pressure stage (Power2 LP) Fig. 3: Function of the low-pressure stage Power2 Two-stage turbocharging HP compressor Power2 LP... -
Page 10: Symbols, Definitions
Operation Manual / Power2 650-M / Low-pressure stage 1 Introduction / 1.6 Symbols, definitions Symbols, definitions Symbols The following symbols are used in this document: Indicates an action step. 1. Indicates a numbered action step. → Refers to a page number Definition of mandatory signs Mandatory signs show the protective equipment to be worn for a task. -
Page 11: Registered Trademarks
Operation Manual / Power2 650-M / Low-pressure stage 1 Introduction / 1.7 Registered trademarks Definition of pictograms The following pictograms can occur in this document. These point out actions that must be taken in accordance with the meaning of the relevant pictogram. -
Page 12: Storage Of New Low-Pressure And High-Pressure Stages
Operation Manual / Power2 650-M / Low-pressure stage 1 Introduction / 1.8 Storage of new low-pressure and high-pressure stages Storage of new low-pressure and high-pressure stages Storage for up to 6 months New low-pressure and high-pressure stages and spare parts from Turbo Systems can be stored in their closed packages for 6 months from the date of delivery without additional... -
Page 13: Fig. 5: Package With Hygrometer
Operation Manual / Power2 650-M / Low-pressure stage 1 Introduction / 1.8 Storage of new low-pressure and high-pressure stages Long-term storage of low-pressure and high-pressure stages The low-pressure and high-pressure stages will be prepared for long-term storage if reques- ted in the purchase order. The package is equipped with a hygrometer (see illustration). -
Page 14: Safety
Operation Manual / Power2 650-M / Low-pressure stage 2 Safety / 2.1 Introduction Safety Introduction The two-stage turbocharging system (Power2) manufactured by Turbo Systems is state of the art and complies with the respective health and safety standards in effect at the time the system was built. -
Page 15: Definition Of Mandatory Signs
Operation Manual / Power2 650-M / Low-pressure stage 2 Safety / 2.3 Definition of mandatory signs Definition of mandatory signs To be worn at all times Protective clothing Safety footwear to protect against mechanical hazard and risk of falling Table 2: Personal protective equipment to be worn at all times... -
Page 16: Intended Use
Operation Manual / Power2 650-M / Low-pressure stage 2 Safety / 2.5 Intended use Intended use Use on internal combustion engines Power2 from Turbo Systems is intended for charging internal combustion engines. To ensure compliance with the machinery directive 2006/42/EC when using on gas engines, the Power2 must be operated in an engine room classified as "not at risk of explosion". -
Page 17: Deflagration On Gas Engines
Operation Manual / Power2 650-M / Low-pressure stage 2 Safety / 2.6 Deflagration on gas engines Deflagration on gas engines Low-pressure stages from Turbo Systems can tolerate a deflagration with a transient pres- sure increase of 12 bar (guideline value). High-pressure stages from Turbo Systems can tolerate a deflagration with a transient pres- sure increase of 15 bar (guideline value). -
Page 18: Warning Plates On The Low-Pressure Stage
Operation Manual / Power2 650-M / Low-pressure stage 2 Safety / 2.7 Warning plates on the low-pressure stage Warning plates on the low-pressure stage Warning plates are affixed at the following locations: Fig. 6: Location of Power2 LP warning plates If warning plates are not present in the designated locations or not readable, proceed as fol- lows: Order new warning plates from Turbo Systems service stations. -
Page 19: Rating Plate Of The Low-Pressure Stage
Operation Manual / Power2 650-M / Low-pressure stage 2 Safety / 2.8 Rating plate of the low-pressure stage Rating plate of the low-pressure stage Fig. 7: Rating plate Operating limits Operating limits at engine overload (110%). In test rig operation only, unless otherwise agreed with the enginebuilder. -
Page 20: Periodic Check Of The Pressure Vessels
Operation Manual / Power2 650-M / Low-pressure stage 2 Safety / 2.9 Periodic check of the pressure vessels normally only apply when running at overload (110 %) during trials on the engine Mmax Mmax test bed. These limit values can also be permitted during operation for special applications. -
Page 21: Lifting Of Loads
Operation Manual / Power2 650-M / Low-pressure stage 2 Safety / 2.10 Lifting of loads 2.10 Lifting of loads WARNING Suspended loads Loads that are not attached according to regulations can cause injury to personnel or fatal accidents. Loads must always be fastened to properly functional lifting gear with a sufficient load limit. -
Page 22: Prerequisites For Operation And Maintenance
Operation Manual / Power2 650-M / Low-pressure stage 2 Safety / 2.11 Prerequisites for operation and maintenance 2.11 Prerequisites for operation and maintenance Responsibility of the operating company In awareness of its responsibility, the operating company must ensure that only authorised personnel work on the Power2, who: ¡... -
Page 23: Hazards During Operation And Maintenance
Operation Manual / Power2 650-M / Low-pressure stage 2 Safety / 2.12 Hazards during operation and maintenance 2.12 Hazards during operation and maintenance Noise hazards The turbocharger's noise emission is influenced by its installation and operating conditions. A noise level exceeding 85 dB(A) is harmful. - Page 24 Operation Manual / Power2 650-M / Low-pressure stage 2 Safety / 2.12 Hazards during operation and maintenance WARNING Hot surfaces on the non-insulated low-pressure and high-pressure stage Non-insulated low-pressure and high-pressure stages can cause serious in- juries to personnel (burns).
-
Page 25: Safe Operation
Operation Manual / Power2 650-M / Low-pressure stage 2 Safety / 2.13 Safe operation 2.13 Safe operation Mechanical hazards during operation During standard operation, no mechanical hazards are caused by the low-pressure and high- pressure stage, provided that it has been properly installed. -
Page 26: Safe Maintenance
Operation Manual / Power2 650-M / Low-pressure stage 2 Safety / 2.14 Safe maintenance 2.14 Safe maintenance Occupational safety WARNING Injuries to persons Severe injuries to personnel or fatal accidents can be caused by mechanical influences as a consequence of hazardous and inadequate operational pro- cedures or non-compliance with safety and health standards. - Page 27 Operation Manual / Power2 650-M / Low-pressure stage 2 Safety / 2.14 Safe maintenance Welding work Wear personal protective equipment (PPE) for welding operations. When performing welding work in the vicinity of the low-pressure stage, always cover the filter silencer to prevent the filter mat from being damaged.
- Page 28 Operation Manual / Power2 650-M / Low-pressure stage 2 Safety / 2.14 Safe maintenance Mechanical hazards when working on the low-pressure and high-pressure stage WARNING Physical hazards due to rotating parts The rotor can rotate due to the stack draught alone. Contact with rotating parts can cause severe injury.
- Page 29 Operation Manual / Power2 650-M / Low-pressure stage 2 Safety / 2.14 Safe maintenance CAUTION Environmental hazard Improper handling of operating materials and supplies can lead to environ- mental damage. Observe the information in the material safety data sheet for the operat- ing materials and supplies.
-
Page 30: Removal And Installation
Operation Manual / Power2 650-M / Low-pressure stage 3 Removal and installation / 3.1 Transport / weight Removal and installation Transport / weight Swivel lifting eyes to be used Two swivel lifting eyes (S) are required for the safe lifting of loads. These are not included in the Turbo Systems scope of delivery. -
Page 31: Removing The Low-Pressure Stage
Operation Manual / Power2 650-M / Low-pressure stage 3 Removal and installation / 3.2 Removing the low-pressure stage Removing the low-pressure stage WARNING Risk of tipping If the turbocharger is not sufficiently supported or not supported at all dur- ing removal and installation, it may tip over and cause severe injury to per- sonnel or accidents resulting in fatalities. -
Page 32: Installing The Low-Pressure Stage
Operation Manual / Power2 650-M / Low-pressure stage 3 Removal and installation / 3.3 Installing the low-pressure stage Installing the low-pressure stage Fig. 12: Suspension of complete low-pressure stage Attach one lifting gear to each of the two bearing casing suspension points. -
Page 33: Commissioning
Operation Manual / Power2 650-M / Low-pressure stage 4 Commissioning / 4.1 Oil supply Commissioning Oil supply 4.1.1 Introduction In all operating states, a functioning and carefully executed oil supply is an important pre- requisite for trouble-free operation of the low-pressure and high-pressure stage. -
Page 34: Table 11: Filter Mesh Width
Operation Manual / Power2 650-M / Low-pressure stage 4 Commissioning / 4.1 Oil supply 4.1.4 Long-term lubrication Long-term lubrication occurs if the times specified for the pre- or post-lubrication are ex- ceeded with the engine at a standstill. Adhere to the admissible oil pressure range (see Table 12: Oil pressure range... -
Page 35: Inspection Procedures
Operation Manual / Power2 650-M / Low-pressure stage 4 Commissioning / 4.2 Inspection procedures Inspection procedures 4.2.1 Introduction Inspection procedures include preventative visual controls, monitoring and measuring work before and during commissioning. Inspection procedures enable changes to the low and high-pressure stage to be detected. - Page 36 Operation Manual / Power2 650-M / Low-pressure stage 4 Commissioning / 4.2 Inspection procedures 4.2.3 Checks after commissioning (engine in idle mode) Lubricating system Check the oil pressure in the oil supply pipes. Check oil inlet temperature. The admissible values are specified in chapter Monitoring during operation →38.
-
Page 37: Commissioning After Taking Out Of Operation
Operation Manual / Power2 650-M / Low-pressure stage 4 Commissioning / 4.3 Commissioning after taking out of operation Commissioning after taking out of operation If present Remove cover plates (blind flanges) from the compressor casing, the gas inlet and the gas outlet. -
Page 38: Monitoring During Operation
Operation Manual / Power2 650-M / Low-pressure stage 5 Monitoring during operation / 5.1 Lubricating oil pressure Monitoring during operation Lubricating oil pressure CAUTION Assuring lubricating oil pressure Serious damage to the engine or property can result from a missing or insuf- ficient lubricating oil supply. -
Page 39: Lubricating Oil Temperature
Operation Manual / Power2 650-M / Low-pressure stage 5 Monitoring during operation / 5.2 Lubricating oil temperature Power2 Status Status Oil pressure at measur- ing point M Engine Low-pressure and high-pressure stage [bar] oil, in Engine Admissible 1.3 ... 2.5 2.0 …... -
Page 40: Speed Measurement
Operation Manual / Power2 650-M / Low-pressure stage 5 Monitoring during operation / 5.3 Speed measurement Speed measurement 5.3.1 Introduction Speed measurement systems enable the constant monitoring of the speeds of the low-pres- sure and the high-pressure stage. 5.3.2 Low-pressure stage 5.3.2.1... -
Page 41: Fig. 14: Dimension X
Operation Manual / Power2 650-M / Low-pressure stage 5 Monitoring during operation / 5.3 Speed measurement 5.3.2.2 Replacing the speed measurement system WARNING Hot cable connector and hot speed sensor Danger of burns. The cable connector and speed sensor can reach temperat- ures in excess of 100 °C during operation. -
Page 42: Fig. 15: Removing The Speed Measurement System
Operation Manual / Power2 650-M / Low-pressure stage 5 Monitoring during operation / 5.3 Speed measurement Fig. 15: Removing the speed measurement system Installing the speed measurement system Fig. 16: Setting dimension X 1. Set speed sensor (86505) in the plate (86507) to dimension X. -
Page 43: Fig. 17: Control Dimension S
Operation Manual / Power2 650-M / Low-pressure stage 5 Monitoring during operation / 5.3 Speed measurement Fig. 17: Control dimension S 3. Secure plate with wedge lock washer (86508) and socket screw (86510). Observe tighten- ing torque. 4. Adjust dimension X until S = 0 mm is reached. - Page 44 Operation Manual / Power2 650-M / Low-pressure stage 5 Monitoring during operation / 5.3 Speed measurement 5.3.3 Differences in speed between the low-pressure or high- pressure stages The speeds of the low-pressure stages differ significantly from the speeds of the high-pres- sure stages.
-
Page 45: Operation And Service
Operation Manual / Power2 650-M / Low-pressure stage 6 Operation and service / 6.1 Noise emission Operation and service Noise emission WARNING Noise hazards Exposure to noise can harm the hearing system, impair health and the psy- chological state and may lead to lack of attention and irritation. -
Page 46: Service Work
Operation Manual / Power2 650-M / Low-pressure stage 6 Operation and service / 6.2 Service work Service work Service work includes visual controls, monitoring, measuring and inspection as well as func- tional checks. Service work enables the detection and rectification of changes to the low and high-pressure stage and ensures full operability of the low and high-pressure stage. - Page 47 Operation Manual / Power2 650-M / Low-pressure stage 6 Operation and service / 6.2 Service work 6.2.4 Service work every 12000 ... 16000 hours of operation The rotor and bearing parts must be checked and assessed by a Turbo Systems service sta- tion.
-
Page 48: Expected Replacement Intervals
Operation Manual / Power2 650-M / Low-pressure stage 6 Operation and service / 6.3 Expected replacement intervals Expected replacement intervals Rotating components The recommended replacement intervals of the compressor and turbine wheels are spe- cified with the aid of the safety concept for rotating parts (SIKO) and dependent on the op- erating conditions. -
Page 49: Stopping The Engine
Operation Manual / Power2 650-M / Low-pressure stage 6 Operation and service / 6.4 Stopping the engine Stopping the engine CAUTION Residual heat in the low-pressure and high-pressure stage If the residual heat in the low-pressure and high-pressure stage is not suffi- ciently dissipated by the circulating lubricating oil, machine damage could occur. -
Page 50: Periodic Maintenance
Operation Manual / Power2 650-M / Low-pressure stage 7 Periodic maintenance / 7.1 Foreword to maintenance Periodic maintenance Foreword to maintenance Maintenance work includes regular visual controls and cleaning operations which are inten- ded to ensure the trouble-free functioning of the low-pressure and high-pressure stage. -
Page 51: Cleaning The Compressor During Operation
Operation Manual / Power2 650-M / Low-pressure stage 7 Periodic maintenance / 7.2 Cleaning the compressor during operation Cleaning the compressor during operation 7.2.1 Introduction Approval by enginebuilder The following instructions for wet cleaning only apply to cleaning with pure water and under the precondition that the enginebuilder approves the process. - Page 52 Operation Manual / Power2 650-M / Low-pressure stage 7 Periodic maintenance / 7.2 Cleaning the compressor during operation 7.2.2 Principle of wet cleaning Principle of wet cleaning To clean the compressor stage during operation, water is injected before the compressor wheel.
-
Page 53: Table 16: Cleaning Parameters Power2 Lp
Operation Manual / Power2 650-M / Low-pressure stage 7 Periodic maintenance / 7.2 Cleaning the compressor during operation 7.2.3 Wet cleaning with direct water supply Prerequisites Do not clean the compressors of the different high and low-pressure stages at the same time, but one after the other. -
Page 54: Cleaning Turbine And Nozzle Ring During Operation
Operation Manual / Power2 650-M / Low-pressure stage 7 Periodic maintenance / 7.3 Cleaning turbine and nozzle ring during operation Cleaning turbine and nozzle ring during operation Power2 650-M is carried out without turbine cleaning function. Cleaning the filter silencer 7.4.1 Variant: Filter silencer with connecting rod Fig. 18: Cleaning the filter silencer... - Page 55 Operation Manual / Power2 650-M / Low-pressure stage 7 Periodic maintenance / 7.4 Cleaning the filter silencer (see Fig. 18: Cleaning the filter silencer →54) Dismantling and cleaning the cover grid (81266) Loosen and remove lock nuts (81273). Loosen and remove screws (81272) to the connecting rods (81269).
-
Page 56: Fig. 19: Cleaning The Filter Silencer (2)
Operation Manual / Power2 650-M / Low-pressure stage 7 Periodic maintenance / 7.4 Cleaning the filter silencer CAUTION Penetration of dirt and foreign particles Any penetration of dirt and foreign particles into the compressor can dam- age it. Fit the connecting rods (81269) correctly in the slots on the filter silencer body (81135). -
Page 57: Fig. 20: Cleaning The Filter Silencer
Operation Manual / Power2 650-M / Low-pressure stage 7 Periodic maintenance / 7.4 Cleaning the filter silencer 7.4.2 Variant: Filter silencer with tension band Fig. 20: Cleaning the filter silencer 81135 Filter silencer body 81266 Cover grid 81136 Absorption segment 81270... - Page 58 Operation Manual / Power2 650-M / Low-pressure stage 7 Periodic maintenance / 7.4 Cleaning the filter silencer (see Fig. 20: Cleaning the filter silencer →57) Dismantling and cleaning the cover grid (81266) Loosen the tension bands (81270). Remove and clean cover grid (81266).
-
Page 59: Troubleshooting
Operation Manual / Power2 650-M / Low-pressure stage 8 Troubleshooting / 8.1 Malfunctions when starting Troubleshooting Malfunctions when starting Delayed start-up Possible causes Remedy Low-pressure Pressure stage contaminated Clean Bearing damaged Contact a Turbo Systems service sta- high-pressure tion Rotor rubbing... -
Page 60: Malfunctions During Operation
Operation Manual / Power2 650-M / Low-pressure stage 8 Troubleshooting / 8.2 Malfunctions during operation Malfunctions during operation Lubricating oil pressure too low Possible causes Remedy Engine Oil filter heavily contaminated Clean Oil pump in lubricating system de- Check/replace fective... -
Page 61: Table 27: Malfunctions During Operation - Power2 Hp Speed Increases
Operation Manual / Power2 650-M / Low-pressure stage 8 Troubleshooting / 8.2 Malfunctions during operation Increase in high-pressure stage speed Possible causes Remedy High-pressure Heavy contamination of the nozzle Contact a Turbo Systems service sta- stage ring tion Low-pressure stage defective... -
Page 62: Table 29: Malfunctions During Operation - Charge Air Pressure Too Low
Operation Manual / Power2 650-M / Low-pressure stage 8 Troubleshooting / 8.2 Malfunctions during operation Charge air pressure too low Engine performance and engine speed unchanged, suction condition normal Possible causes Remedy Engine Air receiver not sealed Repair Gas piping between engine and tur-... -
Page 63: Table 31: Malfunctions During Operation - Compressor 1 Contamination
Operation Manual / Power2 650-M / Low-pressure stage 8 Troubleshooting / 8.2 Malfunctions during operation Contamination of the compressor Reduced compressor performance/efficiency and therefore engine performance losses Possible causes Remedy Low-pressure Heavy contamination of the com- Clean the compressor pressor components due to the in-... -
Page 64: Surging Of The Low-Pressure Or High-Pressure Stage
Operation Manual / Power2 650-M / Low-pressure stage 8 Troubleshooting / 8.3 Surging of the low-pressure or high-pressure stage Surging of the low-pressure or high-pressure stage Possible causes Remedy Low-pressure Filter silencer or diffuser contamin- Clean ated high-pressure stage Charge air... -
Page 65: Malfunctions When Stopping
Operation Manual / Power2 650-M / Low-pressure stage 8 Troubleshooting / 8.4 Malfunctions when stopping Malfunctions when stopping Runout noises Possible causes Remedy Low-pressure Pressure stage contaminated Clean Bearing damaged Contact a Turbo Systems service sta- high-pressure tion Rotor rubbing... -
Page 66: Disassembly And Assembly
Operation Manual / Power2 650-M / Low-pressure stage 9 Disassembly and assembly / 9.1 Introduction Disassembly and assembly Introduction WARNING Non-observance of the work steps and further work Incorrectly performed work or further work can cause injury to personnel or damage to the machine. -
Page 67: Material Required
Operation Manual / Power2 650-M / Low-pressure stage 9 Disassembly and assembly / 9.2 Material required Material required Customer spare part set Before starting work, make sure the required customer spare part set is available (see chapter Spare parts →97). -
Page 68: Weights Of Assemblies
Operation Manual / Power2 650-M / Low-pressure stage 9 Disassembly and assembly / 9.3 Weights of assemblies Weights of assemblies The specified weights of the individual parts or assemblies are rounded-up standard values. Fig. 21: Overview of assemblies Designation Weight [kg]... -
Page 69: Removing The Filter Silencer And Injection Ring
Operation Manual / Power2 650-M / Low-pressure stage 9 Disassembly and assembly / 9.4 Removing the filter silencer and in- jection ring Removing the filter silencer and injection ring Dismantle insulation as far as necessary. If present: Disconnect supply line for compressor cleaning from filter silencer. -
Page 70: Removing The Air Suction Branch And Injection Ring
Operation Manual / Power2 650-M / Low-pressure stage 9 Disassembly and assembly / 9.5 Removing the air suction branch and injection ring Removing the air suction branch and injection ring Disconnect the air line in accordance with the enginebuilder's instructions. -
Page 71: Axial Clearance A Prior To Disassembly
Operation Manual / Power2 650-M / Low-pressure stage 9 Disassembly and assembly / 9.6 Axial clearance A prior to disas- sembly Axial clearance A prior to disassembly CAUTION Clearances outside the tolerance Serious damage to engines or property can be caused by clearances outside the tolerance and excessively worn parts. -
Page 72: Removing The Wall Insert
Operation Manual / Power2 650-M / Low-pressure stage 9 Disassembly and assembly / 9.7 Removing the wall insert Removing the wall insert CAUTION Clearance between compressor wheel and wall insert Serious damage to machinery or property can result from rubbing or jam- ming of the compressor wheel at the wall insert. -
Page 73: Fig. 26: Removing Wall Insert 2
Operation Manual / Power2 650-M / Low-pressure stage 9 Disassembly and assembly / 9.7 Removing the wall insert Fig. 26: Removing wall insert 2 4. Unplug cable connector (86515) and fix speed measurement cable in wall insert. 5. Fit bracket (90030) with screws (90955) and nuts (90415). -
Page 74: Removing The Compressor Casing
Operation Manual / Power2 650-M / Low-pressure stage 9 Disassembly and assembly / 9.8 Removing the compressor casing Removing the compressor casing Fig. 28: Removing the compressor casing 1 1. Loosen two studs (72002) and screw (72021) in the upper area. 2. Fit bracket (90030) with four screws (90959). -
Page 75: Removing The Cartridge Group
Operation Manual / Power2 650-M / Low-pressure stage 9 Disassembly and assembly / 9.9 Removing the cartridge group Removing the cartridge group CAUTION Clearance between blade tip and casing Serious damage to machinery or property can result from the rubbing or jamming of the blade tips on the casing. -
Page 76: Fig. 31: Moving Out Cartridge Group 2
Operation Manual / Power2 650-M / Low-pressure stage 9 Disassembly and assembly / 9.9 Removing the cartridge group Fig. 31: Moving out cartridge group 2 7. Carefully move out cartridge group. 8. Put cartridge group into the fixtures in the turned-over toolbox cover. -
Page 77: Removing Turbine Diffuser And Nozzle Ring
Operation Manual / Power2 650-M / Low-pressure stage 9 Disassembly and assembly / 9.10 Removing turbine diffuser and nozzle ring 9.10 Removing turbine diffuser and nozzle ring Fig. 33: Removing turbine diffuser and nozzle ring 1 1. Loosen and remove the screws (61056). -
Page 78: Fig. 35: Removing Turbine Diffuser And Nozzle Ring 3
Operation Manual / Power2 650-M / Low-pressure stage 9 Disassembly and assembly / 9.10 Removing turbine diffuser and nozzle ring Fig. 35: Removing turbine diffuser and nozzle ring 3 7. Insert bracket with guide tube into connecting flange. 8. Secure guide tube with bolt (90033). -
Page 79: Installing Turbine Diffuser And Nozzle Ring
Operation Manual / Power2 650-M / Low-pressure stage 9 Disassembly and assembly / 9.11 Installing turbine diffuser and nozzle ring 9.11 Installing turbine diffuser and nozzle ring Fig. 37: Installing the nozzle ring and turbine diffuser 1 Part number Thread and tightening torque... -
Page 80: Fig. 38: Installing The Nozzle Ring And Turbine Dif
Operation Manual / Power2 650-M / Low-pressure stage 9 Disassembly and assembly / 9.11 Installing turbine diffuser and nozzle ring Fig. 38: Installing the nozzle ring and turbine diffuser 2 Part number Thread and tightening torque 61056 M10x90 50 Nm Table 40: Tightening torque (61056) 1. -
Page 81: Installing The Cartridge Group
Operation Manual / Power2 650-M / Low-pressure stage 9 Disassembly and assembly / 9.12 Installing the cartridge group 9.12 Installing the cartridge group CAUTION Clearance between blade tip and casing Serious damage to machinery or property can result from the rubbing or jamming of the blade tips on the casing. -
Page 82: Fig. 41: Inserting The Cartridge Group
Operation Manual / Power2 650-M / Low-pressure stage 9 Disassembly and assembly / 9.12 Installing the cartridge group Fig. 41: Inserting the cartridge group Part number Thread and tightening torque 42087 M12x60 80 Nm Table 41: Tightening torque (42087) 1. Screw in a guide stud (90321) in the upper area on the left and right. -
Page 83: Fig. 42: Measuring Control Dimension X
Operation Manual / Power2 650-M / Low-pressure stage 9 Disassembly and assembly / 9.12 Installing the cartridge group Control dimension after installing cartridge group CAUTION Control dimension outside the tolerance value If the control dimension is out of tolerance, the cartridge group has not been correctly installed and can be the cause of serious damage to the ma- chine or property. -
Page 84: Installing The Compressor Casing
Operation Manual / Power2 650-M / Low-pressure stage 9 Disassembly and assembly / 9.13 Installing the compressor casing 9.13 Installing the compressor casing Fig. 43: Installing the compressor casing Part number Thread and tightening torque 61037 250 Nm 61037 (nuts that are difficult to access) Pre-tightening torque 60 Nm Tightening angle 90°... -
Page 85: Installing The Wall Insert
Operation Manual / Power2 650-M / Low-pressure stage 9 Disassembly and assembly / 9.14 Installing the wall insert 9.14 Installing the wall insert CAUTION Clearance between compressor wheel and wall insert Serious damage to machinery or property can result from rubbing or jam- ming of the compressor wheel at the wall insert. -
Page 86: Fig. 45: Installing The Wall Insert 2
Operation Manual / Power2 650-M / Low-pressure stage 9 Disassembly and assembly / 9.14 Installing the wall insert Fig. 45: Installing the wall insert 2 Part number Tightening torque 72002 M16x334 50 Nm Table 45: Tightening torque (72002) 1. Remove plate (90032), screw (90656), nut (90432) and plates (90031). -
Page 87: Axial Clearance A After Assembly
Operation Manual / Power2 650-M / Low-pressure stage 9 Disassembly and assembly / 9.15 Axial clearance A after assembly 9.15 Axial clearance A after assembly CAUTION Clearances outside the tolerance Serious damage to engines or property can be caused by clearances outside the tolerance and excessively worn parts. -
Page 88: Installing The Air Suction Branch And Injection Ring
Operation Manual / Power2 650-M / Low-pressure stage 9 Disassembly and assembly / 9.16 Installing the air suction branch and injection ring 9.16 Installing the air suction branch and injection ring Fig. 47: Installing the air suction branch Part number Thread and tightening torque... -
Page 89: Installing The Filter Silencer And Injection Ring
Operation Manual / Power2 650-M / Low-pressure stage 9 Disassembly and assembly / 9.17 Installing the filter silencer and in- jection ring 9.17 Installing the filter silencer and injection ring Fig. 48: Installing the injection ring and filter silencer Part number... -
Page 90: Table Of Tightening Torques
Operation Manual / Power2 650-M / Low-pressure stage 9 Disassembly and assembly / 9.18 Table of tightening torques 9.18 Table of tightening torques Fig. 49: Overview of tightening torques The following tightening torques [Nm] must be observed for the designated bolted connec-... -
Page 91: Taking Out Of Operation At Short Notice
Operation Manual / Power2 650-M / Low-pressure stage 10 Taking out of operation at short notice / 10.1 Possible emergency re- pairs Taking out of operation at short notice 10.1 Possible emergency repairs WARNING Danger of fire and explosion due to lubricating oil leaks Leaking oil may ignite on hot surfaces. -
Page 92: Fig. 50: Cover Plate / Gasket, Sleeves And Screws
Operation Manual / Power2 650-M / Low-pressure stage 10 Taking out of operation at short notice / 10.1 Possible emergency re- pairs 10.1.1 Manufacturing the cover plate The cover plate and the other parts that are required are not part of the scope of delivery of... -
Page 93: Fig. 51: Fitting The Cover Plate
Operation Manual / Power2 650-M / Low-pressure stage 10 Taking out of operation at short notice / 10.1 Possible emergency re- pairs 10.1.2 Fitting the cover plate Fig. 51: Fitting the cover plate Part number Thread and tightening torque 42087 M12x60 80 Nm Table 51: Tightening torque (42087) -
Page 94: Taking Out Of Operation For A Long Period
Operation Manual / Power2 650-M / Low-pressure stage 11 Taking out of operation for a long period / 11.1 General Taking out of operation for a long period 11.1 General When taking the low-pressure and high-pressure stage out of operation, mothballing meas- ures must be taken in order to minimise the risk of corrosion on components. -
Page 95: Material And Disposal
Operation Manual / Power2 650-M / Low-pressure stage 12 Material and Disposal / 12.1 REACH and RoHS Compliance Declara- tion For Products Material and Disposal 12.1 REACH and RoHS Compliance Declaration For Products Turbo Systems hereby confirms that all genuine products, parts and components supplied... -
Page 96: Disposing Of Low-Pressure And High-Pressure Stage Components
Operation Manual / Power2 650-M / Low-pressure stage 12 Material and Disposal / 12.2 Disposing of low-pressure and high- pressure stage components 12.2 Disposing of low-pressure and high-pressure stage components Disposal must be environmentally compatible, professional, and in compliance with locally applicable regulations. -
Page 97: Spare Parts
Operation Manual / Power2 650-M / Low-pressure stage 13 Spare parts / 13.1 Ordering spare parts Spare parts 13.1 Ordering spare parts CAUTION Spare part storage All spare parts that were ordered together with the low-pressure and/or high-pressure stage must be kept intact and ready for use. -
Page 98: Table 52: Customer Spare Part Set (97070)
Operation Manual / Power2 650-M / Low-pressure stage 13 Spare parts / 13.1 Ordering spare parts Required customer spare part set (97070) For the work described in the Operation Manual, the customer spare part set (97070) is re- quired. These parts are only available in the complete set. -
Page 99: Spare Part - Illustrations
Operation Manual / Power2 650-M / Low-pressure stage 13 Spare parts / 13.2 Spare part – Illustrations 13.2 Spare part – Illustrations The spare parts lists shown below are only available in English. Rotor and Bearing parts 21000 21011 21002*... -
Page 100: Table 54
Operation Manual / Power2 650-M / Low-pressure stage 13 Spare parts / 13.2 Spare part – Illustrations Cartridge 42099 10900 42012* 42043 42049 * = Available within the spare part set HZTL443549 Mod. A Part no. Designation 42012* O-ring 42043... -
Page 101: Table 55
Operation Manual / Power2 650-M / Low-pressure stage 13 Spare parts / 13.2 Spare part – Illustrations Bearing casing 42039* 42015 42011* 42400 42087* 42405* 42300 42008* 42001 42017* 42018* 42700 42305* 42306* * = Available within the spare part set HZTL443399 Mod. -
Page 102: Table 56
Operation Manual / Power2 650-M / Low-pressure stage 13 Spare parts / 13.2 Spare part – Illustrations Gas inlet casing axial 51256 51259 51258 51230 51229 52208 56018* 51074 56017* 51169 56001 51001 * = Available within the spare part set HZTL443405 Mod. -
Page 103: Table 57
Operation Manual / Power2 650-M / Low-pressure stage 13 Spare parts / 13.2 Spare part – Illustrations Gas inlet casing radial 51259 51256 51230 51258 51229 52208 51001 51169 56017* 51074 56018* 56001 * = Available within the spare part set HZTL443400 Mod. -
Page 104: Table 58
Operation Manual / Power2 650-M / Low-pressure stage 13 Spare parts / 13.2 Spare part – Illustrations Gas outlet casing 61050 61009 61001 61042 61052 68002 61035 61036 61037* 61039 61038 61011 61012 61056* 61073 63000 * = Available within the spare part set HZTL443401 Mod. -
Page 105: Table 59
Operation Manual / Power2 650-M / Low-pressure stage 13 Spare parts / 13.2 Spare part – Illustrations Injection ring 73000 73000 HZTL443459 Mod. A Part no. Designation 73000 Injection ring (Blowby ring) Table 59 © Copyright 2022 ABB. All rights reserved. -
Page 106: Table 60
Operation Manual / Power2 650-M / Low-pressure stage 13 Spare parts / 13.2 Spare part – Illustrations Compressor casing 72000 72021 77002 79020* 79021* 79000 77040* 77000 77023 77022* 77016* 72005 72006 86505 72003* 86507 72004* 86508 86510 86509 86516... -
Page 107: Table 61
Operation Manual / Power2 650-M / Low-pressure stage 13 Spare parts / 13.2 Spare part – Illustrations Air suction branch axial 82170 82171 82004 82005(p) 82006(p) 82140 82000 82008(p) 82007(p) (p) = pre-assembled HZTL443458 Mod. A Part no. Designation 82000... -
Page 108: Table 62
Operation Manual / Power2 650-M / Low-pressure stage 13 Spare parts / 13.2 Spare part – Illustrations Air suction branch radial 82170 82171 82004 82005(p) 82007(p) 82006(p) 82008(p) 82140 82000 (p) = pre-assembled HZTL443404 Mod. A Part no. Designation 82000... -
Page 109: Table 63
Operation Manual / Power2 650-M / Low-pressure stage 13 Spare parts / 13.2 Spare part – Illustrations Filter silencer, connecting rods 81170 81171 81005(p) 81005(p) 81004 81006(p) 81006(p) 81140 81266 81272 81269 81273 81137 81135 81008 81007 81136 81000 (p) = pre-assembled HZTL443403 Mod. -
Page 110: Table 64
Operation Manual / Power2 650-M / Low-pressure stage 13 Spare parts / 13.2 Spare part – Illustrations Filter silencer, tension band 81170 81265** 81171 81005(p) 81005(p) 81004 81006(p) 81006(p) 81140 81266 81270 81271 81137 81135 81008 81007 81136 81000 (p) = pre-assembled ** = if provided HZTL443469 Mod. -
Page 111: Tools
Operation Manual / Power2 650-M / Low-pressure stage 14 Tools / Tools For the work described in the Operation Manual, the customer tool set 90000 is required. Part number Designation Quantity 90010 Wooden crate 90030 Bracket 90031 Plate 90032... -
Page 112: Gas Piping (Option)
Discolourations on the insulation, the smell of exhaust gas and unusual noises (whistling, hissing) can indicate small leaks. If such new and unusual signs are found, their cause must be determined. Noise emission See main chapter 4 (Operation Manual / Power2 650-M / Product description) Expected replacement interval Product Replacement interval [h]... -
Page 113: Removal And Installation
Operation Manual / Power2 650-M / Low-pressure stage 15 Gas piping (option) / 15.3 Removal and installation Perform a visual inspection of the sealing points (flange connection to the gas inlet cas- ing and gas outlet casing). Always replace bellows with damaged sealing locations with a new bellows. -
Page 114: Fig. 54: Installing Gas Piping
Operation Manual / Power2 650-M / Low-pressure stage 15 Gas piping (option) / 15.3 Removal and installation 15.3.3 Installing gas piping WARNING Gas leakage Gaskets that were installed incorrectly or are defective can lead to gas leaks. Dispose of used or defective gaskets. -
Page 115: Storage And Disposal
They must be stored in such a way that mechanical damage to the parts can be excluded. See also main chapter 4 (Operation Manual / Power2 650-M / Product description) Disposing of gas piping components See main chapter 4 (Operation Manual / Power2 650-M / Product description) 15.5... -
Page 116: Fig. 55: Gas Piping With Part Numbers (Gej920 / Power2 650)
Operation Manual / Power2 650-M / Low-pressure stage 15 Gas piping (option) / 15.5 Spare parts CAUTION Spare part storage All spare parts that were ordered together with the low-pressure and/or high-pressure stage must be kept intact and ready for use. -
Page 117: Figures
Operation Manual / Power2 650-M / Low-pressure stage Figures Figures Fig. 1: Power2 with bellows layout and function..7 Fig. 31: Moving out cartridge group 2......76 Fig. 2: Layout and function of the low-pressure Fig. 32: Putting down cartridge group onto cover . 76 stage ................. -
Page 118: Tables
Operation Manual / Power2 650-M / Low-pressure stage Tables Tables Table 1: Definition of pictograms ......11 Table 29: Malfunctions during operation – Charge air pressure too low ............62 Table 2: Personal protective equipment to be worn at all times ..............15 Table 30: Malfunctions during operation –... - Page 119 Operation Manual / Power2 650-M / Low-pressure stage Tables Table 58 ................ 104 Table 59 ................ 105 Table 60................ 106 Table 61 ................. 107 Table 62 ................ 108 Table 63 ................ 109 Table 64................. 110 Table 65: Customer tool set 90000......111 Table 66: Expected replacement interval ....112 Table 67: Maintenance interval .........
Need help?
Do you have a question about the Power2 650-M and is the answer not in the manual?
Questions and answers