
Subscribe to Our Youtube Channel
Related Manuals for Ivoclar Vivadent Odyssey Navigator

Summary of Contents for Ivoclar Vivadent Odyssey Navigator
- Page 1 P A R T N E R I N G I N E S T H E T I C D I G I T A L D E N T I S T R Y All manuals and user guides at all-guides.com ®...
-
Page 2: Table Of Contents
3.2.6 High Speed Vacuum Systems .....................19 3.2.7 Access and Visual ........................19 3.2.8 Odyssey Navigator Diode Laser Frequency .................20 T h e L e a d e r i n D i o d e L a s e r s . - Page 3 5.4.8 Select Your Power ........................26 5.4.9 Selecting Programs ........................26 5.4.10 Aiming Beam ..........................26 5.4.11 Tips............................26 5.4.12 Procedure ..........................26 5.4.13 Odyssey Navigator Self Diagnostic and Monitoring..............27 ® Navigator 3 W AT T D I O D E L A S E R...
- Page 4 8.2 Repairs & Returns to Ivoclar Vivadent, Inc........
-
Page 5: Introduction
Any of these items can be used to shut down the laser. The design and technology used in the ODYSSEY NAVIGATOR allows the dentist or hygienist* to transport the laser between different operatories. -
Page 6: Specifications
All manuals and user guides at all-guides.com Section 2 SPECIFICATIONS 2.0 SPECIFICATIONS Weight: 2.5 lbs Dimension in inches (H X W X L): While in cradle - 9 1/2” X 4” X 6” Out of cradle – 7” x 4” x 3” Laser Classification (Per 60825): Laser Diode Class 4 Laser Device Wavelength:... -
Page 7: Warranty (Also See Section 8)
All manuals and user guides at all-guides.com Section 2 SPECIFICATIONS 2.2 WARRANTY (ALSO SEE SECTION 8) Laser: 2 years Parts and Labor Rechargeable lithium polymer battery: 1 year Handpiece assembly: 6 months 2.3 PARTS LIST (1) Laser Unit (1) Fiber Cleaver (3) Protective Glasses (1) Package of (50) Unit dose fiber Handpiece Tips –... -
Page 8: Laser Assembly Instructions
3.0.1 Unpacking the Laser & Dealer Assistance Your local authorized Ivoclar Vivadent dealer can provide a representative to assist you when you are ready to remove the laser from its shipping container. Do not attempt to unpack the laser and install the various components without reading this section first. -
Page 9: Wireless Foot Pedal Installation Procedure
All manuals and user guides at all-guides.com Section 3 LASER ASSEMBLY INSTRUCTIONS Each of the following items should be inspected, inserted into the appropriate receptacle, and when applicable, locked or snapped into place. 3.1.1 Wireless Foot Pedal Installation Procedure 1. Make sure the laser is 8. -
Page 10: Power Cord Installation
LASER ASSEMBLY INSTRUCTIONS 3.1.2 Power Cord Installation Remove the power cord from the Odyssey Navigator package and plug the power cord into the appropriate receptacle on the back of the laser cradle. See Fig 3.1.2 Plug the power cord into a 110 Volt AC outlet rated at 60Hz. -
Page 11: Installing The Handpiece Cable To The Laser
3.1.4 Connection of Handpiece Assembly to the Laser 1. The handpiece assembly is already installed when you receive your new Odyssey Navigator Diode Laser. Please leave the handpiece assembly connected to the laser unit unless you have to switch handpiece assemblies or if you have to ship the laser for technical reasons. -
Page 12: Inserting The Unit-Dose Laser Tip Into The Handpiece
All manuals and user guides at all-guides.com Section 3 LASER ASSEMBLY INSTRUCTIONS 3.1.5 Inserting the unit dose fiber tip into the handpiece Remove a unit dose fiber tip from its package, remove the plastic protective cap, and snap it into the handpiece. -
Page 13: Placing The Laser Unit In The Docking Cradle
5 hours. 3.1.7 Odyssey Navigator Remote Interlock The Odyssey Navigator Laser is equipped with a Remote Interlock Jack. The Remote Interlock Jack is provided so that a clinician may install the laser in a dedicated laser treatment room such that the laser will be interlocked with the entrance door of the room. -
Page 14: Emergency Shutdown Switch
All manuals and user guides at all-guides.com Section 3 LASER ASSEMBLY INSTRUCTIONS 3.1.8 Emergency Shutdown Switch Before you activate the laser, make sure the red Laser Stop button is in the depressed position. The laser will activate only with the button in the depressed position. -
Page 15: Installation Test
3.1.11 Installation Test 1. After login, from the Main Menu, touch the “Quick Set Up” Button 2. The Odyssey Navigator is pre-set to “Continuous Wave” (CW) 3. Power setting is pre-set to 1.0W 4. Hold the fiber approximately 2-4 mm away from a piece of articulating paper. -
Page 16: Touch Screen Menu
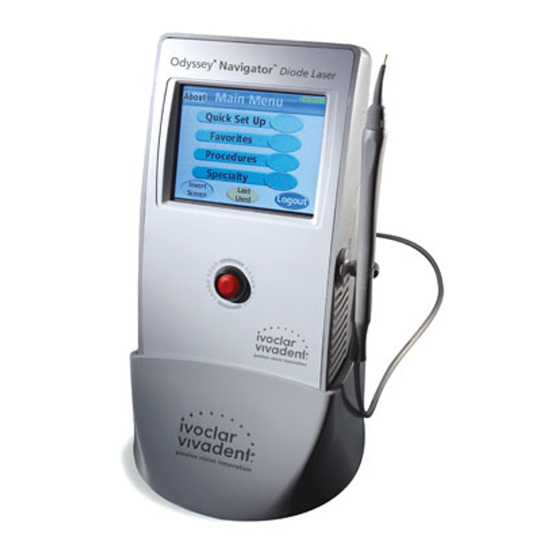
All manuals and user guides at all-guides.com Section 3 LASER ASSEMBLY INSTRUCTIONS 3.1.13 Touch Screen Menu The Main Menu screen gives you the choice to use a ”Quick Set Up” (Fig 3.1.13a) - with settings you designate for each procedure–or you may select a pre-set program sorted in alphabeti- cal order under the “Procedures”, or under the “Specialty”... - Page 17 LASER ASSEMBLY INSTRUCTIONS Aiming Beam The Odyssey Navigator diode laser is actually two lasers in one, the infrared 810 nm wavelength laser which performs the actual treatment of the soft tissue, the “working beam” and the 650 nm “laser pointer” which illuminates the focal point of the “working beam”...
-
Page 18: Preset Programs
Section 3 LASER ASSEMBLY INSTRUCTIONS 3.1.14 Preset Programs The Odyssey Navigator comes with procedure specific settings installed. The Procedures are accessed from the Main Menu by depressing “Procedures.” Procedures may also be accessed through the “Specialty” category. By accessing in this way, the procedures are sorted according to speciality, Fig. -
Page 19: Evaluating The Facility And Environmental Considerations
All manuals and user guides at all-guides.com Section 3 LASER ASSEMBLY INSTRUCTIONS 3.2 EVALUATING THE FACILITY AND ENVIRONMENTAL CONSIDERATIONS In order to insure the safe use of the laser in your facility, please check to make sure that the proposed location has the following: 3.2.1 Power Requirements 110 - 240 V AC ±10 % at 50 - 60 Hz 3 Amps... -
Page 20: Odyssey Navigator Diode Laser Frequency
(2.4GHz frequency), it would immediately be ignored in the same way. In summary, the wireless receivers in the Odyssey Navigator diode laser have less than 2% of the output power of typical Bluetooth or Wi-Fi devices, and therefore have no significant potential as an interference source. Odyssey Navigator wireless receiver modulation is incompatible with Wi-Fi or Bluetooth devices, and therefore cannot mistakenly receive data from such devices. -
Page 21: Safety Considerations
SAFETY CONSIDERATIONS The safe use of the Odyssey Navigator is the responsibility of the entire dental team, the laser safety officer appointed, and the dental office team. Protocols for the safe use of lasers have been developed by a combination of medical and dental pro- fessionals working in concert with educators at the university level, scientists and laser manufacturers. -
Page 22: In-Office Safety Issues
4.3.4 Test Firing the Laser Always test-fire the Odyssey Navigator prior to using it intra-orally using a power of 1 Watt continuous wave or less. Place the laser in the ready mode, then, activate the laser for 1-2 seconds while aiming the fiber onto a 2X2 gauze sponge wetted with water. -
Page 23: Emergency Shutdown Options
4. Power Cord – unplug from the wall outlet 4.3.11 Hard Tissue Procedures The Odyssey Navigator diode is not an appropriate laser for hard tissue procedures. The diode laser is attracted to melanin, hemoglobin and, to some extent, water and oxygenated hemoglobin. Avoid prolonged exposure of the energy when working in and around the cervical areas of the tooth. -
Page 24: Operating The Laser
The pulses per second, the duty cycle and the energy intensity per pulse will determine your average power. In the pulsed mode, the Odyssey Navigator is programmed to deliver 10 pulses per second with each pulse lasting for 0.05 seconds. The duty cycle is set for 50% so you will have 1 energy pulse with 1 period of rest with no energy between each pulse. -
Page 25: Tissue Responses To Laser Energy
All manuals and user guides at all-guides.com Section 5 OPERATING THE LASER 5.3 TISSUE RESPONSES TO LASER ENERGY Maximum results will be achieved by regulating the power and the speed that the operator moves the fiber tip. Tissue Charring is an undesirable after effect of too much power or the tip moving too slowly. Always use the least amount of power necessary to complete your procedure. -
Page 26: Select Your Power
All manuals and user guides at all-guides.com Section 5 OPERATING THE LASER 5.4.8 Select Your Power Press the arrows until you have reached the desired Wattage. Beginning with a low of 0.1 Watts, the power increas- es in increments of 100 mW up to a maximum of 3.0 Watts (CW). By holding the arrow keys to increase or decrease the power, you can have an un-interrupted increase until you reach your desired power. -
Page 27: Odyssey Navigator Self Diagnostic And Monitoring
When the Odyssey Navigator Laser’s microprocessor detects an issue with performance it will immediately notify you by way of an audible beep. There are two different ways in which the Odyssey Navigator will alert you to any issues: 1. Continuous audible beep when foot pedal is engaged. If you are operating the Odyssey Navigator with the foot pedal engaged and the Odyssey Navigator emits a constant audible beep and stops the beep when you release the foot pedal, the microprocessor has determined that the laser power output has fallen below the set level. -
Page 28: System Components: Preparations, Care And Maintenance
All manuals and user guides at all-guides.com Section 6 SYSTEM COMPONENTS: PREPARATIONS, CARE AND MAINTENANCE 6.0 UNIT-DOSE FIBER TIPS The fiber optic element of a laser is responsible for carrying the light from the diode array to the tissue being treated. The dental laser fibers are usually made of quartz, sapphire, silica or a combination of those elements. -
Page 29: Cleaving The Fiber
All manuals and user guides at all-guides.com Section 6 SYSTEM COMPONENTS: PREPARATIONS, CARE AND MAINTENANCE 6.1.2 Cleaving the Fiber The tips are designed for single use application.However, if the need arises to cleave the tip the operator should place their index finger at the spot of the proposed cleave (Fig. -
Page 30: Calibration
SYSTEM COMPONENTS: PREPARATIONS, CARE AND MAINTENANCE 6.2.3 Calibration The Odyssey Navigator Laser uses solid-state circuitry to continuously monitor the power output, and adjusts the power supplied to the laser module to keep the output consistent with the user defined setting. If output levels are more than ±... -
Page 31: Recommended Autoclave Procedure
All manuals and user guides at all-guides.com Section 6 SYSTEM COMPONENTS: PREPARATIONS, CARE AND MAINTENANCE 6.3.2 Recommended Autoclave Procedure 1. Autoclave the handpiece sleeve only. First remove the unit-dose tip after the procedure. Unscrew the metal handpiece sleeve counterclockwise and separate from the handpiece. The recommended autoclave cycle is 132°C at 27 psi for 15 minutes. -
Page 32: Prepare Fiber
If the tip slides out, re-insert it and try again or use a new fiber tip and follow the same procedure. Please call your Ivoclar Vivadent representative if the tip will not be retained as intended. This is a safety measure to ensure proper seating of the tip during the intra oral procedure and to maintain the selected power output. -
Page 33: Labels, Signs, Warnings And Manufacturer's Information
7.1 REGULATORY COMPLIANCE The Odyssey Navigator Diode Laser has been tested to the latest safety standards applicable to medical lasers in the US and Canada including IEC 60825, IEC 60601-2-22, IEC 60601-1, CSA/CAN C22.2 No. 601.1 and the Food and Drug Administration’s Laser Performance Standard (21 CFR 1040.10 and 1040.11). -
Page 34: Nominal Ocular Hazard Distance (Nohd)
All manuals and user guides at all-guides.com Section 7 LABELS, SIGNS, WARNINGS AND MANUFACTURER’S INFORMATION 7.3.4 CAUTION US Federal law restricts this device to sale by or on the order of a licensed dentist. 7.3.5 CAUTION Eyewear that protects your eyes from wavelengths other than 810 nm do not provide proper protection for use with this laser. -
Page 35: Servicing
This warranty does not cover damage to the Odyssey Navigator Diode Laser unit or components caused by accident, mis- use, or being tampered with. This warranty does not include postage, or delivery charges. This warranty does not apply to the external finish of the console, handpiece, fiber, power cord or foot pedal. -
Page 36: Selected References On Laser Dentistry
All manuals and user guides at all-guides.com Section 9 SELECTED REFERENCES ON LASER DENTISTRY Coluzzi, Donald J. and Convissar, Robert A., “ tlas of laser applications in dentistry”. 2007 Quintessence Publishing Co., Inc. Vassallo, John, Dental Clinics of North merica, vol. 48(4), W.B Saunders Company, 2004. Academy of Laser Dentistry, www.laserdentistry.org. -
Page 37: Troubleshooting
All manuals and user guides at all-guides.com Section 10 TROUBLESHOOTING PROBLEM: Laser has no response. Corrective Action: Check that the power cord is securely plugged into back of the laser unit. Corrective Action: Check that the power switch on the side panel is turned to the on ( | ) position. Corrective Action: Check that the Laser Stop button is depressed. - Page 38 IC: 4214A-XBEE (2) this device must accept any interference received, including interference that may cause undesired operation. Ivoclar Vivadent, Inc. recommends the implementation of a laser safety program in connection with the use of this product. Complies with: IEC 60601-2-22 FCC Parts 15 & 18 (47 CFR) IEC 60825-1 1C-RSS 210 CSA/CAN C22.2 No.
Need help?
Do you have a question about the Odyssey Navigator and is the answer not in the manual?
Questions and answers