
Related Manuals for GPX 250r TSE


Summary of Contents for GPX 250r TSE
- Page 1 GPX MOTO GPX MOTO GPX 250r TSE Maintenance Manual WWW.GPXMOTO.COM WWW.GPXMOTOUK.COM - 1 - www.GPXMOTO.com + www.GPXMOTOUK.com...
- Page 2 GPX MOTO This service manual is edited by GPXMOTO No part of this publication may be reproduced without authorization. GPXMOTO reserves the right to make changes at any time without notice and without incurring any obligation. The vehicle pictured in this owner’s manual may not match your actual vehicle.
- Page 3 Riding motorcycles is dangerous and the GPX should not be operated with out the rider wearing a helmet , goggles ,boots and gloves at the bare minimum.
- Page 4 GPX MOTO GPX MOTO - 4 - www.GPXMOTO.com + www.GPXMOTOUK.com...
-
Page 5: Table Of Contents
GPX MOTO CONTENT MEANINGS OF REPRESENTATION....................9 SYMBOLS USED…........................9 DEGREES OF RISK AND SYMBOLS..................9 ADVICE...............................10 APPEARANCE............................11 GPX COMPONENTS AND POSITIONS..................11 VIN CODE, CHASSIS NUMBER AND ENGINE NUMBER…............13 VIN CODE…..........................13 CHASSIS NUMBER........................13 ENGINE NUMBER…........................ 13 PARAMETER............................14 DIMENSIONS AND SPECIFICATIONS................14 CONTROLS............................16 CLUTCH LEVER........................16 FRONT DISC BRAKE......................16... - Page 6 GPX MOTO ABSORBER..........................25 MEASURE THE SUSPENSION SAG …………………………………………………………26 MEASURE DISTANCE BETWEEN CENTER OF REAR WHEEL AND REAR FENDER UNDER NO LOAD........................26 MEASURE DISTANCE BETWEEN REAR WHEEL CENTER AND REAR FENDER DRIVING CONDITION.......................27 ADJUSTING THE SPRING PRELOAD OF REAR SHOCK ABSORBER.......27 CHECKING THE FRONT FORK SETTINGS................27...
- Page 7 CHECKING THE SPOKES...................... 47 ELECTRICAL SYSTEM........................48 REMOVING OR INSTALLING THE BATTERY...............48 CHANGING THE BATTERY.......................48 MAIN CABLE GPX VEHICLE WIRING DIAGRAM..................49 COOLING SYSTEM...........................50 COOLING SYSTEM PROFILE....................50 REMOVING OR INSTALLING THE RADIATOR AND GRILL..........50 CHECK ANTIFREEZE LEVEL....................51 DRAINING THE COOLANT...................... 51 FILLING THE COOLING SYSTEM...................52...
- Page 8 GPX MOTO NA..............................60 REMOVAL OF THE WATER COOLING PUMP...............60 INSTALLATION OF WATER COOLING PUMP..............60 ENGINE CYLINDER BLOCK AND PISTON.................. 61 CYLINDER BLOCK AND PISTON PARTS SPECIFICATIONS..........61 REMOVAL OF CYLINDER ....................... 62 CYLINDER INSPECTION......................62 REMOVAL OF PISTON.......................62 PISTON AND PISTON RING INSPECTION................63 CLEANING AND INSPECTION OF CYLINDER HEAD............63...
- Page 9 GPX MOTO PREPARING FOR USE AFTER LONG STORAGE..............84 MAINTENANCE POINTS........................84 TORQUE SPECIFICATION TABLE FOR THE WHOLE VEHICLE..........89 - 9 - www.GPXMOTO.com + www.GPXMOTOUK.com...
-
Page 10: Meanings Of Representation
* All work marked with this symbol requires specialist knowledge and technical understanding. If you do not have the confidence to perform that, you can go to an authorized GPX workshop or GPX after-sale service point. There, your motorcycle will be optimally cared for by specially trained experts using the specialist tools required. -
Page 11: Advice
Do not use non-original parts to modify this motorcycle. If you need to replace any parts, please use spare parts and accessory products that are approved and / or recommended by GPX and have them installed by an authorized GPX workshop. GPX accepts no liability for any personal modification, other products and any resulting damage or loss. -
Page 12: Appearance
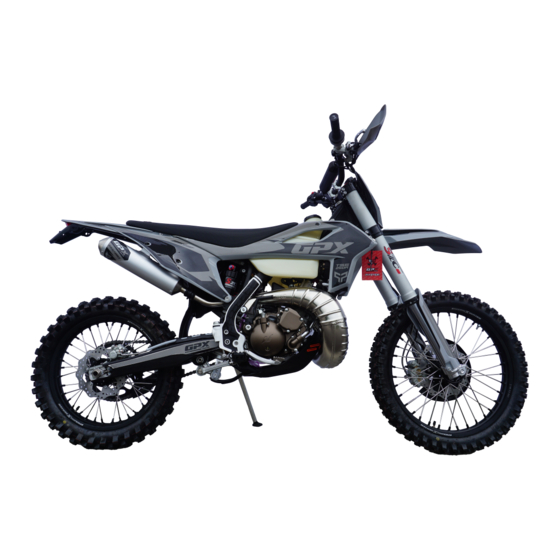
GPX MOTO APPEARANCE TSE 250R COMPONENTS AND POSITIONS www.GPXMOTO.com + www.GPXMOTOUK.com - 11 -... - Page 13 GPX MOTO Name Name Front fender Front brake caliper Headlight Front shock Handlebar Fuel tank Vent pipe Carburettor Fuel tank cap Gear shift lever Fuel tank petcock Pedal Air filter cover Chain Chain guide cover Chain guide Front disc brake cover Rear sprocket www.GPXMOTO.com + www.GPXMOTOUK.com...
- Page 14 GPX MOTO www.GPXMOTO.com + www.GPXMOTOUK.com - 13 -...
- Page 15 GPX MOTO Name Name Tail light Rear brake caliper Rear fender Aluminium swinging arm Exhaust silencer Triangle rocker arm Seat U-shape rocker arm Rear shock Rear brake oil cup Upper clamp Brake pedal Cooling water tank Exhaust pipe Lower clamp...
-
Page 16: Vin Code
GPX MOTO VIN CODE Vin code of the TSE 250r ,is located on the head stock. CHASSIS NUMBER Chassis Number of TSE 250r is located on the headstock/frame/chassis under the handlebars ENGINE NUMBER www.GPXMOTO.com + www.GPXMOTOUK.com - 15 -... - Page 17 GPX MOTO The engine number of TSE 250r is located on the engine case behind the cylinder block. www.GPXMOTO.com + www.GPXMOTOUK.com - 16 -...
-
Page 18: Parameter
Battery electronics Chain #520, 12T/52T O ring Frame/Shock/Brake/Wheel system Parameters Central double cradle type high-strength steel tube frame, GPX Frame type International patent design Front shock SZC Front suspension. 310mm travel. Comprising of quality high performance Telescopic, closed cartridge type units with adjustable www.GPXMOTO.com + www.GPXMOTOUK.com... - Page 19 GPX MOTO compression and rebound. Seals , dust seal and range of springs available (after market), L=950mm. Compression recovery dual adjustable nitrogen airbag rear shock, Rear shock L=480mm, 300mm travel , CRF general configuration.Quality high performance unit with spring preload, adjustable compression as well as...
- Page 20 GPX MOTO Competitive high-strength aluminium alloy fat bar (imported),,material Handlebar 7075 Φ28.6mm, with GPX special ultra-soft off-road grip 1.60×21, 2.15×18, 7050 high strength aluminium rim , F/R rims forged CNC wheel hub Powerful Hydraulic alloy twin piston caliper with 260mm disc...
-
Page 21: Controls
GPX MOTO CONTROL CLUTCH The clutch is controlled by the clutch lever, which is fitted on the left side of the handlebar. By adjusting 2 the screws indicated you can change the biting point of the clutch and the distance between the clutch lever and handlebar to your preference. - Page 22 GPX MOTO www.GPXMOTO.com + www.GPXMOTOUK.com - 21 -...
-
Page 23: Throttle Lever
GPX MOTO THROTTLE LEVER The throttle lever is located on the right side of the handlebar. The throttle is very sensitive. Turn the throttle counter clockwise to increasing the engine speed and power ouput. The reverse will reduce the engine speed and power output. It will back to normal smoothly once you lease the handle. -
Page 24: Fuel Tank Switch
The gear shift is located on the left side of the engine. This is operated by the left foot by pushing down or by pulling up with your foot. The GPX engine has six gear as International Standard, and you can find the illustration on the left. www.GPXMOTO.com + www.GPXMOTOUK.com... -
Page 25: Rear Disc Brake
SIDE STAND SUPPORT The GPX has a retractable side stand for parking. When parking, make the stand is fully down. When operating the motorcycle make sure the stand is retained in the up position by use of the rubber band. - Page 26 GPX MOTO www.GPXMOTO.com + www.GPXMOTOUK.com - 25 -...
-
Page 27: Preparing For Use
GPX Dealers for professional aid. 4. After each use, clean the vehicle with running water. 5. GPX is not responsible for any vehicle problems caused by malicious acts RUN-IN PROCESS Motorcycle engines have a lot of relative moving parts, such as pistons, piston rings, cylinder blocks, meshing transmission gears, etc. -
Page 28: Riding Instructions
19. Check the fuel tank switch. PRECAUTIONS FOR STARTING The required to start the GPX are as follows: 1. Turn the petrol tank switch to the "ON" position; 2. Pull up the choke knob on the carburettor to activate it ;... - Page 29 GPX MOTO PRECAUTIONS FOR TURNING 1. Take care to slow down in advance conditions when turning 2. Lower your centre of gravity to reduce the risk of side rolling when turning 3. Do not shift gears when turning PRECAUTIONS FOR ACCELERATION 1.
-
Page 30: Suggested Inspection Time For All Parts Of The Vehicle
ATTENTION:This table is for reference only. Please adjust the maintenance cycle of the motorcycle according to the specific model and use situation. WARNING:For the inspection, adjustment and replacement of the engine, please consult GPX Service Centre to avoid damage. www.GPXMOTO.com + www.GPXMOTOUK.com... -
Page 31: Suspension System
The total standard rider mass of the GPX off-road motorcycle is shown in the table below. TSE 250r 75~85KGS... - Page 32 GPX MOTO www.GPXMOTO.com + www.GPXMOTOUK.com - 31 -...
-
Page 33: Absorber
"A2". 3. Use a single stand to support the vehicle 4. Calculate the difference between "A1" and "A2" and denote it as "D1". The value of "D1" when GPX motorcycle leaves factory is shown below TSE 250R 10~34mm - 26 -... -
Page 34: Measure Distance Between Rear Wheel Center And Rear Fender In Driving Condition
GPX MOTO MEASURE DISTANCE BETWEEN REAR WHEEL CENTER AND REAR FENDER IN DRIVING CONDITION The measurement procedure is as follows: 1. The driver rides the motorcycle (the engine does not start) 2. Up right the motorcycle so that the centre surface of the tire is perpendicular to the ground 3. -
Page 35: Adjusting The Compression Damping Of Front Forks
GPX MOTO If it is difficult to rebound the front shock absorber, decrease the rebound damping appropriately. When the ambient temperature is high, the front shock absorber should also be properly bled of air using the bleed button on the top of the fork cap. Push the bleed button for 5 seconds to release all of the air. - Page 36 GPX MOTO The handlebars of the vehicle can be adjusted according to the customer’s driving habits. The specific steps are as follows: 1. Remove the handlebar cover and handlebar pad on the handlebar. 2. Loosen the bolts securing the upper handlebar clamp so that the handlebar can be turned.
-
Page 37: Vehicle Maintenance
GPX MOTO VEHICLE MAINTENANCE PLACEMENT Raise you motorcycle on its centre stand always when carrying out the related maintenance. It is helpful to remove or install various parts. REMOVING OR INSTALLING THE DISC BRAKE COVER Removing steps are as follows: 1. -
Page 38: Removing Or Installing The Front Disc Brake
GPX MOTO REMOVING OR INSTALLING THE FRONT BRAKE DISC CALIPER Removing Steps are as follow: 1. Remove the front brake fluid hose clamp from the left fork protection guard. 2. Remove the front brake master cylinder from the handlebars. 3. Remove the front disc brake caliper. - Page 39 GPX MOTO Removing Steps are as follows: 1. Remove the headlight 2. Remove the front wheel 3. Remove the front brake caliper 4. Remove both front forks 5. Remove the handlebars 6. Remove the lock nut and the punch bolt of the steering column as indicated 7.
-
Page 40: Check The Front Steering
2. Turning the handlebars left to right to control . It should move smoothly and there should be no obstruction. 3. If you find that the steering of the GPX is feeling graunchy , stiff or is loose with excessive movement please remove the top and bottom steering clamps to check that the bearing is both clean and greased and also that it is adjusted to the correct tension. -
Page 41: Removing Or Installing Front Headlight
GPX MOTO REMOVING OR INSTALLING FRONT HEADLIGHT Removing Steps are as follows: 1. Remove or loosen the rubber fixing strap on both the left and right fork suspension leg. 2. Remove the headlight 3. Pull out the connector between headlight and main... - Page 42 GPX MOTO Removing Steps are as follows: 1. Remove the 2 fixing screws. 2. Pull out the Front Fender. Installing Steps: The instalment should be carried out in the reverse order of removal. - 35 - www.GPXMOTO.com + www.GPXMOTOUK.com...
-
Page 43: Removing Or Installing The Rear Shock Absorber
GPX MOTO REMOVING OR INSTALLING THE REAR SHOCK ABSORBER Check the rear shock absorber to determine the performance of the unit. Please follow the steps below to removing the rear shock absorber: 1. Remove the rear silencer. 2. Remove the upper and lower mounting bolts of the rear shock absorber and the sub frame bolts. -
Page 44: Removing Or Installing The Air Filter Housing
, but reapply grease on the locating pins to ease installation and removal. NOTE: GPX adopts a unique tool-free maintenance design. The side cover of the air filter can be removed or installed from the main body of the cover only by hands. -
Page 45: Cleaning And Maintenance Of Air Filter
GPX MOTO CLEANING AND MAINTENANCE OF AIR FILTER Before performing maintenance on the air filter parts, it is necessary to check the filter first. Follow this direction: 1. Check whether there are cracks on the surface of the air filter rubber hose that connect the carburettor to the air box. -
Page 46: Removing Or Installing The Fuel Tank
For the cleaning of the exhaust system, please consult with GPX dealers before operating. If you need to replace the muffler tube, please follow the steps below: Unscrew the 2 mounting bolts of the silencer. - Page 47 GPX MOTO Removing steps as below: 1. Remove the seat . 2. Remove the left and right radiator shroud screws. 3. Unscrew the single central fuel tank installation screw. 4. Remove the fuel tank from the frame. Installing Steps: The instalment should be carried out in the reverse order of removal.
-
Page 48: Check And Clean The Chain
GPX MOTO CHECK AND CLEAN THE CHAIN Checking the condition of the chain: 1. Observe the chain from the rear of the vehicle to check whether the chain is skewed as a whole 2. Rotate the rear wheel by hand and observe whether... -
Page 49: Check And Adjust Thechain Tension
GPX MOTO CHECK AND ADJUST THE CHAIN TENSION The chain transfers the power output from the engine to the wheels. It is therefore important that the chain is in good condition , is well lubricated and works correctly. It is an important part of the motorcycle. The chain needs frequent inspection and maintenance to ensure its normal use. - Page 50 We repeat , from an economic point of view, it is worthwhile to replace the entire chain drive system at the same time. At any time, you should use the original parts from GPX factory or the ones authorized by GPX . The chain needs to be lubricated regularly, see the lubrication section for details.
-
Page 51: Guide
GPX MOTO CHECK THE STRUCTURE OF THE REAR SPROCKET, ENGINE SPROCKET AND GUIDE CHAIN Check the condition of the swinging arm rubber and the chain guide as per the guide photos. Under normal circumstances, these two parts play a role in guiding the movement of the chain. If they are... - Page 52 GPX MOTO CHECK THE HANDLEBAR POSITION This setting is very personal to the operator. You should sit on the motorcycle and rest your hands on the handlebars naturally, and feel whether the position of the clutch grip and brake grip are comfortable or not.
-
Page 53: Check The Free-Play Of Front Brake Lever
GPX MOTO MAINTENANCE OF THE BRAKE SYSTEM CHECK THE FREE-PLAY OF FRONT BRAKE LEVER Checking steps as below: 1. Rest your right hand on the right hand grip naturally 2. Use the index finger and middle finger of your right hand to check the free play. -
Page 54: Check The Front Brake Fluid Level
2.5mm 3.5mm CHECK THE FRONT BRAKE LIQUID LEVEL GPX uses hydraulic disc brakes that contain DOT 4 brake fluid You can check the liquid level through the observation glass hole. If the liquid level is lower than the bottom edge of the observation hole, you should immediately replenish the fluid to the upper edge. -
Page 55: Check The Front Brake Pads
NOTE: The brake pads should be replaced as a complete set. If you are not sure to complete the replacement work, please go to the GPX dealer and have a professional to complete the replacement. CHECK THE FREE-PLAY OF FOOT BRAKE www.GPXMOTO.com + www.GPXMOTOUK.com... - Page 56 GPX MOTO In normal use,the free-play of the brake pedal is shown in the table below. Check the brake lever and pay attention to whether the stroke is correct. Model Free-Play 25~30mm www.GPXMOTO.com + www.GPXMOTOUK.com - 44 -...
-
Page 57: Check The Rear Brake Disk Fluid Level
DANGER: Please pay attention to check whether the brake fluid is leaking and whether the brake fluid pipe is damaged. If so, please contact GPX dealer. REFILLING THE REAR BRAKE DISK BRAKE FLUID LEVEL Refilling steps are as follows: 1. Remove the screw. -
Page 58: Check The Rear Brake Pads
DANGER: If it is found that the brake system is too worn, the corresponding parts should be replaced immediately to avoid safety accidents. The specific work should be carried out after consulting the GPX dealer. www.GPXMOTO.com + www.GPXMOTOUK.com - 45 -... -
Page 59: Tire Inspection And Maintenance
GPX MOTO TIRE INSPECTION AND MAINTENANCE REMOVING OR INSTALLING THE FRONT WHEEL Removing Steps are as follows: Lift the motorcycle off the ground and Stabilize it by using a motorcycle stand. Remove front disc brake cover. Loosen the 2 front wheel axle pinch bolts on each side. -
Page 60: Check Tire Pressure
If you find that the spokes are loose and weak, you must check all the spokes and both wheels. If there is any further problem, please contact the GPX dealer. www.GPXMOTO.com + www.GPXMOTOUK.com - 47 -... - Page 61 GPX MOTO www.GPXMOTO.com + www.GPXMOTOUK.com - 48 -...
-
Page 62: Electrical System
If you found bubble appears in the surface of the battery or it needs frequent charging, you should change the battery. The new battery should use GPX original Battery or authorized one by GPX. The battery size: 112mm×69mm×85mm www.GPXMOTO.com + www.GPXMOTOUK.com... -
Page 63: Main Cable
GPX MOTO MAIN CABLE GPX VEHICLE WIRING DIAGRAM www.GPXMOTO.com + www.GPXMOTOUK.com - 50 -... -
Page 64: Cooling System
GPX MOTO COOLING SYSTEM COOLING SYSTEM PROFILE The excess heat from the engine is captured by the water and antifreeze (coolant)within the cooling system. This coolant is circulated around the engine and through 2 radiators by a coolant pump that is mounted within the engine . -
Page 65: Draining The Coolant
GPX MOTO CHECK COOLANT/ANTI FREEZE LEVEL Stop and stand the motorcycle upright on a horizontal surface. Release the radiator cap when the engine is cool only . Sway the motorcycle from side to side and then check the antifreeze level, which should be between Min and Max and should be less that 1 inch from the very top of the neck . -
Page 66: Filling The Cooling System
GPX MOTO FILLING THE COOLING SYSTEM You should change the coolant regularly to increase service lift. Main work: Drain out the coolant. → p.50 Replace the bolt after draining the coolant completely. Fill in a little of coolant through radiator tank. -
Page 67: Installing The Engine
INTRODUCING ABOUT THE ENGINE STRUCTURE 1. COOLING SYSTEM The GPX uses coolant to cool the engine. The coolant enters the engine from the water tank through the radiators, takes away the heat of the engine, flows back to the water tank, and then exchanges heat with the air. -
Page 68: The Engine Adjustment
GPX MOTO THE ENGINE ADJUSTMENT IDLE SPEED ADJUSTMENT OF CARBURETOR The idle speed of the carburettor can be adjusted through the idle screw and air mixture screw. Proceed as follows: 1. Rotate the air screw clockwise until it reaches the top of its stroke, and then reverse one and a quarter of a turn;... - Page 69 4. After the fuel is drained, screw the drain bolt back If you suspect the carburettor is still contaminated , a more thorough examination and cleaning process will be required. If you do now have adequate knowledge you should consult a GPX dealer. www.GPXMOTO.com + www.GPXMOTOUK.com - 56 -...
-
Page 70: Checking The Shift Lever Position
GPX MOTO CHECK THE SHIFT LEVER POSITION The inspection steps are as follows: Shift 1. Raise the whole vehicle so that the centre plane of the tire is perpendicular to the ground 2. The line of sight is level with the tread surface, and observe the position of the shift head 3. -
Page 71: Lubricant Selection
It is forbidden to replace it with ordinary engine oil, gear oil, vegetable oil, etc. When the GPX leaves the factory, 15W/40-SF grade oil is filled in the transmission box. If you change to other lubricating oil, its quality level should reach SG level... -
Page 72: Lubricant Replacement
GPX MOTO LUBRICANT REPLACEMENT When replacing the lubricating oil, it should be done before the engine is warm and has not yet cooled, so as to ensure that the lubricating oil in the crankcase can be discharged quickly and completely. When replacing, place an oil pan under the engine and unscrew the oil bolt A to release the lubricating oil. - Page 73 GPX MOTO www.GPXMOTO.com + www.GPXMOTOUK.com - 60 -...
-
Page 74: Removal Of The Water Cooling Pump
GPX MOTO REMOVAL OF THE COOLING PUMP The removal steps of the cooling pump are as follows: 1. Place a container under the engine, unscrew the engine drain bolt A, and release the coolant in the engine. 2. Unscrew the fastening bolts B, C, D of the water pump cover. -
Page 75: Engine Cylinder Block And Piston
GPX MOTO 4. Install the cooling pump cover NOTE: Sealant needs to be applied to both sides of the paper pad of the cooling pump cover. NOTE: The tightening torque of the cooling pump cover bolts is 10~15N.m. ENGINE CYLINDER BLOCK AND PISTON... -
Page 76: Removal Of Cylinder
GPX MOTO REMOVAL OF CYLINDER The cylinder block removal steps are as follows: 1. Remove the cylinder head. 2. Remove the cylinder head gasket. 3. Remove the cylinder block. NOTE: When removing the cylinder, the cylinder block positioning pin cannot fall into the crankcase. -
Page 77: Piston And Piston Ring Inspection
GPX MOTO PISTON AND PISTON RING INSPECTION Use thickness gauge A to measure the gap between the piston ring and the groove of the piston ring. Measurement standard value: The first ring: 0.02~0.04 The second ring: 0.02~0.06 Remove the piston ring. -
Page 78: Check The Clearance Between Cylinder And Piston
GPX MOTO CHECK CLEARANCE BETWEEN CYLINDER PISTON Measure the outer diameter 10mm above the bottom end of the piston skirt. Standard value: 77.950~77.97 Calculate the gap between the cylinder and the piston. MEASURE THE DIAMETER OF PISTON PIN AND PIN HOLE Measure the diameter of the piston pin hole: Standard value: 17.002~17.008... -
Page 79: Installation Of Piston
GPX MOTO Precautions when installing the piston ring: The opening of one ring faces the pin position of the other ring; The opening of the second ring faces the pin position of the second ring. INSTALLATION OF PISTON Install the piston, piston pin and new piston retaining ring. -
Page 80: Installation Of Cylinder
GPX MOTO INSTALLATION CYLINDER The installation steps of the cylinder block are as follows: 1. Install the new paper pad and positioning pin. 2. Coat the cylinder and piston ring with a layer of oil. 3. Install the cylinder. The tightening torque of cylinder block nut: 24±2N.m NOTE: When installing, avoid damaging the piston. -
Page 81: Removing The Clutch
GPX MOTO REMOVAL THE CLUTCH The clutch disassembly steps are as follows: 1. Remove the locking bolt of the clutch friction plate. 2. Remove the clutch friction plate pressure plate and pull rod. 3. Loosen the clutch lock nut. 4. Remove the clutch assembly. -
Page 82: Installation Of The Clutch
GPX MOTO Use a thickness gauge to check the flatness of the driven friction plate Standard value: ≤0.1 Repair limit value: 0.2 Vernier caliper to check the free height of the clutch spring Standard value: 35.5 Repair limit: 34 INSTALLATION OF CLUTCH The clutch installation steps are as follows: 1. -
Page 83: Installation Of The Right Crankcase Cover
GPX MOTO 8. Installation centre set combination 9. Install the clutch lock nut gasket (concave face down) 10. Install the clutch lock nut (chamfered face down) The installation torque is: (70~80) N·m 11. Install the clutch cover 12. Install bearings, flat washers and push rods 13. -
Page 84: Removal / Installation Of The Shift Mechanism In The Engine
GPX MOTO REMOVAL OR INSTALLATION OF THE SHIFT MECHANISM IN THE ENGINE The disassembly and assembly steps of the shift mechanism are as follows: 1. Remove the clutch assembly. 2. Pull out the shift arm. Check whether the shift arm has any deformation and wear that affect the use. -
Page 85: Removal / Installation Of Starter Motor
GPX MOTO MAGNETO AND ELECTRIC STARTING PARTS OF ENGINE REMOVAL OR INSTALLATION OF STARTER MOTOR The removal steps of the starter motor are as follows: 1. Remove the motor mounting bolt A 2. Remove the starting motor Installation is carried out in the reverse order of removal. -
Page 86: Removal / Installation Of Magneto Stator
GPX MOTO REMOVAL OR INSTALLATION OF MAGNETO STATOR The removal steps of the magneto stator are as follows: 1. Remove the mounting bolt B of the stator crimping plate. 2. Remove the stator crimping plate. 3. Remove the trigger component D. -
Page 87: Engine Crankshaft And Transmission Mechanism
GPX MOTO 8. Check whether the double gear and the driven gear are worn or damaged, if any, replace it. Installation is carried out in the reverse order of removal. Torque of tightening bolts of electric start driven wheel pressing plate: 10~14N·m... -
Page 88: Removal Of Crankcase
GPX MOTO REMOVAL OF CRANKCASE The removal steps of the crankcase are as follows: 1. Loosen the connecting bolts of the crankcase. 2. Remove the right crankcase. 3. Remove the positioning pin of the box. Remove the sealant on the end face, do not damage the... -
Page 89: Transmission Mechanism Inspection
GPX MOTO Check the crankshaft bearing for wear or damage, if any, replace it. TRANSMISSION MECHANISM INSPECTION Check the thickness of the shift fork plate A. Standard value: 4.93~5.0 Repair limit value: 4.83 Check the fork pin diameter B Standard value: 5.93~6.0 Check whether the rotation and axial sliding of the gears of the main and counter shafts are flexible. -
Page 90: Installation Of Transmission Mechanism
GPX MOTO INSTALLATION OF TRANSMISSION MECHANISM The installation steps of the transmission mechanism are as follows: 1. Heat the crankshaft bearing hole of the left crankcase to 130~150℃. 2. Gently press the crankshaft into the crankcase. 3. Turn the crankshaft to see if it turns flexibly. -
Page 91: Installation Of Remaining Parts
GPX MOTO INSTALLATION OF REMAINING PARTS The installation steps are as follows: 1. Install O-ring B and counter shaft sleeve A on the counter shaft. 2. Apply a proper amount of thread fastening glue to the thread of the counter shaft. -
Page 92: Engine Tightening Torque Table
GPX MOTO ENGINE TIGHTENING TORQUE TABLE The engine tightening torque table is as follows: Applicable parts TORQUE VALUE Cylinder head nut M8 28-32N.m Cylinder head boltM6 10-15N.m Timing sprocket 10-15N.m Clutch tightening nut 40-50N.m Magneto rotor bolt 65-71N.m Valve cover 12-18N.m... - Page 93 GPX MOTO or short-circuited The ignition switch is faulty The starting mechanism is slipping, Low Pressure and the engine cannot be turned Valve clearance is too small Valve opening blocked Cylinder or piston ring wear Test cylinder pressure Cylinder head gasket...
- Page 94 GPX MOTO of the fine adjustment screw of the Correct carburettor plunger Deterioration of Air leak Carburettor seal ring Check whether the Loose carburettor carburettor gasket is leaking Damaged carburettor Airtight gasket The spark plug is faulty or carbon deposits...
- Page 95 GPX MOTO Valve clearance is too Check whether there is Abnormal noise in the large abnormal noise in the valve valve Valve wear Piston and cylinder wear The small end holes of the piston pin and Check whether there is...
- Page 96 ⑥Meet low smoke emission requirements; ⑦It has miscibility with fuel. Regarding the choice of engine oil, GPX recommends you choose a fully synthetic quality and branded 2 stroke oil that is well known for its racing heritage and reliability .
-
Page 97: Motorcycle Cleaning
GPX MOTO MOTORCYCLE CLEANING The cleaning of the vehicle is also an important part of the daily use and maintenance of the motorcycle. Frequent cleaning of your motorcycle can keep your car in a good state of motion and prolong its service life. You can clean your motorcycle through the following steps: 1. - Page 98 In the following content, we will enumerate the problems that occurred during your use, find out the possible causes and give general solutions. Problems Reason Solution Crank stuck Contact GPX Service Centre The crank of the engine Cylinder/piston/ connecting rod Contact GPX Service Centre stuck cannot be turned...
- Page 99 After everything is done, the GPX owner should add new mixed fuel to the engine before the GPX can drive. Because the moisture in the crankcase difficult completely evaporate, the new fuel...
- Page 100 Remove the carburettor and clean the nozzle Dirt in the carburettor nozzle Damaged worn crankshaft Contact GPX Service Centre bearings Problem with ignition Contact GPX Service Centre Engine sound is abnormal overheat See "Engine Overheating" section Carbon deposits in the combustion...
- Page 101 Black smoke from exhaust The combustible mixture is too Adjust the carburettor valve pipe rich Clutch abnormality Contact GPX Service Centre The fork is bent or stuck Check and adjust the fork Damaged gear lever Replace the gear lever Gearbox gear does not...
- Page 102 Check the disc brake disc, if its Disc brake disc wear thickness is less than the limit thickness, replace it Damaged cylinder head Contact GPX Service Centre Brackets, nuts, and bolts are not Check and adjust the torque of the tightly fastened corresponding fasteners...
- Page 103 Replace the disc brake Insufficient brake fluid Replenish brake fluid Deteriorating brake fluid Replace brake fluid Piston damaged Contact GPX Service Centre Brake failure Check the brake pads, if the thickness is less than the minimum Brake pad wear friction thickness, replace the...
- Page 104 GPX MOTO Rear sprocket mounting 27~35 M8×31 10.9 level screws Rear axle nut M22×1.5 452~550 Rear brake disc guard 7~11 M6×12 mounting bolt Brake pedal head mounting 4~7 M5×10 full thread screw 20~32 Brake limit bolt M8×20 full thread Rear brake pump mounting 7~11...
Need help?
Do you have a question about the 250r TSE and is the answer not in the manual?
Questions and answers
what are the torque values for the rear linkage and swingarm on a TSE 250?