Table of Contents
Advertisement
Quick Links
Advertisement
Table of Contents

Related Manuals for Deger MLD Control

Summary of Contents for Deger MLD Control
- Page 1 ASSEMBLY INSTRUCTIONS MLD Control Energy Converter 6 with Central Control Box...
- Page 2 / publisher. We reserve the right for technical changes. Version: 2018-12-12 Original version in German 01/10/2021 ASSEMBLY INSTRUCTIONS MLD Control EC-6 with CCB III Page 2...
-
Page 3: Table Of Contents
Connection diagram ......................... 25 6.2.1 CCB III with wind monitor ......................25 6.2.2 CCB III with old wind monitor ....................... 25 Overview ............................26 Places of installation ........................27 Start-up ..............................28 01/10/2021 ASSEMBLY INSTRUCTIONS MLD Control EC-6 with CCB III Page 3... -
Page 4: Abbreviations
Maximum Light Detection MLD Control Energy converter, CCB, MLD sensors, wind monitor, snow sensor OSHA Occupational Safety and Health Administration Personal protective equipment Spanner Width (wrench size) Uninterruptible power supply 01/10/2021 ASSEMBLY INSTRUCTIONS MLD Control EC-6 with CCB III Page 4... -
Page 5: General Information
Varying light conditions: Because of different levels of cloudiness, the light conditions in solar parks vary for each DEGER system. The individual control makes sure every DEGER system is optimally oriented to the brightest source of irradiation. -
Page 6: Introduction
Take proper actions to protect the installed DEGER system in its full range of motion from unauthorised access, such as enclosing it with a fence. Near the entry area to the DEGER system there must be a warning sign stating that it is prohibited to remain within the range of pivoting motion. -
Page 7: Symbols Used
- Any and all safety equipment and standards to be in compliance with Federal, provinces, and local codes and OSHA standards Symbols used The following symbols appear on the DEGER system and are used in the present document: No unauthorised access Read and follow the operating manuals and safety information before start-up Presentation of information 1.7.1 Lists and instructions... -
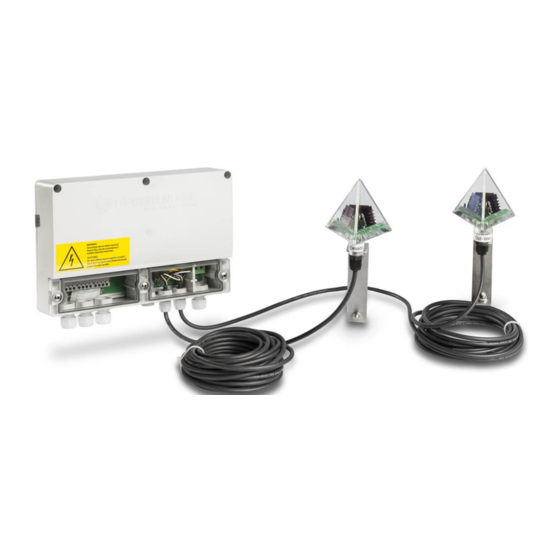
Page 8: Energy Converter 6 (Ec-6)
The clamping area on the M12 cable fitting is designed for a cable cross-section of 1 to 5 mm, while the clamping area on the M16 cable fitting is designed for a cable cross-section of 2 to 7 mm. 01/10/2021 ASSEMBLY INSTRUCTIONS MLD Control EC-6 with CCB III Page 8... -
Page 9: Ec-6: Function
J2: SAFE POS function OFF J3: Reverse direction for southern hemisphere ON J4: Reverse direction for northern hemisphere ON Jumper J2 must be connected to J7 for broken wire detection to be activated. 01/10/2021 ASSEMBLY INSTRUCTIONS MLD Control EC-6 with CCB III Page 9... -
Page 10: Ec-6: Changing Configuration
J4 connected: Night function for northern hemisphere ON J5 connected: Night function OFF J7: Must be open J7: SAFE POS function ON J6 connected: Reverse polarity OFF J7 connected: SAFE POS function ON 01/10/2021 ASSEMBLY INSTRUCTIONS MLD Control EC-6 with CCB III Page 10... -
Page 11: Ec-6: Led Display
If a motor is rotating in the opposite direction of that which is displayed by the LED lamps, switch the connection cables for the motor from pin 1-2 to 3-4 or vice versa. 01/10/2021 ASSEMBLY INSTRUCTIONS MLD Control EC-6 with CCB III Page 11... -
Page 12: Central Control Box (Ccb)
Red Wire of Wind Monitor The clamping area on the cable fitting is designed for a cable cross-section of 3.5 mm to 7 mm. 01/10/2021 ASSEMBLY INSTRUCTIONS MLD Control EC-6 with CCB III Page 12... -
Page 13: Ccb: Function
Wind monitor + snow sensor: A wind monitor and snow sensor do not have to be installed on every DEGER system when a CCB is used in a solar energy plant that has several systems. One snow sensor and one wind monitor can be used for up to 100 DEGER systems. -
Page 14: Wind Monitor
Switch contact for wind alarm, potential-free Red Wire Connection for CCB Note: If you have our old wind monitor with our new anemometer, then please refer to page 19 & 25 for installation 01/10/2021 ASSEMBLY INSTRUCTIONS MLD Control EC-6 with CCB III Page 14... - Page 15 The primary wire may not be routed on the same side as the secondary wires. Primary and secondary wires should never be routed together. The cable of the anemometer can be extended up to 100 m. 01/10/2021 ASSEMBLY INSTRUCTIONS MLD Control EC-6 with CCB III Page 15...
-
Page 16: Port Description
Sensor connection Output: DC12V----2.0A As can be seen above, we have 3 points of connections in DEGER wind monitor: Sensor Connection: The anemometer connector should be connected to the sensor connection port. The anemometer comes with 20m cable. It is advised to install the anemometer within 20m range. -
Page 17: Display Interface
4.1.3 Display Interface: In this section, information will be provided on different options of our DEGER wind monitor software: Main Interface: The main interface shows the following information: a. Wind Speed: It shows the wind speed from rotation of anemometer in m/s. - Page 18 Figure 5: History As shown above, this stores the wind speed information with corresponding time and date. Default interval time is 5 minutes. The interval time is shown on main screen and can be set only by a DEGER team member.
-
Page 19: Anemometer Installation With Old Wind Monitor
(except for when the broken wire detector is connected). 1. The pre-assembled pendulum kit has to be fastened to the DEGER system on the left side of the module surface, when viewed from the rear, using the aluminum profile F-SET-X. The distance between outer edge of module and nodal bar must be 200 mm. - Page 20 M8. Aluminum If necessary, extend the F-Set-X by using the profile profile connector. Torque M6: 8 Nm Profile connector Torque M8: 20 Nm Torque M10: 38 Nm 01/10/2021 ASSEMBLY INSTRUCTIONS MLD Control EC-6 with CCB III Page 20...
- Page 21 All other DEGER systems For this purpose the aluminum profile F-SET-X of the pendulum kit is fastened to the two outer aluminum profiles of the DEGER system each with one clamping piece MTH M8, bolt M8x30 and sliding nut M8. min. 20 cm...
-
Page 22: Snow Sensor
Clamp plate mounted to the bottom side of the module surface using two bolts M6, two clamp plates and two sliding nuts M6. Torque: 8 Nm Module Sliding nut 01/10/2021 ASSEMBLY INSTRUCTIONS MLD Control EC-6 with CCB III Page 22... -
Page 23: Connection
The snow sensor is equipped with a 5 m connection cable. The cable has to be extended depending on installation place of the CCB and is connected as described in chapter 6. 01/10/2021 ASSEMBLY INSTRUCTIONS MLD Control EC-6 with CCB III Page 23... -
Page 24: Connection
2 x 1 mm² Power AC 100-240 V This diagram is an example. The wire cross section has to be dimensioned according to the cable length and to the local requirements. 01/10/2021 ASSEMBLY INSTRUCTIONS MLD Control EC-6 with CCB III Page 24... -
Page 25: Connection Diagram
2. A 4-wire data cable is suitable for the simple connection of EC-6 to CCB. 3. A 6-wire cable is required when the SAFE POS (broken wire detection) is integrated. 4. Use conductor cross-section for control cable EC-6 to CCB: For each DEGER system (EC-6) 10 mA at DC 24 V 5. -
Page 26: Overview
Pin 20, 21, 16, 17, 18, 19 Pin 23 - 1, 2, 3, 4 Pin + - 20 Pin 22, + Cable: Green, Red Optional: Snow sensor Cable: br, bl, bk Wind Monitor 01/10/2021 ASSEMBLY INSTRUCTIONS MLD Control EC-6 with CCB III Page 26... -
Page 27: Places Of Installation
Places of installation Rear view drawing. Cables can be routed through mast Power supply for EC-6 Cable can also be used inverter when designed accordingl 01/10/2021 ASSEMBLY INSTRUCTIONS MLD Control EC-6 with CCB III Page 27... -
Page 28: Start-Up
Start of check The elevation drive and azimuth drive must be moved along the entire path to ensure that the DEGER system mechanism can move freely, that all cables are long enough for the entire range of motion, and that the limit switches switch off the motors. -
Page 29: Technical Data
-20 °C to +50 °C Barometric pressure range 70 kPa to 106 kPa Air humidity range 5% to 95% Expanded air humidity range 0% to 100% (for wind monitor Advanced) 01/10/2021 ASSEMBLY INSTRUCTIONS MLD Control EC-6 with CCB III Page 29... -
Page 30: Troubleshooting
10.1 Troubleshooting diagram for energy converter DANGER! When conducting tests on the DEGER system, ensure that all parts have been disconnected from the power by an electrical breaker, provided by the client. When conducting tests where there is live voltage, take appropriate actions to prevent injury to persons and property damage. -
Page 31: Fault Report
Installer Operator For return parts: DEGERenergie GmbH & Co. KG Company/name Service- Industriestr. 70 D-72160 Horb a.N. Address Germany Postal code, city Contact partner > phone number, e-mail address 01/10/2021 ASSEMBLY INSTRUCTIONS MLD Control EC-6 with CCB III Page 31... -
Page 32: Maintenance
(DC 12 to 26 V). Connect the two wires of the elevation drive to the positive (+) and negative (-) terminal of the battery pack. If the DEGER system moves into the inclined position, switch the wires for the elevation drive at the (+) and (-) terminal of the battery pack. -
Page 33: Appendix
This declaration of conformity will lose its validity, if the product is modified, supplemented or changed in any other way without our explicit consent and/or components not belonging to the range of accessories offered by DEGER, are used and also in case of improper assembly and installation or unintended use. -
Page 34: Tüv Certificate
14.2 TÜV certificate 01/10/2021 ASSEMBLY INSTRUCTIONS MLD Control EC-6 with CCB III Page 34... -
Page 35: Imprint
HRA 730079 VAT ID No.: DE 295812054 Partner Company: DE Verwaltungs GmbH Registry Court of Companies: Stuttgart District Court HRB 749359 CEO: Hünkar Korkmaz Registered Head Office: Horb am Neckar 01/10/2021 ASSEMBLY INSTRUCTIONS MLD Control EC-6 with CCB III Page 35...
Need help?
Do you have a question about the MLD Control and is the answer not in the manual?
Questions and answers