Table of Contents
Advertisement
Available languages
Available languages
Quick Links
Advertisement
Chapters
Table of Contents

Related Manuals for LMX Bikes LMX 161 2021


Summary of Contents for LMX Bikes LMX 161 2021
- Page 1 MANUEL UTILISATEUR LMX 161 Français - 2021...
- Page 3 Toute l’équipe LMX vous remercie de votre confiance pour avoir choisi la LMX ● 161. La moto ultra-légère 45 kg électrique est maintenant entre vos mains ! ●...
- Page 4 AVIS DE SÉCURITÉ Le propriétaire doit agir de manière responsable et suivre les directives de ce manuel. Une attention particulière doit être accordée à la section relative à la ...
-
Page 5: Table Of Contents
SOMMAIRE Description générale Pneumatiques - p.19 Notes pour le propriétaire - p.5 Batterie - p.20 Informations sur le produit - p.5 Freinage - p.21 Informations sur la garantie - p.5 ... -
Page 6: Description Générale
DESCRIPTION GÉNÉRALE NOTES POUR LE PROPRIÉTAIRE Félicitations! Vous êtes maintenant propriétaire de l’une des meilleures motos légères tout-terrain du marché. Chez LMX, nous sommes fiers de fabriquer ces véhicules et ... -
Page 7: Caractéristiques Générales
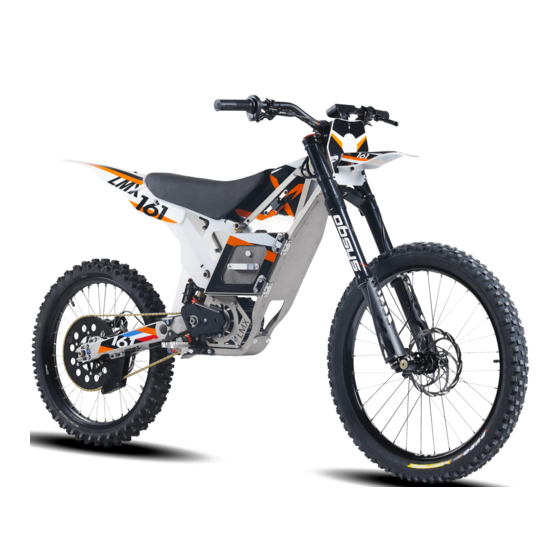
CARACTÉRISTIQUES GÉNÉRALES PROPULSION MOTEUR BRUSHLESS DC PUISSANCE MÉCANIQUE 3.1 Kw nominal/ 5 Kw max COUPLE 10 Nm en continu (25 Nm en pic) REFROIDISSEMENT A air, convection naturelle MODES DE FONCTIONNEMENT Mode 1 : ECO. -
Page 8: Assemblage De La Lmx 161
ROUE AVANT : HALO SAS 26’’x 32H ARRIERE : LMX 19’’x 1.4” 36H POIDS ET MESURES POIDS EN ORDRE DE MARCHE 45 kg CHARGE ADMISSIBLE 105 kg HAUTEUR DE SELLE 850 à... -
Page 9: Installation De La Roue Avant
INSTALLATION DE LA ROUE AVANT La procédure ci-dessous s’applique uniquement pour les fourches SR Suntour RUX 38 mm. Elle provient du manuel de la fourche que nous vous fournissons lors de ... - Page 10 Les roues doivent être en bon état et les pneus gonflés à la pression adéquate. ● Référez-vous à la plaque signalétique du cadre ou à ce manuel pour les valeurs ...
- Page 11 Veuillez nous contacter si votre cadre est endommagé, votre cadre doit être réparé ou remplacé pour garantir votre sécurité. Commencez par tester votre moto sur une surface d’herbe ou de route lisse avec les ...
- Page 12 Relevez la béquille et appuyez une fois sur le bouton de puissance vert marqué d’un éclair (poignée de droite) pour activer la puissance et pouvoir rouler. Le voyant de puissance s’allume en vert et valide ...
- Page 13 Mode total trip “TT” Affiche le nombre d’heures d’utilisation Ce décompte ne peut pas être réinitialisé Mode “RT” riding timer Affiche le temps d’utilisation depuis la dernière mise ...
-
Page 14: Entretien Général
ÉNERGIE Le graphique à droite de l’écran est composé de sept barres représentant le niveau de la batterie. A noter : la barre de réserve permet de faire 5 km ... -
Page 15: Nettoyage De La Lmx
Serrage Niveau Le serrage des disques de frein AVANT 4 Nm et ARRIÈRE Serrage de la couronne 10 Nm Serrage des rayons des roues AVANT et Vérifiez que la tension des rayons est toujours correcte ... -
Page 16: Amortisseur Arrière
AMORTISSEUR ARRIÈRE A. Réglages hydrauliques : compression Les ajustements sont effectués au-dessus cartouche d'air tournant simplement le bouton bleu marqué d'un ... - Page 17 Les biellettes d’amortisseur se situent à la base du bras oscillant et de l’amortisseur. Les biellettes de suspension LMX BIKES sont équipées de liaisons sans entretien ni graissage. ...
-
Page 18: Réglage De La Fourche
4. RÉGLAGE DE LA FOURCHE Se référer au manuel de la fourche. SR Suntour : https://www.srsuntour.com/service/download-area/consumer-downloads/bike/ NETTOYAGE ET VIDANGE DE LA FOURCHE Les intervalles de nettoyage et graissage recommandées sont les suivants : Après les 50 premières heures d’utilisation ... - Page 19 2. Retendre la chaîne Desserrez les 3 vis de blocage côté Clé 6 pans de disque et côté couronne de 2 ou 3 ...
-
Page 20: Pneumatiques
PNEUMATIQUE PNEU ARRIÈRE Dimension 2.75” - 19” Charge admissible 155kg a 2.27 Bars Pression 1.8 Bars recommandée Marque Shinko PNEU AVANT Dimension 26”... -
Page 21: Batterie
Pression De 1.5 à 2.5 Bars recommandée Conseillée : 1.8 Bars Marque Duro 26”x 3.0” BATTERIE IMPORTANT UTILISEZ UNIQUEMENT LE CHARGEUR D’ORIGINE Chargement de la batterie ... -
Page 22: Freinage
Temps de charge 3h pour une charge de 0 à 90% de la batterie. La fin de charge (derniers 10%) peut prendre plus de temps. ... - Page 23 Enlevez la goupille qui empêche la tige de sortir de son logement. Tenez fermement l’étrier dans la paume de la main et ...
-
Page 24: Erreurs Et Défauts En Cours D'utilisation
Installez l'étrier sur la moto et serrez les deux vis. M6 de manière à avoir une rotation de la roue AR sans ... -
Page 25: Température Excessive
TEMPERATURE EXCESSIVE La batterie est dotée de 4 capteurs de température Si la température dépasse 75°C, l’alimentation se coupe. Quand la température descend sous les 65°C, la batterie se réinitialise et la moto redémarre. Une température de batterie >... -
Page 26: Codes Erreur Du Contrôleur
CODES ERREUR DU CONTRÔLEUR Le contrôleur est doté de deux LED. La LED Verte indique un fonctionnement normal, tandis que la LED rouge peut clignoter pour signifier un défaut. ... - Page 27 26 ...
-
Page 28: Autres Défauts
AUTRES DÉFAUTS LE CAPTEUR DE BÉQUILLE NE FONCTIONNE PAS Un capteur de béquille défectueux peut être dangereux et il est important de vérifier son fonctionnement. Si le capteur ne fonctionne pas, la moto peut être mise en mode active sans que la béquille ne soit remontée. -
Page 29: Support Technique
SUPPORT TECHNIQUE IMPORTANT Pour toute demande de support, merci de vous adresser à l’adresse mail ci-dessous : TOUTE DEMANDE ENVOYÉE SUR UN AUTRE CANAL NE SERA PAS PRISE EN ... - Page 30 OWNER MANUAL LMX 161 English - 2021...
- Page 31 The entire LMX team thanks you for your confidence in choosing the LMX 161. ● The 45 kg electrical motorcycle is now in your hands! ● The LMX 161 is fully assembled and ready to ride with you. ●...
- Page 32 roads in Europe. Non-approved models are strictly prohibited for use on public roads in France. The data, specifications and illustrations in this manual do not commit LMX BIKES, ...
- Page 33 CONTENTS General description Tires - p.19 Notes for the owner - p.5 Battery - p.20 Product information - p.5 Braking - p.21 Warranty information - p.5 Anti tampering - p.5 Errors and faults in use ...
-
Page 34: General Description
GENERAL DESCRIPTION NOTES FOR THE OWNER Congratulations! You are now the owner of one of the best off-road lightweight motorcycles on the market. At LMX, we are proud to build these vehicles and launch ... -
Page 35: Main Features
MAIN FEATURES PROPULSION MOTOR BRUSHLESS DC MECHANICAL POWER 3.1 Kw nominal/ 5 Kw max TORQUE 10 Nm continuous (25 Nm in peak) COOLING Air, natural convection OPERATING MODES Mode 1 : ECO. -
Page 36: Assembly Of The Lmx 161
REAR: LMX 19''x 1.4 "36HOperating WEIGHTS AND MEASUREMENTS WEIGHT 45 kg MAXIMUM WEIGHT 105 kg HEIGHT OF SEAT 850 to 890 mm GROUND GUARD 290 mm WAGON 1310 mm LENGTH ... -
Page 37: Front Wheel Installation
FRONT WHEEL INSTALLATION This procedure below is only applicable for SR Suntour RUX 38 mm forks. It comes from the fork manual that we provide you with the shipment. For other fork models, refer to the fork manual. -
Page 38: Safety Instructions
SAFETY INSTRUCTIONS Before using the product, the owner (you) should read the following safety instructions. The LMX 161H is designed for use on public roads and authorized paths, because it is ... - Page 39 Kilometer counter start-up 1 - LEDs 2 - Power modes 3 - Speed (here in km/h) 4 - Battery level 5 - Counter mode 6 - Reset button (hold this button down for a few ...
- Page 40 Economy mode : the number 1 is displayed on the meter. In this mode, the LMX only offers 50% of its maximum power and ...
- Page 41 "RT" riding timer mode. Displays the operating time since the last reset Mode "AVG" Displays the average speed Mode "max" Displays the maximum speed reached since ...
-
Page 42: General Maintenance
ENERGY The graph on the right of the screen is composed of seven bars representing the level of the battery. Warning : the reserve bar allows you to do ... -
Page 43: Cleaning The Lmx
Tightening Level The tightening of the brake disc FRONT 4 Nm and REAR Tightening the crown 10 Nm Tightening the spokes of the front and Check that the spoke tension is always correct ... -
Page 44: Rear Shock
REAR SHOCK See DNM shock manual A. Hydraulic adjustment : Compression Adjustments are made over the air cartridge by simply turning the knob marked with a blue "C". ... - Page 45 bearings. LMX Bikes offers you a pre assembled kit (rods + ...
-
Page 46: Fork Settings
4. FORK SETTINGS Refer to the fork manual. SR Suntour : https://www.srsuntour.com/service/download-area/consumer-downloads/bike/ CLEANING AND DRAINING THE FORK Recommended cleaning and lubrication intervals are as follows: After the first 50 hours of use Every 6 months ... - Page 47 2. Retensioning the chain Loosen the 3 locking screws on the disc 6mm allen side and crown side by 2 or 3 turns. key Rotate the adjust knob clockwise direction to loosen the chain and ...
-
Page 48: Tires
TIRES REAR TIRE Size 2.75” - 19” Maximum weight 155 kg a 2.27 Bars Recommended pressure 1.8 Bars Brand Shinko FRONT TIRE Size ... -
Page 49: Battery
Recommended From 1.5 to 2.5 Bars pressure Recommended : 1.8 Bars Brand Duro 26”x 3.0” BATTERY IMPORTANT USE THE ORIGINAL CHARGER ONLY Battery charging The charging device consists of a case ... -
Page 50: Braking
Lifetime After 300 to 500 full charge cycles, the battery will only offer 70% of its total capacity. This number of cycles will be greatly impacted by the use case, riding style, storage temperature. Storage ... - Page 51 Firmly hold the stirrup in the palm of your hand and unscrew the stem retaining the pads Push the pads down the caliper We get the three following parts that are to change. CAUTION : Never activate the brake lever when the caliper and disc are not installed.
-
Page 52: Errors And Faults In Use
ERRORS AND FAULTS IN USE If the motorcycle power supply is abnormally disconnected during use, refer to the following elements : BATTERY PROTECTION The system has several safety features. In general, the battery is automatically reset. If this is not the case, be sure to remove it from the bike and then reinstall it. -
Page 53: Low Temperature
LOW TEMPERATURE The battery has 4 temperature sensors. If the temperature is below -15 ° C the power turns off. When the temperature rises to -10 ° C, the battery resets and the bike restarts. A battery temperature <-15 °... -
Page 54: Controller Error Codes
CONTROLLER ERROR CODES The controller has two LEDs. The green LED indicates normal operation, while the red LED may flash to indicate a fault. 25 ... - Page 55 26 ...
-
Page 56: Other Faults
OTHER FAULTS THE SIDE STAND SENSOR DOES NOT WORK A faulty side stand sensor can be dangerous and it is important to check its operation. If the sensor does not work, the motorcycle can be put into active mode without raising the stand. -
Page 57: Technical Support
TECHNICAL SUPPORT IMPORTANT For any support request, please contact the following email address : ANY REQUEST SENT ON ANOTHER CHANNEL WILL NOT BE TAKEN INTO ... - Page 58 LMX Bikes - MS Systèmes SAS 8 ZA Les Quatre Vies 38290 Frontonas France www.lmxbikes.com +33 4 69 31 04 29...
Need help?
Do you have a question about the LMX 161 2021 and is the answer not in the manual?
Questions and answers