
Related Manuals for LMX Bikes MT-161-H


Summary of Contents for LMX Bikes MT-161-H
-
Page 1: Table Of Contents
Model Title Date LMX 161-H LMX 161-H OWNER'S MANUAL 11-18 Contents INTRODUCTION OF THE OWNER'S MANUAL LMX 161-H 1 General description 2 Note to the owner 2 Your Product Information 3 Warranty Information 3 Anti-tampering 3 ... -
Page 2: Introduction Of The Owner's Manual Lmx 161-H
In this manual are for information concerning the use and maintenance of the bike and its components and their settings. These elements will allow a correct and safe use of the bike. LMX Bikes OWNER'S MANUAL LMX 161-H 2 019... -
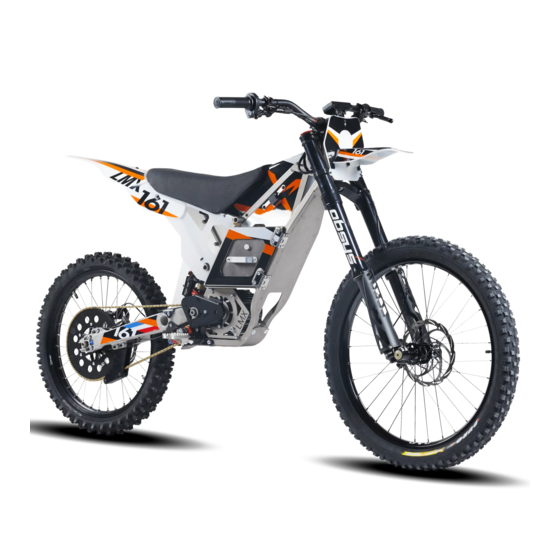
Page 3: General Description
MT-161-H V1.2 The data, specifications and illustrations in this manual do not bind LMX BIKES, which reserves the right to make changes and improvements to its models at any time without notice. General description ... -
Page 4: Your Product Information
lead to unintended dangerous behavior of the motorcycle and cause accidents with severe injuries. LMX Bikes OWNER'S MANUAL LMX 161-H 2 019... -
Page 5: General Characteristics
WEIGHTS AND MEASUREMENTS weight 45kg Load capacity 105kg HEIGHT OF SEAT 850 to 890 mm * GROUND GUARD 290 mm WAGON 1310 mm * LENGTH 2140 mm * HEIGHT 1159 mm LMX Bikes OWNER'S MANUAL LMX 161-H 2 019... -
Page 6: First Assembly Of The Bike
Without removing the bike from the wood rack, install the bracket on the fork by tightening the four M6 screw of the bracket on the upper side of the fork. Use the "longest" position of the stem. Tightening torque: 10 NM LMX Bikes OWNER'S MANUAL LMX 161-H 2 019... -
Page 7: Front Wheel Installation
Unscrew the locking cap on the right side of the fork CAUTION reverse the screw, turn clockwise to unscrew Unscrew the wheel axle by the left side of the motorcycle Turn counterclockwise to unscrew LMX Bikes OWNER'S MANUAL LMX 161-H 2 019... - Page 8 Screw in the clockwise direction. Tighten to 15Nm with an 8mm hex wrench Install the right side locking cap, screw it in c ounterclockwise direction. Tighten to 15N.m Pre LMX Bikes OWNER'S MANUAL LMX 161-H 2 019...
-
Page 9: Operation Checklist
pressure. Refer to the frame nameplate or this manual for pressure values. ● The throttle must have a functional return spring. LMX Bikes OWNER'S MANUAL LMX 161-H 2 019... -
Page 10: Safety Instructions
Keep in mind at all times that an electrical fault can cause the motor to rotate at any time if the power is on. LMX Bikes OWNER'S MANUAL LMX 161-H 2 019... - Page 11 3 Speed ( here in km / h) 4 Battery level 5 Counter mode 6 Reset button (hold this button down for a few seconds to set the value to 0) 7 Switch to next mode LMX Bikes OWNER'S MANUAL LMX 161-H 2 019...
- Page 12 CHOICE OF POWER MODES Economy Mode: The number 1 is displayed on the meter. In this mode, the bike only offers 50% of its maximum power and consumes less. LMX Bikes OWNER'S MANUAL LMX 161-H 2 019...
- Page 13 Press the red button marked "boost" on your red commodo. DISPLAY MODES Trip Mode: Trip Total Trip Mode "TT" Total Hours Used This count can not be reset. LMX Bikes OWNER'S MANUAL LMX 161-H 2 019...
- Page 14 Used to measure the operating time since the last reset Mode "AVG" indicates the average speed Mode "max" informs the maximum speed reached since the last reset. LMX Bikes OWNER'S MANUAL LMX 161-H 2 019...
- Page 15 Warning: The reserve bar allows you to do about 5km. When the reserve is reached, the bottom LED "low battery" orange starts to light up. LMX Bikes OWNER'S MANUAL LMX 161-H 2 019...
-
Page 16: General Maintenance
performance, refer to the brake manufacturer's recommendations and this manual for changing pads. LMX Bikes OWNER'S MANUAL LMX 161-H 2 019... -
Page 17: After The First Hours Of Use
See section: Chain tension It is normal for the chain to relax at the first outlets The tightening of the swingarm 15 Nm axis Control headset Before each ride LMX Bikes OWNER'S MANUAL LMX 161-H 2 019... -
Page 18: Cleaning The Motorcycle
"soft", then to go to the desired notch thereafter. The factory setting is 3 notches from the stop "soft" HARD MEDIUM SOFT Number 10-15 5-10 0-5 of notches LMX Bikes OWNER'S MANUAL LMX 161-H 2 019... -
Page 19: Adjusting Rebound
Tip: During the use of the motorcycle, a critical release of the spring will be detectable by clicking noises at the shock absorber. LMX Bikes OWNER'S MANUAL LMX 161-H 2 019... -
Page 20: Maintenance Of The Shock Absorber
In case of large clearance, it is essential to change the plain bearings. LMX Bikes ... -
Page 21: Fork Adjustments - Compression
The factory setting is 3 notches since the stop "slow". SLOW AVERAGE FAST Number 0 - 5 6 - 10 11 - 15 of notches LMX Bikes OWNER'S MANUAL LMX 161-H 2 019... -
Page 22: Cleaning And Draining The Fork
Once the cap has been Wrench removed, pull the spring out of the tube Original RST grease Clean the parts with rags and lubricate them generously with a special grease for suspension. LMX Bikes OWNER'S MANUAL LMX 161-H 2 019... - Page 23 Thread lock BLUE Follow the steps in reverse order for reassembly, making Grease suspension sure to use grease on the moving parts and the thread lock on the assemblies LMX Bikes OWNER'S MANUAL LMX 161-H 2 019...
-
Page 24: Chain Tension
Then press your rule on the swingarm and then measure the gap between the highest attainable point and the lowest point. There should be a difference of about 20 mm. LMX Bikes OWNER'S MANUAL LMX 161-H 2 019... -
Page 25: Chain Tensioning
Check with the ruler that Steel ruler the position of the axle in the swingarm is the same on each side. Tighten the screw at Torque wrench 7Nm torque. LMX Bikes OWNER'S MANUAL LMX 161-H 2 019... -
Page 26: Pneumatics
Dimension 2.75 "- 19" Load capacity 155kg a 2.27 Bar Recommended 1.8 Bar pressure Brand Shinko Front Tire Size 26 "x 3.00" LMX Bikes OWNER'S MANUAL LMX 161-H 2 019... - Page 27 MT-161-H V1.2 Recommended From 1.5 to 2.5 Bar Pressure Recommended: 1.8 Bars Brand Duro 26 "x 3.0" LMX Bikes OWNER'S MANUAL LMX 161-H 2 019...
-
Page 28: Battery
Charge time 3h for charging 0-90% of battery Charge end (last 10%) may take longer Loading full batteries does not affect their life. LMX Bikes OWNER'S MANUAL LMX 161-H 2 019... - Page 29 24H every 5 cycles to ensure cell balancing and optimal battery performance. Note: T he battery should not (or can not) lose charge level when not in use. LMX Bikes OWNER'S MANUAL LMX 161-H 2 019...
-
Page 30: Braking
circled in red on the photo Then remove the stirrup from its housing Hold the stirrup firmly in the palm of your hand and unscrew the pin holding LMX Bikes OWNER'S MANUAL LMX 161-H 2 019... - Page 31 Install the caliper on the motorcycle and tighten the two screws. M6 so as to have a rotation of the wheel AR without friction pads. Tighten both screws to 10N.M LMX Bikes OWNER'S MANUAL LMX 161-H 2 019...
-
Page 32: Errors And Faults In Use
If the temperature exceeds 75 ° C, the power turns off. When the temperature drops below 65 ° C, the battery resets and the motorcycle restarts. A battery temperature> 65 ° C prohibits battery charging LMX Bikes OWNER'S MANUAL LMX 161-H 2 019... -
Page 33: Low Temperature
Any modification of the parameters in the "parameters settings" tab is saved and causes the cancellation of the guarantee. Android Software: https://www.lithiumbatterypcb.com/Android%20APP%20V2.1.1011.zip LMX Bikes OWNER'S MANUAL LMX 161-H 2 019... -
Page 34: Controller Error Codes
MT-161-H V1.2 Controller Error Codes The controller has two LEDs. The green LED indicates normal operation, while the red LED may flash to indicate a fault. LMX Bikes OWNER'S MANUAL LMX 161-H 2 019... - Page 35 MT-161-H V1.2 LMX Bikes OWNER'S MANUAL LMX 161-H 2 019...
-
Page 36: Other Faults
If this operation is not sufficient, changing the pads and bleeding the brakes may be necessary. Seechange section. LMX Bikes OWNER'S MANUAL LMX 161-H 2 019... -
Page 37: Contact Information
MT-161-H V1.2 Contact Information LMX bikes is a trademark of MS SAS Systems 8 ZA LES 4 VIES 38290 FRONTONAS FRANCE tel. +33 9 81 68 31 48 www.lmxbikes.com contact@lmxbikes.com LMX Bikes OWNER'S MANUAL LMX 161-H 2 019...
Need help?
Do you have a question about the MT-161-H and is the answer not in the manual?
Questions and answers