
Subscribe to Our Youtube Channel
Related Manuals for Adesso TP-3200

Summary of Contents for Adesso TP-3200
- Page 1 PROFESSIONAL FM TRANSCEIVER TP-3200 INSTRUCTION MANUAL * Please carefully read before use...
- Page 2 Thank you for purchasing our hand held FM transceiv- er. This model is novel designed with stable perfor- mance and we want to develop this model to be a por- table equipment, also easy to operate with a variety of sophisticated functions, so we are using the most advanced technology.
-
Page 3: Table Of Contents
PRECAUTION The transceiver is a product with good design and advanced tech- CONTENTS nology. The following suggestions will help you perform the obliga- tions of warranty cause, understand and realize the security of us- ing transceivers. UNPACKING AND CHECKING EQUIPMENT ....1 1. -
Page 4: Unpacking And Checking Equipment
UNPACKING AND CHECKING EQUIPMENT PREPARATION Charging the Battery Pack Please take the transceiver from the package carefully. We suggest that you should check the following accessories before throwing The battery pack is not charged at the factory; Please charge it be- away the package. -
Page 5: Installing/Removing The Battery Pack
Installing/Removing the Battery Pack The average using time of the supplied battery pack is 8 hours. Av- Plug the Charger power cable erage times is calculated by using 5% transmit time, 5% receive into an AC outlet. time, and 90% standby time. CAUTION ‹... -
Page 6: Installing The Antenna
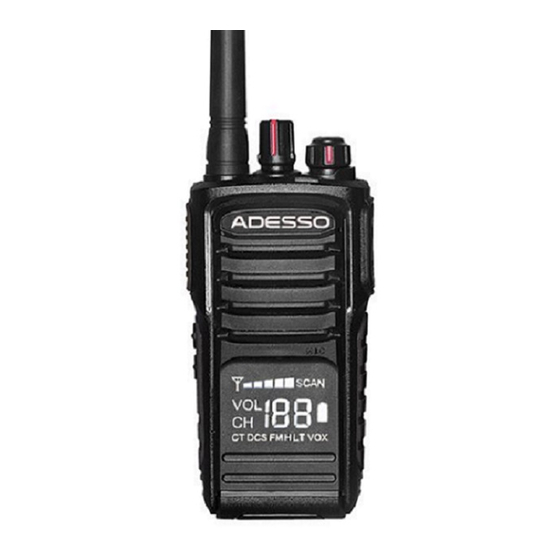
GETTING ACQUAINTED Installing the Antenna Channel selector Hold the antenna base and screw the anten- Antenna Rotate to select na clockwise into the antenna connector at channels 1~199. LED indicator the top of the transceiver, until tighten. Power switch/ Lights red while NOTE: Don’t hang keys, speaker or micro- Volume control transmitting. -
Page 7: Operation
OPERATION AUXILIARY FUNCTIONS Time-out Timer Switch ON the transceiver by turning The purpose of the Time-out Timer is to prevent any person from the Power switch/Volume control using a channel for an extended period of time. clockwise. If you continuous transmitting 60 seconds, transceiver will stop ‹... -
Page 8: Monitor
SPECIFICATIONS Monitor Unity Section If no signal occurs, the transceiver squelch circuit will automatically make the speaker silence, so you will not hear background noise. Frequency range 400~480MHz To manually turn off the squelch circuit, hold the Monitor button. Rated voltage DC 7.4V (Li-ion battery) This operation is helpful for you to adjust the volume level or receive Memory channel... -
Page 9: Troubleshooting Guide
TROUBLESHOOTING GUIDE FREQUENCY CHART Model Name: ________________________________________ Problem Solution Serial Number: _______________________________________ ‹ Battery may run out of power, please update the battery or recharge the battery. Transmit Receive No power Channel QT/DQT ‹ The battery pack may not be in- Frequency Frequency stalled correctly. - Page 10 GUARANTEE CARD Model Number: Serial Number: Purchasing Date: Dealer: Telephone: User’s Name: Telephone: Address: Post Code: REMARKS: 1. This guarantee card to be kept by the user, no replen- ishment if lost. 2. This guarantee card to be filled & chopped by the deal- er, or it is invalid.
Need help?
Do you have a question about the TP-3200 and is the answer not in the manual?
Questions and answers