Mosquito Magnet DEFENDER Troubleshooting & Repair Manual
Hide thumbs
Also See for DEFENDER:
- Operation manual (9 pages) ,
- Operation manual (18 pages) ,
- Operation manual (18 pages)
Advertisement
Quick Links
Mosquito Magnet DEFENDER / LIBERTY
NOTICE: With the exception of the reference to the Mosquito Web Site Information this guide and pictures are copyrighted. It shall not be copied and/or duplicated –
in whole or in part - without the owner's [Frank Piccione] expressed written permission. Warning! "Be very careful when working with electrical connections and hot
parts (e.g. igniters, combustion chambers, etc.). We are not responsible for any damage to your unit or harm to yourself or others that may occur when following the
Mosquito Magnet
©
The Mosquito Magnet (MM**) has a tendency to stop working after a few seasons.
IMPORTANT: Do your work outside because it can get a bit messy and you will not want any insects,
which have not died, flying around in your house!
Most problems are usually caused by a failed (or loose connection of the) thermocouple or igniter. Another
common failure cause is a clogged filter!
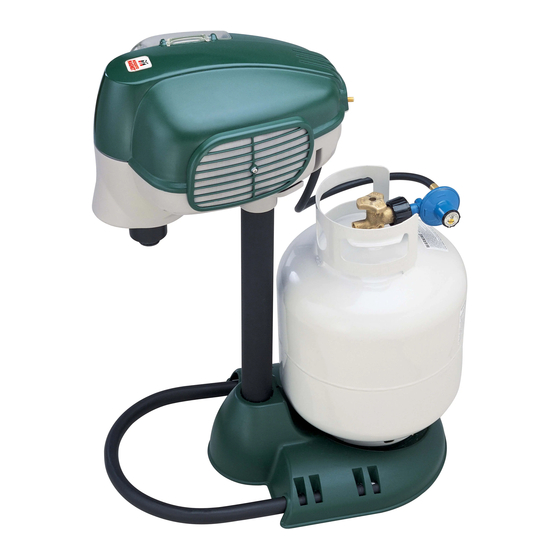
All Mosquito Magnets have the following in common: Power supply [Cord or Battery], liquid propane connector
consisting of a regulator, a propane mixing chamber, Schrader valve, LP solenoid valve, LP sprayer, igniter,
thermocouple, catalytic converter, fan, combustion chamber and a circuit board.
When you power on the unit, it turns on the fan and delivers airflow through the combustion chamber. Shortly
afterwards, the igniter is energized [it gets hot & ignites the propane], then the solenoid valve opens and allows
Liquid Propane to enter the combustion chamber through the sprayer. As soon as there is combustion, the
thermocouple sends feedback to the circuit board and the unit will continue to run. If there is no combustion the
Thermocouple will cause a shutdown of the unit. The propane is then converted in to CO2 via the catalytic
converter before exiting through the Plume Tube. The Schrader valve is the access point where you connect a
CO2 cartridge Quick Clear [blow out foreign matter from the tip of the sprayer] the unit via CO2 cartridge.
For troubleshooting, you may need a multi-meter, Phillips head screwdriver, a few wrenches, high-temperature
silicone adhesive, a 12-volt AC power supply, and Teflon tape [I suggest using Y
tape which is often labeled as "Gas type" OR
Before you dive in opening the combustion chamber try the following:
1. Disconnect the gas line from the propane tank.
2. Using the reset tool, reset BOTH the tank and the regulator. Do this procedure twice. For
pictures & detailed instructions go to:
http://support.mosquitomagnet.com/help/common/opdrt.aspx
3. Use the Quick-Clear procedure. For additional info & pictures go to:
http://support.mosquitomagnet.com/help/common/qcv.aspx
a. Use up to FOUR CO2 cartridges, in a row, to clean out the Schrader valve. This is very
important.
b. Do not do it just once or twice.
4. Reconnect the Regulator to the propane tank.....with the unit turned OFF.
Now...SLOOOOOOOOWLY, very slowly open the propane tank valve... To the 3/4 open
position. I cannot emphasize how important it is to open the valve slowly. Otherwise, you can
lock up the regulator.
5. Now turn on the unit and let it run for five minutes, then check to see if you still have a fault
code**. If you do, you will have to take the combustion chamber apart to repair it.
If this does not do the trick, try the following:
1. Disconnect the propane tank from the regulator and hook it up to your BBQ... Turn on the BBQ
and let it run for about 10 minutes... You could have air in the propane tank.
2. Reconnect the regulator to the tank with the unit off, then disconnect the regulator, then
reconnect it... Open the valve on the tank 3/4 of the way open. Now turn on your unit...
3. If this does not do the trick, disconnect the regulator from the propane tank and give it a shake...
If you hear rattling there is a very good possibility you have a bad regulator.
If the unit is up and running...always be sure to turn off the gas supply a minute or two before you turn
off the unit...Then run a Quick-Clear procedure... This should be done every time the propane tank is
changed.
What causes the problem? When liquid propane is pumped there is always a chance that oil from the
pump gets mixed in with the propane. It is the oil and/or dirt which plug the filter just behind the spray
head.
[See Figure
Page 1 of 13
Troubleshooting & Repair Steps
directions listed in our repair manual."
DEFENDER
6]
RectorSeal #5 pipe thread sealant
©
ellow - double density Teflon
]
.
Advertisement

Related Manuals for Mosquito Magnet DEFENDER


Summary of Contents for Mosquito Magnet DEFENDER
- Page 1 DEFENDER © The Mosquito Magnet (MM**) has a tendency to stop working after a few seasons. IMPORTANT: Do your work outside because it can get a bit messy and you will not want any insects, which have not died, flying around in your house! Most problems are usually caused by a failed (or loose connection of the) thermocouple or igniter.
-
Page 2: Troubleshooting Steps
I found that this method works better than mineral spirits. A plugged filter is what causes most of the problems with the Mosquito Magnet… Impurities in the Liquid Propane are filtered out before the gas enters the chamber, but eventually it gets plugged……. - Page 3 Mosquito Magnet LIBERTY 1. The disassembly of the chamber and cleaning is basically the same as IT IS FOR THE DEFENDER. NOTE: There are two small screws, on either side of the inside of Plume tube, which must be removed before you can remove the top plastic cover.
- Page 4 Mosquito Magnet DEFENDER / LIBERTY Troubleshooting & Repair Steps © Figure 1. Power Supply Line Test> Showing various meters which can be used Page 4 of 13...
- Page 5 Mosquito Magnet DEFENDER / LIBERTY Troubleshooting & Repair Steps © Figure 2 – The combustion chamber The combustion chamber removed Figure 3 – Igniter Igniter removed Figure 3A – testing the Igniter using a 12 volt Battery Figure 4 – The Thermocouple...
- Page 6 Mosquito Magnet DEFENDER / LIBERTY Troubleshooting & Repair Steps © Figure 6 – Remove screws holding the LP line in place. Figure 7 - remove all three screws holding the combustion chamber in place. Figure 8 – Fan housing Figure 9 – Two screws holding the housing to the Combustion Chamber.
- Page 7 Mosquito Magnet DEFENDER / LIBERTY Troubleshooting & Repair Steps © Figure 14 – Open combustion chamber Clean this area Figure 15 – Clean catalytic converter w/Low w/ a small wire brush Odor Mineral spirits. Let it air-dry throughly! Figure 16 – High Temp gasket compund holding the Figure 17 –...
- Page 8 14. Remove the Thermocouple [Usually the screw holing it in place has disintegrated as is the usual case with the igniter] 15. Remove the Igniter. 16. Now use the same cleaning procedure as outlined for the Defender. Page 8 of 13...
- Page 9 Mosquito Magnet DEFENDER / LIBERTY Troubleshooting & Repair Steps © Picture #2 Picture #3 Picture #4 Page 9 of 13...
- Page 10 Mosquito Magnet DEFENDER / LIBERTY Troubleshooting & Repair Steps © Picture #5 Picture#6 Components Page 10 of 13...
- Page 11 Mosquito Magnet DEFENDER / LIBERTY Troubleshooting & Repair Steps © This a bad one…Cleaning Needed!! Air filters located at the bottom of the head. They can be taken out and washed with soap and water. Fan housing support Page 11 of 13...
- Page 12 Mosquito Magnet DEFENDER / LIBERTY Troubleshooting & Repair Steps © LIBERTY PLUS Page 12 of 13...
- Page 13 Mosquito Magnet DEFENDER / LIBERTY Troubleshooting & Repair Steps © Page 13 of 13...
Need help?
Do you have a question about the DEFENDER and is the answer not in the manual?
Questions and answers
How can i easily remove the U shaped base leg from the base please? I see it is locked in by the tabs....
To remove the U-shaped base leg from the Mosquito Magnet Defender, unscrew the cover from the attractant compartment, then turn the base and leg assembly to unlock the legs from the slots on the base.
This answer is automatically generated