Table of Contents
Advertisement
Quick Links
Advertisement
Table of Contents

Related Manuals for Kegco Hot Draft KC HDT301


Summary of Contents for Kegco Hot Draft KC HDT301
- Page 1 Installation Guide Model: KC HDT301...
-
Page 2: Table Of Contents
FINE TUNING YOUR HOT DRAFT® TOWER SYSTEM ..................26 CLEANING AND MAINTENANCE FOR YOUR HOT DRAFT ® TOWER ..............29 TROUBLESHOOTING THE HOT DRAFT ® TOWER ..................... 31 WARRANTY INFORMATION .......................... 32 8510 Miralani Dr. (888) 980 - 4810 support@kegco.com San Diego, CA 92126... -
Page 3: Safety Warning
SERIOUS BODILY INJURY OR DEATH COULD OCCUR IF YOU IGNORE THIS WARNING. “Hot liquids under pressure can be dangerous and even fatal if installed improperly installed and maintained. “ 8510 Miralani Dr. (888) 980 - 4810 support@kegco.com San Diego, CA 92126... -
Page 4: Important Safety Information
Beverage Factory lockout must be used. (Ref. NEC 422.31) Phone: 1-(800) - 710-9939 8510 Miralani Dr. (888) 980 - 4810 support@kegco.com San Diego, CA 92126... -
Page 5: About
Congratulations on the purchase of your new HOT DRAFT® Tower! This U.S. patented product (https://kegco.com/pages/patents) is the property of Ryan Bros. Coffee and is the World’s First Draft System that allows you to enjoy both cold and hot products at the point of dispense without the burning effects of holding tanks or the lessening of flavor from oxidation. -
Page 6: Technical Specifications
HOT DRAFT® Installation Guide for https://kegco.com/pages/patents TECHNICAL SPECIFICATIONS PRODUCT FEATURES On/Off Switch Yes Dimensions 16 ” (H) x 15” (W) x 7 ” (D) Gas Used Nitrogen Operating Temperature Range F – 180 Electrical Plug No 4.8 kW/240 V/60 Hz/20A... -
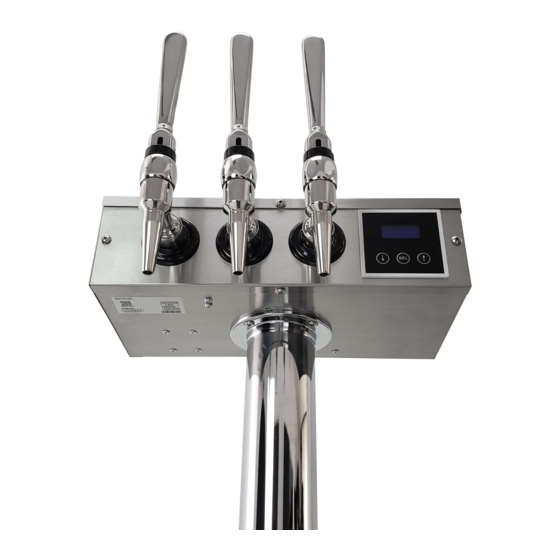
Page 7: Parts Diagram
HOT DRAFT® Installation Guide for https://kegco.com/pages/patents PARTS DIAGRAM 1. Heater Assembly 6. Heating Chamber 13. Inlet Barbed Nipple 19. Control Panel 2. Compression Fitting 7. Inlet Manifold for 3/16” ID Tubing 20. 90 Elbow Shank for Hot Draft® Tubing 8. Triac 14. -
Page 8: Before Installation Of Your Hot Draft® Tower
HOT DRAFT® Installation Guide for https://kegco.com/pages/patents BEFORE INSTALLATION OF YOUR HOT DRAFT® TOWER READ THESE INSTRUCTIONS THOROUGHLY AND COMPLETELY PRIOR TO INSTALLATION & USE. FAILURE TO FOLLOW INSTRUCTIONS COULD CAUSE PROPERTY DAMAGE, SERIOUS PERSONAL INJURY, OR DEATH. By installing this product, you acknowledge the terms of the manufacturer’s warranty. Once the Tower is installed, do not return product to the place of purchase. -
Page 9: Assemble The Hot Draft® Tower Dispense System
HOT DRAFT® Installation Guide for https://kegco.com/pages/patents ASSEMBLE THE HOT DRAFT® TOWER DISPENSE SYSTEM Safety Instructions: 1. Pressurized Nitrogen can be dangerous. Handle with care. 2. Never exceed 60 PSI. 3. Always connect Nitrogen tank to regulator. Never connect the tank directly to keg. - Page 10 HOT DRAFT® Installation Guide for https://kegco.com/pages/patents 2. Once the power cable is inside the kegerator cabinet, (a) guide the cable through the knockout in the back wall and (b) out the other side. 3. (a) Align the tower flange with the holes on top of the kegerator. Insert the provided Tower Screws into the holes. (b) Use a Philips Head Screwdriver and appropriate wrench to tighten the screws with provided nuts and washers.
- Page 11 HOT DRAFT® Installation Guide for https://kegco.com/pages/patents 4. Feed the air-cooling line up into the tower. 5. Install the Power Cable Strain Relief Clamp. (a) Slip the Clamp around the power cable. (b) Pinch the ends of the Strain Relief Clamp close together. (c) Align the holes with the back right Tower Screw. (d) Use the provided nut and washer to tighten the clamp.
- Page 12 HOT DRAFT® Installation Guide for https://kegco.com/pages/patents If you are installing the tower on a surface other than the kegerator top, you must use the necessary hardware to drill holes for screws and beverage lines. Follow the tower flange dimensions outlined below to match the screw positions on your surface.
-
Page 13: Attaching The Faucets
HOT DRAFT® Installation Guide for https://kegco.com/pages/patents Attaching the Faucets When attaching the faucet to the tower, (a) line up the teeth on the inside of the faucet with the teeth inside the shank. (b) Screw the coupling nut onto the faucet and tighten with the faucet wrench. (c) Screw the tap handle onto the faucet lever. -
Page 14: Gas Connection
HOT DRAFT® Installation Guide for https://kegco.com/pages/patents Gas Connection The Nitrogen tank will arrive empty, and you will need to have it filled locally. The best way to find a place to fill the tank is to search for a welding supply store in your zip code. We recommend the use of Industrial Grade Nitrogen for the best result. -
Page 15: Coupler Connection
HOT DRAFT® Installation Guide for https://kegco.com/pages/patents Coupler Connection Commercial keg couplers attach to both the beverage and gas lines. With this unit, you can use one keg to dispense both cold and hot beverage by using the provided Low Profile T-Splitter Fitting. - Page 16 HOT DRAFT® Installation Guide for https://kegco.com/pages/patents 3. Identify the beverage lines. Pull the beverage lines away from the Hot Draft® Tower until they are taut. The beverage lines will be different lengths. Follow the guide pictured below to identify the lines and corresponding faucet.
- Page 17 HOT DRAFT® Installation Guide for https://kegco.com/pages/patents 4. The beverage lines come with Beer Nuts at the end that attach to the T-splitter. (a) Be sure to insert a neoprene washer into the Beer Nut before attaching to the T-splitter. (b) Attach the Hot Draft®...
-
Page 18: Setting Pressure
HOT DRAFT® Installation Guide for https://kegco.com/pages/patents Setting Pressure If dispensing coffee, the pressure should be set to about 30-40 PSI. The best way to set the pressure is to turn the dial on the front of the regulator counterclockwise until it is all the way out. This will turn the regulator off. Turn the valve on the bottom of the regulator to the side to ensure no Nitrogen will pass through the regulator. -
Page 19: Electrical Configuration
HOT DRAFT® Installation Guide for https://kegco.com/pages/patents ELECTRICAL CONFIGURATION Beverage Factory recommends that this product be installed by a licensed and qualified electrician in accordance with all applicable national, state, provincial, and local electrical codes. As with all electrical appliances, under no circumstances should you attempt to install, repair, or disassemble this water heater without first shutting off all power to the unit directly at the fuse or breaker box. -
Page 20: Voltage Setting Configuration
HOT DRAFT® Installation Guide for https://kegco.com/pages/patents Voltage Setting Configuration The HOT DRAFT® Tower will be operable on either 208V, 220V, or 240V electrical systems. Contact a licensed and qualified electrician to confirm your installation location’s voltage supply. The unit must be configured for your specific voltage supply. - Page 21 HOT DRAFT® Installation Guide for https://kegco.com/pages/patents 2. (a) The DIP Switch will be located on the left edge of the backside of the Control Board. (b) Use a Flathead Screwdriver, or suitable tool, to adjust the DIP Switch. 3. Configure the DIP Switch for your electrical supply according to the guide below. This information is also printed on the Control Board directly underneath the DIP Switch.
-
Page 22: Electrical Diagram
HOT DRAFT® Installation Guide for https://kegco.com/pages/patents Electrical Diagram 8510 Miralani Dr. (888) 980 - 4810 support@kegco.com San Diego, CA 92126... -
Page 23: Navigating Your Hot Draft® Tower
HOT DRAFT® Installation Guide for https://kegco.com/pages/patents NAVIGATING YOUR HOT DRAFT® TOWER When you first plug in your Hot Draft® Tower, the LED Display will show the Main Screen with the message “Starting Up”. The display panel includes several other features to operate and control the Hot Draft® Tower. -
Page 24: Purge
HOT DRAFT® Installation Guide for https://kegco.com/pages/patents PURGE “PURGE On/Off” is the setting to toggle Purging Mode. Pressing “SEL” will bring you to a screen where you can toggle Purging Mode “ON” or “OFF” by pressing either “Up” or “Down”. Pressing “Select” will return you back to the service menu. -
Page 25: Pouring With Your Hot Draft® Tower
HOT DRAFT® Installation Guide for https://kegco.com/pages/patents POURING WITH YOUR HOT DRAFT® TOWER (a) While idle, the Main Screen will display “On Demand”, indicating that your Hot Draft® Tower is ready for operation. (b) Open the Hot Draft® Faucet to begin heating your beverage. -
Page 26: Fine Tuning Your Hot Draft® Tower System
HOT DRAFT® Installation Guide for https://kegco.com/pages/patents FINE TUNING YOUR HOT DRAFT® TOWER SYSTEM If the beverage is not pouring accurately to the setpoint temperature, the Hot Draft® Tower can be fine-tuned to achieve consistent and accurate pours. Two settings can be manually fine-tuned to improve the accuracy of the Hot Draft® Tower: Compensation Factor and Flow Rate adjustment. - Page 27 HOT DRAFT® Installation Guide for https://kegco.com/pages/patents 2. The second method of adjusting Flow Rate is to adjust the Flow Adjustment Spindle (see 7 in Parts Diagram). To access the flow adjustment spindle, the lid must be removed. ENSURE THE UNIT IS UNPLUGGED AND TURNED OFF BEFORE REMOVING LID AND REACHING INSIDE.
- Page 28 HOT DRAFT® Installation Guide for https://kegco.com/pages/patents Flow rate is adjusted by using a flathead screwdriver to tighten or loosen the flow adjustment spindle, as shown below. To increase the flow rate, loosen the flow adjustment spindle by turning counterclockwise. To decrease the flow rate, tighten the flow adjustment spindle by turning clockwise, as shown below.
-
Page 29: Cleaning And Maintenance For Your Hot Draft ® Tower
CLEANING AND MAINTENANCE FOR YOUR HOT DRAFT ® TOWER Regular cleaning and maintenance of your Hot Draft® Tower is key to ensuring peak performance over time. Kegco offers a full line of cleaning products to keep your draft lines free of contaminants that may affect your beverage flavor and flow. - Page 30 HOT DRAFT® Installation Guide for https://kegco.com/pages/patents Cleaning Procedure 1. To clean your Hot Draft® Tower, set the unit to “Cleaning Mode” (see section Navigating your Hot Draft® Tower). This will disable the heating process and allow for cleaning solution to pass through the Hot Draft® components. Failure to do so may result in the formation of toxic vapors and gases.
-
Page 31: Troubleshooting The Hot Draft ® Tower
HOT DRAFT® Installation Guide for https://kegco.com/pages/patents TROUBLESHOOTING THE HOT DRAFT ® TOWER PROBLEM Possible causes Possible solutions The unit is not connected to a - Check electrical plug for proper connections. power source. - Ensure circuit breaker is turned on. -
Page 32: Warranty Information
WHAT IS COVERED LIMITED ONE-YEAR WARRANTY: For one year from the date of purchase by the original owner, Kegco will, at its option, repair or replace any part of the unit, which proves to be defective in material or workmanship under normal use. During this period Kegco will provide all parts and labor necessary to correct such defects free of charge, so long as the unit has been installed and operated in accordance with the written instructions in this manual.
Need help?
Do you have a question about the Hot Draft KC HDT301 and is the answer not in the manual?
Questions and answers