
Related Manuals for Vega Absolute VEGA MT X CAN


Summary of Contents for Vega Absolute VEGA MT X CAN
- Page 1 MONITORING DEVICE VEGA MT X CAN User Manual REVISION NUMBER FIRMWARE VERSION 0.10b rc41.18 www.vega-absolute.ru...
-
Page 2: Table Of Contents
Vega MT X CAN / User Manual CONTENTS INTRODUCTION .....................................3 1 DESCRIPTION AND OPERATION ..............................4 Device description .....................................4 Functionality .......................................4 Marking .........................................5 Device series .......................................6 2 SPECIFICATION ....................................8 3 OPERATION BEGINNING ...................................9 Device appearance ....................................9 Contacts description ..................................10 Device indication....................................11 SIM installing .....................................12... -
Page 3: Introduction
Vega MT X CAN / User Manual INTRODUCTION This manual is designated for Vega MT X CAN series monitoring device (hereinafter – the device) manufactured by Vega-Absolute OOO and provides information on powering and activation procedure, control commands and functions of the device. -
Page 4: Description And Operation
1 DESCRIPTION AND OPERATION DEVICE DESCRIPTION Vega MT X CAN device is designed for monitoring of vehicles by the using of GLONASS/GPS positioning systems including the determination of vehicle placement, speed, and motion direction as well as for transmitting of collected data through GSM. -
Page 5: Marking
Vega MT X CAN / User Manual Manage of actuators by the commands and by the events Built-in black box holding up to 100,000 entries SMS-notifications with a wide spectrum of set abilities GPS-odometer Geofences control with ability of SMS-notification and manage of actuators (up to 50... -
Page 6: Device Series
Vega MT X CAN / User Manual DEVICE SERIES Version Antennas Bluetooth ГНСС Internal 3.0 + BLE Quectel MC60 Quectel MC60 4 band modem ГЛОНАСС/GPS/Galileo/QZSS External 850/900/1800/1900 MHz Sensitivity: -167 dBm (tracking) included GPRS class 12 Hot start: 1 s / Cold start: 35 s 85.6 kbps Up/Down... - Page 7 Vega MT X CAN / User Manual Int v2 Internal 3.0 + BLE SIM868E SIM868E 4 band modem ГЛОНАСС/GPS/Galileo/QZSS Ext v2 External 850/900/1800/1900 MHz included Sensitivity: -166 dBm GPRS class 12 Hot start: 1 s / Cold start: 29 s 85.6kbps Up/Down...
-
Page 8: Specification
Vega MT X CAN / User Manual 2 SPECIFICATION Parameter Value Housing dimensions, mm 110 х 67 х 20 Ingress protection rating IP53 External power, V 9…36 Consumption current, mА - in sleep mode Up to 5 - in active mode 40…300... -
Page 9: Operation Beginning
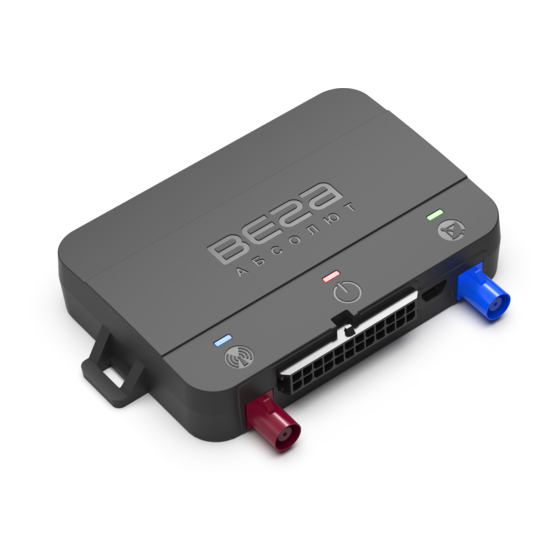
3 OPERATION BEGINNING DEVICE APPEARANCE Vega MT X CAN is represented in black plastic case which has four screws and mounting eyelets. On the case there are LED indicators signed by pictograms, wire connector and USB. Depend on device version there might be connectors for external antennas GSM and GNSS. -
Page 10: Contacts Description
Vega MT X CAN / User Manual CONTACTS DESCRIPTION Contact Wire color Description Black Ground - Orange 1-Wire Pink Digital output 1 Dark blue Digital output 3 White + yellow Multifunctional input 1 White + red Multifunctional input 3 Yellow + white... -
Page 11: Device Indication
Vega MT X CAN / User Manual Violet Digital output 2 Grey Digital output 4 White + dark blue Multifunctional input 2 Pink + red Lin/K-Line Dark blue + white RS-232 TX Pink + dark blue RS-485 B Brown CAN3 Low... -
Page 12: Sim Installing
Vega MT X CAN / User Manual SIM INSTALLING To use the Vega MT X CAN monitoring device, you need a micro-SIM with support of SMS and GPRS functions. There must be cash on the account. PIN protection must be disabled. - Page 13 Vega MT X CAN / User Manual Boards before Boards after replacing replacing SIM-holders SIM-holders The location of the SIM slots may differ depending on the board version, and the SIM card may be installed in different way Boards before replacing SIM-holders Boards after replacing SIM-holders MT X Ext –...
-
Page 14: Mounting Recomendations
Vega MT X CAN / User Manual MOUNTING RECOMENDATIONS First, you need to make connection settings, after which you can configure and change other parameters at any time remotely as needed. Connection settings are: monitoring servers’ settings (protocol, IP-address and port);... - Page 15 Vega MT X CAN / User Manual Step by step mounting is as follows: 1. De-energizing the connected equipment and the vehicle's on-board power. 2. Connection of external power wires according to the scheme through a fuse. 3. Power ON.
-
Page 16: External Equipment Connection
4 EXTERNAL EQUIPMENT CONNECTION DALLAS TEMPERATURE SENSORS Vega MT X CAN monitoring device allows to connect is up to ten Dallas temperature sensors through 1-Wire interface. Connection scheme is on the picture below. If connected temperature sensor has three contacts instead of two then you should close “Power” with “Ground”. - Page 17 Vega MT X CAN / User Manual Click “OK” - the sensor number will be added to the free field. After that you can connect the next sensor in the same way. You can also connect several sensors in turn, while the add window is open, in this case, after clicking the "OK"...
-
Page 18: Authorized Dallas Keys
Vega MT X CAN / User Manual AUTHORIZED DALLAS KEYS Vega MT X CAN monitoring device allows you to connect an I-Button authorized key reader to a 1- Wire pin. The connection scheme is shown in the figure below. The number of authorized keys can reach ten. -
Page 19: Fuel Level Sensors
Vega MT X CAN / User Manual FUEL LEVEL SENSORS The monitoring device allows you to connect fuel level sensors via the RS-485 bus and operates with them using the LLS protocol. To do this, you need to connect to the device through the “Configurator”... -
Page 20: Extension Unit
Vega MT X CAN / User Manual EXTENSION UNIT The Vega MT X CAN monitoring device allows you to connect the Vega BR-1 expansion unit via the RS-485 or RS-232 interface. Vega BR-1 has 15 multifunction inputs and 15 digital outputs. - Page 21 Vega MT X CAN / User Manual Permissible load on each digital output 0.5 A To increase the load on the outputs of the device, you must use an external relay. The relay connection diagram is shown below. By default, after a device reboot, the state of the digital output is reset to 0, that is, "off". In the...
-
Page 22: Inputs
Vega MT X CAN / User Manual INPUTS Vega MT X CAN monitoring device has three multifunctional inputs that can operate in four modes: Analog; Digital; Frequency; Pulse. In analog mode, the input voltage is measured. Such an input can be used for sensors whose readings vary in a certain range. -
Page 23: Tachographs
Vega MT X CAN / User Manual Int, Ext (board revision is higher than 4-th), LTE, Int v2, Ext v2, LTE v2 Analog Pull-down to the ground 240 kOhm Pull-down to the ground 240 kOhm Digital Pull-up to external power 44 kOhm... - Page 24 Vega MT X CAN / User Manual The data transmitted by each tachograph is listed in the table. Data Mercury ТА-001, Shtrih - Тахо RUS Continental VDO DTCO Atol Drive 5 3283/1381 Tachograph commands (download data from card 1, download...
- Page 25 Vega MT X CAN / User Manual Х = 1, 2. The connection of each type of tachograph has its own features, we will consider their connection separately. Mercury ТА-001 connects through RS-485 interface. You should be sure that the firmware version is not lower than V104_0210_norm.
- Page 26 Vega MT X CAN / User Manual Shtrih - Тахо RUS connects through RS-485 interface. In the tachograph settings for the RS-485 interface, the Shtrih-Тахо protocol must be selected. Revision 13 of 27.09.2021...
- Page 27 Vega MT X CAN / User Manual Atol Drive 5 connects through UART interface or through UART <-> RS-232 converter. In the tachograph settings in the part «Penal – Penal protocol», the ScoutNet protocol must be selected. Please note that this tachograph model goes into sleep mode if not used for 25 seconds, and after 7 minutes falls asleep even deeper.
- Page 28 Vega MT X CAN / User Manual Continental VDO DTCO 3283/1381 connects through RS-232 interface located on the front of tachograph. For reading the data about cards and tachograph, it is necessary to connect the vehicle CAN- bus to the tachograph and monitoring device. CAN-bus connecting is option.
-
Page 29: Ble-Sensors
Vega MT X CAN / User Manual From the side of the monitoring device, you should also configure the interface for working with the tachograph. To do that you need to connect to the device through the "Configurator" program and go to the "Settings" menu -> "Tachograph" tab. -
Page 30: Communication Protocols
Vega MT X CAN / User Manual 5 COMMUNICATION PROTOCOLS The Vega MT X CAN monitoring device supports several protocols: EGTS, WIALON IPS, WIALON Combine, VEGA, NDTP. The current protocol description is contained in a separate document, which can be found on the website fmsvega.ru. -
Page 31: Managing Using Sms-Commands
Vega MT X CAN / User Manual 6 MANAGING USING SMS-COMMANDS Some settings of the Vega MT X CAN monitoring device can be managed remotely via SMS commands. General command format is @PIN:command, where PIN is a four numbers PIN of the device (See “Security”... - Page 32 Vega MT X CAN / User Manual server – set the server @PIN:serverY:addr:port&protocol&period&term @2222:server3:193.193.165.1 address inal_addr 65:20332&wips&0&90008 ____________ ____________ Y – server number PIN – 2222 addr – server address Server number – 3 port – server port Server address –...
- Page 33 Vega MT X CAN / User Manual t:unixtime – set lifetime @PIN:XXXX/t:unixtime @4444: reboot/t: for the command ХXXX – command for which is needed to set a 1577196600 lifetime ____________ unixtime – time in UTC when the command PIN – 4444 will not execute even the SMS with it just Command –...
- Page 34 Vega MT X CAN / User Manual ign: 0, - ignition (0 – no, 1 – yes) acc: 4.1, ext: 12.1, - built-in battery and vehicle voltage temp: 19,5, - environment temperature move: 0 – moving (0 – no, 1 – yes) black box: 0, 4, 0, 0 –...
-
Page 35: Storage And Transportation Requirements
Vega MT X CAN / User Manual 7 STORAGE AND TRANSPORTATION REQUIREMENTS Vega MT X CAN devices shall be stored in the original packaging in heated room at temperatures +5 °С to +40 °С and relative humidity less than 85%. -
Page 36: Content Of The Package
Vega MT X CAN / User Manual 8 CONTENT OF THE PACKAGE Content of the package of the Vega MT X CAN device depend on the model. You can identify the device model by the sticker in the factory certificate (see part “Marking”). -
Page 37: Warranty
Vega MT X CAN / User Manual 9 WARRANTY The manufacturer guarantees that the product complies with the current technical documentation, subject to the storage, transportation and operation conditions specified in the "User Manual". The warranty period is 36 months. - Page 38 Vega MT X CAN / User Manual Document Information Title Monitoring Device Vega MT X CAN Document Type Manual - Translation from Russian Document Number В01-МТ10-01 Revision and date 13 of 27.09.2021 This document complies to the next devices: Series Name Device Name Vega МТ...
- Page 39 Vega MT X CAN / User Manual Description of connecting supported tachographs, other edits 02.10.2020 There is a new server type for command: Wialon Combine, there are 09.11.2020 the new SIM-holders in the new board revisions 04.12.2020 There is an alarm about SIM-card installing in the unpowered device 29.03.2021...
- Page 40 Vega MT X CAN / User Manual vega-absolute.ru User Manual © ООО Vega-Absolute, 2019-2021 Revision 13 of 27.09.2021...
Need help?
Do you have a question about the VEGA MT X CAN and is the answer not in the manual?
Questions and answers