Table of Contents
Advertisement
Quick Links
Advertisement
Table of Contents

Related Manuals for RIEJU E-City


Summary of Contents for RIEJU E-City
- Page 1 E-CITY USER MANUAL...
- Page 2 E-CITY...
- Page 3 RIEJU S.A. would like to thank you for your trust in our company and congratulate you on an excellent choice. The E-CITY model is the result of RIEJU, extensive experience in developing high-performance vehicles. The purpose of this Owner’s Manual is to set forth how to use and maintain your vehicle. We ask that you carefully read the instructions and the information provided as follows.
-
Page 4: Table Of Contents
Indicators ..........Solution for common problems warranty ..Sfely driving ........... Warranty ............Protective clothing ........Accessoires ..........Load ............Kickstand and centre stand ......Rear shock absorber ........Recomendations before starting up ....Check for safe driving ........E-CITY... -
Page 5: Vehicle Description
VEHICLE DESCRIPTION Designed to transport the driver and a passenger. You must not exceed a maximum weight of 150 kg, including the trunk. E-CITY is a scooter designed to drive on asphalt. E-CITY... -
Page 6: Vehicle Registration
Please make a note of the chassis and engine serial numbers, which will help you for all purposes (certifi cate of characteristics, insurance, registration, etc.). These numbers will be useful for you for any suggestions or complaints, as well as to order replacement parts. Chassis serial number (p.12) Engine serial number (p.12) Dealer seal E-CITY... -
Page 7: Vehicle Delivery
FIRST INSPECTION Explain that an inspection after 1,000 km is important. PERIODICAL MAINTENANCE Explain the need for periodical maintenance and state that failure to comply with guidelines for check-up and visiting the shop is grounds for “Loss of Vehicle Warranty”. E-CITY... -
Page 8: Inspection Prior To Delivery
- General inspection of nuts and screws: Callipers/discs, transmission/pinions, wheel nuts, tilt, shock absorber, brake / levers, etc..........................Driving components - The digital instrument dashboard checks itself when the ignition is turned on (depending on the model) ..................................- Adjusting the headlight height ............................. E-CITY... - Page 9 ON-ROAD TEST, at least 10 km - Engine operation ................................- Grip on road and suspensions ............................. - Braking and ABS operation (if installed) ........................- No abnormal sounds ..............................CHECKING FINAL APPEARANCE ..........................Manufacturer signature Date E-CITY...
-
Page 10: Technical Info
Wheel (front and rear) Alloy Tyre front size 110/70-12 Tyre rear size 130/70-12 PERFORMANCE 1200 W 3000 W Max. speed 45 Km/h 70 Km/h Kilometre range 55 Km 70 Km Slope Acceleration (0 - 100 m) 12,1 s 9,5 s E-CITY... - Page 11 60 V Energy consumption rate 19 Kw for 1200DT-3 47 Kw 29 Kw for I200DT -3A Undervoltage protection 51 V 51 V Overcurrent protection 35 A 70 A Voltage / frequency charger input power 220V / 50Hz 220V / 50Hz E-CITY...
-
Page 12: Location Of Serial Numbers
LOCATION OF SERIAL NUMBERS Chassis identifi cation number The frame number is die cut under the seat (VIN). Engine identifi cation number The engine number is engraved on the engine itself and on the back tyre. E-CITY... - Page 13 Builder label Your RIEJU has an identifi cation plate with details on: ma- nufacturer, frame number, approval number, and sound emissions level. The vehicle’s identifi cation plate is riveted to the left of the chassis, and also has the frame number (VIN).
-
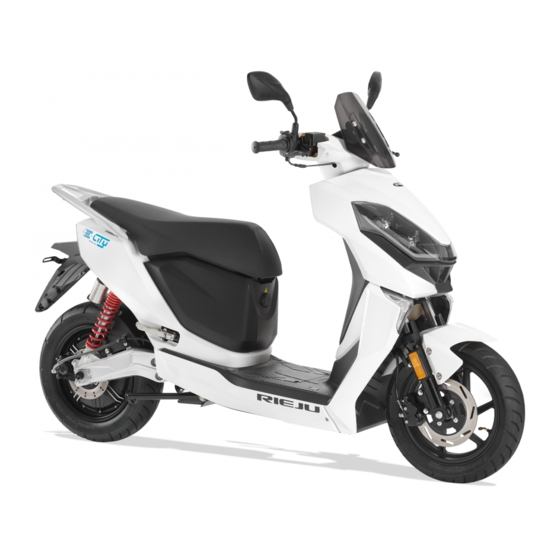
Page 14: Main Vehicle Elements
7. Rear refl ector 12. Centre stand 17. Front light 8. Rear shock absorber 3. Battery 13. Front brake 18. Instrumental panel 4. Rear light 9. Engine 14. Front shock absorber 10. Rear wheel 5. Turn signal 15. Front wheel E-CITY... - Page 15 6. Front right brake lever 11. Turn signals 2. Lights 7. Right grip – Accelerator 12. Left grip 3. Instrument panel 8. Warning light 13. Front left brake lever 4. Driving mode selector 9. On and off 5. Right rear-view mirror 10. Horn E-CITY...
-
Page 16: Ignition Key
LOCK - To block steering, you must turn the steering bar until you meet resistance. Insert key into the lock. Insertar la llave en la cerradura. OFF - press and turn anti-clockwise, into position. LOCK - To unblock steering, turn the key clockwise. OPEN - Open the seat. E-CITY... -
Page 17: Instrument Panel 1200W
- Dynamic - Sport Battery charge indicator in percentage Speed indicator Electric current Mileage Electrical consumption in operation indicator Left turn signal Right turn signal Recharge light High beam on CRUISE CONTROL Light on indicator Cruise control indicator INDICATOR E-CITY... -
Page 18: Instrument Panel 3000W
Electrical failure Right turn signal Driving mode indicator - Economy - Dynamic - Sport Recharge light turn Light sensor Electrical Speed indicator consumption in operation indicator Battery charge Incomming call READY INDICATOR Mileage indicator indicator in percentage indicator E-CITY... -
Page 19: Indicators
This turns on when the scooter battery’s internal indicator reaches its highest level while driving at a high speed. You must reduce speed, or it will be limited automatically. Charge level light: Indicador en Verde: batería al 100%. Blinking yellow: charge less than 15%. Yellow light: charging, between 20 and 99% Blinking light / right turn. E-CITY... - Page 20 Ready light, ready to start up. Incoming call indicator light. Electrical current in amperes light. Battery status indicator light. Light indicates battery level in percentage. Light indicates driving mode: “E” Economy, “D” Dynamic, and “S” Sport. E-CITY...
- Page 21 Light indicating a possible electrical failure. Light indicating vehicle speed. Light indicating total and partial kilometre or mileage. Blinking light / left turn. Cruise control light. Bluetooth indicator light. To connect a smartphone, you must link it with the code 0000 or 1234. E-CITY...
-
Page 22: Sfely Driving
7. To prevent possible accidents, it is important that you remain visible with light-coloured or refl ective clothing. 8. Never drive in another user’s blind spot on the road. E-CITY... - Page 23 9. Remember that braking distance on rainy days is twice as long. Drive with caution and reduce speed on wet roads, asphalt with grease or oil, sewer lids, potholes, etc. E-CITY...
-
Page 24: Protective Clothing
This same protection is also necessary for the passenger. Accessories The original accessories for the E-City vehicles were spe- cifi cally designed and tested on the scooter. - Check that the accessory does not darken the lights, reduce the vehicle’s height from the ground or incline... -
Page 25: Load
Check that the load is properly secured. To prevent possible instability or a slower steering response, do not hang ob- jects from the handlebar. The maximum weight allowed is 150 kg. E-CITY... -
Page 26: Kickstand And Centre Stand
(2) with your foot and lift the scoo- ter, sliding it backward. Before starting up, retract the kickstand or centre stand. After retracting the stand, to start up, press and hold the “P” switch for three seconds to go to “READY” position and begin driving. E-CITY... -
Page 27: Rear Shock Absorber
REAR SHOCK ABSORBER The rear shock absorber is equipped with a separate gas bottle that does not require maintenance. E-CITY... -
Page 28: Recomendations Before Starting Up
Check all fi xation and connection elements. Tighten and adjust them, if necessary. Charge level Check that the charge level is suffi cient. Recharge, if necessary. Surge protector ind. Check that the device is activated or set to “ON”. E-CITY... -
Page 29: Check For Safe Driving
When the P light goes to READY, gently turn the accelerator grip to activate the motor. Do not turn the grip quickly. When starting up, the motor may buzz because of the magnetic fi eld. This will stop when you reach optimum speed. E-CITY... - Page 30 Do not accelerate on downhill slopes or squeeze the brake too hard, as you may skid and overturn. Turn the front headlight on while driving at night. Be especially careful in the rain and do not go through areas with deep water to avoid damaging the motor. Do not drive with just one hand. E-CITY...
-
Page 31: Kilometre Range
- Autonomy may vary due to weather. High temperature can shorten the life cycle of lithium batteries. Extreme temperatures, -10°C/ 45°C. ITEM 1200 W 3000 W Confi guration Motor: 1200W / Battery: 60V26Ah Motor: 3000W / Battery: 60V35Ah Test data Max. speed (km/h) Kilometre range (km) Max. speed (km/h) Kilometre range (km) Mode E-CITY... -
Page 32: Maintenance Programme
Turn grip to verify that it operates properly. Chassis, rear suspension Check all welded points and fi xation elements. Front fork Check fi xation elements and bearings. Shock absorber Check that the shock absorber functions properly. Block set Check that the block set functions properly. E-CITY... - Page 33 Check charging current, voltage. Main cable Check welding points on conduits and insulation. We recommend initial maintenance at 1,000 km or after six months with regular motorcycle use. We advise bringing it in to an offi cial Rieju shop every year. E-CITY...
-
Page 34: Basic Maintenance Kit
BASIC MAINTENANCE KIT With maintenance tools, you can conduct simple repairs, make small adjustments, and replace certain compo- nents. Spanner 13-15 Allen wrench 6mm Tool Bag Double-headed screwdriver: at head and Phillips Spanner 8-10 E-CITY... -
Page 35: Accelerator Grip Operation
Check the accelerator grip’s play. The standard number must be between 2 and 6 mm. To adjust play, loosen the lock nut and turn the adjuster. Once adjustment is complete, tighten the nut. Front right brake lever Right accelerator grip E-CITY... -
Page 36: Battery Maintenance
Avoid exposure to direct sunlight. • Keep the battery clean and dry to prevent excessive self-discharge. • Secure the battery safely to prevent damage. Do not throw, roll, or lean objects on the battery while transpor- ting it. E-CITY... - Page 37 BATTERY CHARGE LEVEL BUTTON RECYCLING: TO PREVENT ENVIRONMENTAL DAMAGE. DISCARD AT A RECYCLING POINT. DO NOT THROW AWAY WITH HOUSEHOLD WASTE. IF YOU WISH, YOU MAY CONTACT TECHNICAL SERVICE. IT IS FORBIDDEN TO REMOVE THE LITHIUM CELLS. E-CITY...
-
Page 38: Front And Rear Brakes
THE EFFICIENCY OF BRAKING AND DRIVING SAFETY. BRAKE FLUID CAN CAUSE IRRITATION. AVOID CONTACT WITH THE SKIN AND EYES. IN THE EVENT OF CONTACT WITH EYES, FLUSH WITH PLENTY OF WATER AND SEE A PHYSICIAN. DO NOT ALLOW DUST OR WATER TO ENTER THE FLUID TANK. E-CITY... - Page 39 In this case, please contact the Distributor. NOTE: IF THIS ADJUSTMENT DOES NOT PRO- VIDE SATISFACTORY RESULTS, PLEASE CON- TACT YOUR DISTRIBUTOR. E-CITY...
- Page 40 FRONT RIGHT BRAKE LEVER Brake fl uid tank lid Brake fl uid lever indicator Brake lever play between Brake fl uid tank lid 10-20mm LEFT REAR BRAKE LEVER Main cylinder Brake fl uid lever indicator Brake lever play between 10-20mm E-CITY...
-
Page 41: Front And Rear Shock Absorber And Suspen- Sions
Next, compress and release the front/rear fork several ti- mes to check that it operates correctly, without noise or loss. Check that the rear fork sump’s play is correct, pressing on the side of the rear wheel. Check that all fi xation elements are securely tightened. E-CITY... -
Page 42: Tyres
0.8 mm. Using the scooter with worn FRONT 200kPa (2 Bar) 225kPa (2.5 Bar) tyres is risky and jeopardises traction and safety while driving. REAR 225kPa (2.25 Bar) 225kPa (2.25 Bar) FRONT TYRE 110/70-12 REAR TYRE 130/70-12 FRONT WHEEL MT 2.5X12 REAR WHEEL J12X3.5 E-CITY... -
Page 43: Battery Charger
You may also recharge with the battery charger plugged in to a 220V AC current. When charging is complete, unplug and then disconnect the battery charger connector. Do not conduct the operation backwards. Lithium-Ion battery 220V AC Battery charger E-CITY... -
Page 44: Fuse
Once the problem has been resolved, install a new spare fuse in the fuse box. Spare 10A Fuse 10A fuse CAUTION: PAY SPECIAL ATTENTION TO INSTRUCTIONS FOR FUSES WHEN REPLACED. DO NOT USE OTHER MATERIALS, SUCH AS ALUMINIUM, IRON, OR COPPER WIRES. OTHERWISE, THE CIRCUIT MAY BURN. E-CITY... -
Page 45: Solution For Common Problems Warranty
The battery charger is not connected to the lithium battery Connect it correctly. The battery does not charge correctly. Loose or disconnected cable. Attach the cable to the battery correctly. or has insuffi cient charge Battery charger operates incorrectly. Go to assistance centre. E-CITY... -
Page 46: Warranty
Warranty Period The warranty period is governed by applicable warranty law in the vehicle’s country of sale. Warranty claims for defects not brought to the attention of a RIEJU-authorised dealer before the end of the warranty period shall be excluded. - Page 47 Replacement parts not authorised for use by RIEJU have been used in maintenance or repair work on the vehicle, or if, and to the extent that, fuels, lubricants, or other liquids (including, but not limited to, cleaning products) that were not expressly mentioned in the User Manual’s instructions have been used...
- Page 48 RIEJU’S behalf. b) If there is doubt as to whether there is a defect or a visual or material inspection is required, RIEJU reserves the right to require that the parts being claimed under the warranty be sent to it, or to request that a RIEJU expert examine them.
- Page 49 If the purchaser resells the product during the warranty period, the terms and conditions of this warranty shall continue to exist under their current scope, such that rights to claim pursuant to this warranty under the terms and conditions governed by this document shall be transferred to the new owner of the motorcycle. E-CITY...
Need help?
Do you have a question about the E-City and is the answer not in the manual?
Questions and answers