
Related Manuals for Toshiba PDR-M500


Summary of Contents for Toshiba PDR-M500
- Page 1 FILE NO. 210-200316 SERVICE MANUAL DIGITAL STILL CAMERA CREATED IN TAIWAN, AUG, 2003...
- Page 2 TOSHIBA PDR-M500 Service Manual Section Description Pages 1. System Overview 1-1. System Diagram Block Diagram 1-2. System Overview Camera System Introduction 2. Disassembly / Assembly 2-1. Disassembly Operation Steps of Disassembly 2-2. Assembly Operation Steps of Assembly 3. Calibration Camera Calibration 4.
- Page 3 1. System Overview Section 1-1 System Diagram SD Card PDR-M500 Block Diagram MAIN PCB SD Card Switch MIC EXT .MIC Connector INT .MIC SCDA1A0801 K4S281633D-RL K4S281633D-RL M28W320ECT70ZB6 TK15467S SPEAKER SDRAM SDRAM Flash Memory 75ohm Driver AV OUT LCD PCB AK4536...
-
Page 4: System Overview
1-2 System Overview The PDR-M500 consists of 7 PC boards (the Main PCB, CCD PCB, Flash PCB, LCD PCB, Switch PCB, Mode PCB and Shutter PCB), a lens unit, a color LCD, a color EVF unit, a flash unit, etc. - Page 5 1-2-1. Startup operation When batteries are loaded or the AC adaptor is connected, a 3.0V voltage for the sub-CPU is generated by U402 and supplied to the sub-CPU (U405). When the POWER switch (S800) is turned on in this status, the camera switches to the boot-up sequence. The sub-CPU (U405) conducts the power on control until the main voltage supplied to the DSP (U901) and other parts is supplied.
- Page 6 (PDR-M500.BIN) is provided on the SD card. When the MENU key is held in, the camera begins operating according to the program in the “PDR-M500.BIN” file on the SD card but the operation for loading in the FlashROM (U304/M28W320ETC70) in the camera is not performed.
-
Page 7: Section 2. Disassembly / Assembly
2. Disassembly / Assembly Section 2-1 Disassembly Step Figure Discription Remark Tools Check if there's Finished Product any scratch on the surface. Remove the screws 01635-236*5 from the Screw driver camera Open the Card Cover A260 and the Jack Cover A250. Remove the Rear The Battery Cover Assembly carefully not... - Page 8 Remove the screws 01635-350*2 from the camera to remove the Screw driver base of Mode Dial A410. Remove the screw 01635-149 from the Tripod Holder A340. Screw driver Remove the Flex Cable Tweezers Main-LCD H600 from the Main PCB ASSY U100.
- Page 9 Detach the Flex Cable Detach the Flex Main-Mode H610 to Cable Main-Mode remove the Main PCB H610 from the ASSY U100 from the Mode PCB ASSY camera. U510. Discharge the solder joints of big capacitor Discharger beside the Flash PCB Tweezers KIT U300.
- Page 10 To disassemble the Speaker ASSY H310 (after step 5) De-solder the wires from the Speaker ASSY Soldering iron H310. Then remove it Tweezers from the back of LCD with tweezers carefully. To disassemble the Color LCD sub-assembly (after step 5a) Remove the screws 01635-223*3 and 01635-000*1 on the...
- Page 11 Rear Cover ASSY 5a17 A110. To disassemble the Card Cover sub-assembly (after step 5) Remove the two screws Screw driver 01635-086*2 as shown. Remove the Card Cover 5a21 Tweezers metal plate. Push the Card Cover 5a22 Tweezers pins. 5a23 Card Cover A260. To disassemble the Microphone sub-assembly (after step 14) Remove the sticked Microphone ASSY...
- Page 12 To disassemble the Battery terminals sub-assembly (after step 15) The top view of camera of step 15. Remove the screws Open the cap of 01635-042*2 of Shutter connector before Screw driver 15a1 PCB ASSY U520 and remove the Shutter Tweezers take off the Shutter PCB PCB U520 as ASSY.
- Page 13 To disassemble the Photo Sensor sub-assembly (after step 22) Remove the Photo Sensor ASSY H500 as shown. The wires had Tweezers been sticked by the sponge.
- Page 14 2-2 Assembly Step Figure Discription Remark Tools Install all the Battery Terminal A600 and drive the screws 01635- Screw driver 164*4 to the Battery Chamber. Install the Battery Chamber into the Main Frame A300. Drive the screw 01635- 010 of Main Frame Screw driver A300.
- Page 15 Install the Photo Sensor ASSY H500 to the camera. Check the Flash Install the Flash Open Open Switch Switch A440. Then A440 can work install the Flash PCB well before KIT U300 into the assemble the Flash camera. PCB KIT U300. Drive the screw 01635- 000 to the Flash PCB Screw driver...
- Page 16 Install the Jack Cover ASSY A250 as shown. The Microphone Assemble the Front ASSY H320 Cover ASSY A100 to might be inserted camera. Check the on the Front Cover ASSY. position of Power Switch first. Connect the wire of Microphone ASSY Screw driver H320 to camera.
- Page 17 Finished Product To assemble the Card Cover ASSY A260 (before step 25) Card Cover A260. Insert the Card Cover 25a1 Tweezers pins. Install the Card Cover 25a3 Tweezers metal plate. Drive the two screws 25a4 Screw driver 01635-086*2 as shown. To assemble the Rear Cover sub-assembly (before step 25) The Color LCD Drive the screws 01635-...
- Page 18 Install the Electric View Finder H220. Connect 25b3 the wire. Drive the Screw driver screw 01635-000 to fix Install the Switch PCB ASSY U500 carefully 25b4 not to damage the cap of the connector. Drive the screws 01635- The Switch PCB 223*3 and 01635-000*1 25b5 Holder (metal...
-
Page 19: Section 3. Calibration
3. Calibration Section 3-1 The items need to be calibrated Change parts Part Sensitive Focus Strobe Firmware Code Aperture update Shutter Defect pixel White balance Lens Module H100 Color LCD H200 Electric View H220 Finder Photo Sensor H500 Main PCB U100 Flash PCB KIT U300... - Page 20 3-3 LCD Calibration Procedure Tools: AC Adapter SD Card with Calibration Firmware Oscilloscope Test Points: Please look at figure 3.3.1. GND (TP608) (TP601) (TP602) (TP600) PSIG (TP610) : Trigger Signal figure 3.3.1. The setting of Oscilloscope: CH1(G) : AC,1V /div, 20us/div; (TP602) CH2(R&B) : AC, 1V/div, 20us/div;...
- Page 21 Fig. 3.3.2 2. Press the UP/DOWN button to select the item LCD. Then press the RIGHT button to enter LCD menu. Menu items are shown as figure 3.3.3. Press the DISP button to initialize LCD setting. If the image on LCD is NG, press MENU button at most 6 times to let it become normal.
- Page 22 5. The setting range of Oscilloscope is AC, 1V/div, 20us/div for the observation of the waveform of G signal (TP602). Press the UP/DOWN button to select the item U_CNT. Then press the RIGHT button. Then Press UP/DOWN to set G signal of the black / white peak-peak to 3.0 +/- 0.1V as shown in figure 3.3.5. Then press OK button to return.
- Page 23 Fig. 3.3.7 8. The setting range of Oscilloscope is AC, 500mV/div, 20us/div, “INV”, “ADD” for the observation of the waveform of G signal (TP602) and B signal (TP600). Press the UP/DOWN button to select the item B_CNT. Then press the RIGHT button.
- Page 24 Fig. 3.3.10...
- Page 25 3-4 EVF Calibration Procedure Tools: AC Adapter SD Card with Calibration Firmware Oscilloscope Test Points: Please look at figure 3.4.1. (TP705) R signal (TP701) G signal (TP702) B signal (TP703) COM signal (TP704) : Trigger Signal figure 3.4.1. The setting of Oscilloscope: Trigger: COM signal (TP704) GND: GND (TP704) CH1(G): AC,1V/div, 20us/div;...
- Page 26 Press the UP/DOWN button to select the item EVF. Then press the RIGHT button to enter EVF menu. Menu items are shown as figure 3.4.3. Press the DISP button to initialize LCD setting. Fig. 3.4.3 Press the UP/DOWN button to select the item VCO. Press the RIGHT button, then adjustment screen will be changed to EVF from LCD.
- Page 27 3.5+/-1.8V 2.3+/-0.12V Fig. 3.4.6 Press the UP/DOWN button to select the item U-BRT. Then Press the RIGHT button. Press UP/DOWN to adjust the waveform of G signal shown as figure 3.4.5. The black level to black level peak-peak voltage should be adjusted 3.5 +/- 1.8V. Then press OK button to return. The setting range of Oscilloscope is AC, 500mV/div, 20us/div, “INV”, “ADD”...
- Page 28 10. The setting range of Oscilloscope is AC, 500mV/div, 20us/div, “INV”, “ADD” for the observation of the waveform of G signal (TP702) and B signal (TP703). Press the UP/DOWN button to select the item B_CNT. Then press the RIGHT button. Then press UP/DOWN to set G-B signal shown as figure 3.4.9. The waveform within 1H should be adjusted flat.
- Page 29 3-5 Sensitive, Aperture, and Shutter Calibration Procedure Tools: AC Adapter SD Card with Calibration Firmware Light Source : Light value is 12+/-0.1 EV; Color temperature is 5100+/-300K. (Fig. 3.5.1) Fig. 3.5.1 Procedure: Install the SD Card with calibration firmware into camera. Close the card cover. Attach camera to AC Adapter.
- Page 30 Put the camera in front of the Light Source. The distance between Lens and Light source is from 1cm to 2cm. Then press OK button to proceed with the adjustment automatically. If the adjustment is OK, it will display SUCCESS as shown in figure 3.5.7.
- Page 31 3-6 Strobe Calibration Procedure Tools: AC Adapter SD Card with Calibration Firmware 18% Gray Chart: Size 1.0m(W) * 1.0m(H) Dark room: Prepare an environment allowing a complete light sealed. Test distance: Between lens and chart is 0.9+/-0.1m. Procedure: Install the SD Card with calibration firmware into camera. Close the card cover. Attach camera to AC Adapter.
- Page 32 Repeat the steps above #6 & #7 several times until the LCD displays SUCCESS while the adjustment is OK shown as figure 3.6. . Press the LEFT button to return. Fig. 3.6.5 If the variable resistor had been turned to 360 degree but the strobe calibration is still fail, the camera is NG.
- Page 33 3-7 Defect Pixel and White Balance Calibration Procedure Tools: AC Adapter SD Card with Calibration Firmware Light Source : Light value is 12+/-0.1 EV; Color temperature is 5100+/-300K. (Fig. 3.5.1) Procedure: Install the SD Card with calibration firmware into camera. Close the card cover. Attach AC Adapter to camera.
- Page 34 Fig. 3.7.7...
- Page 35 3-8 Focus Calibration Procedure Tools: AC Adapter SD Card with Calibration Firmware Collimator Lens ; f = 450mm Chart: Supplied as PDF file “TEST_CHART.pdf” used by printing on A3 size. Test distance : Between collimator lens and chart is 450mm. (Please confirm collimator lens manual so that the distance of camera and chart may be infinity.) Procedure: Install the SD Card with calibration firmware into camera.
- Page 36 3-9 F/W Update Procedure Tools: AC Adapter SD Card with Update Firmware Procedure: Install the SD card with firmware update program into camera. Close the card cover. Attach AC Adapter to camera. Keep pressing the ERASE button and then slide the Power switch to power on the camera.
-
Page 37: Troubleshooting
4. Troubleshooting Section Item Status Analysis How to fix No Image at shooting CCD FPC break Replace the Lens Module ASSY(H100). CCD NG AD coverter NG TG NG CCD PCB NG Width line noise and Length Width line noise or Length line noise is occurred on Replace the Lens Module ASSY(H100). - Page 38 UP, CENTER, DOWN, Swith (S809, S810, S811, S812, S813, S814, S815) Replace the LCD PCB ASSY(U410). LEFT, TRUSH, DISP, Replace the Flex Cable Main-LCD(H600). MENU key are not effective Finder LED (Red and LED drive transister (Q801) NG Replace the Switch PCB ASSY(U500). Green) is not flash Poor Connection Replace the Main PCB ASSY(U100).
- Page 39 5. Mechanical Parts Section U300 5-1 Explode Diagram H610 A410 A600 U510 U520 H600 A300 H500 U100 H100 A100 H320 A440 A250 A140 A340...
- Page 40 A110 H200 H220 A260 H620 A900 U500 Screw Kit 01635-000*11 01635-149*4 U410 H310 01635-010*3 01635-164*4 01635-042*7 01635-223*3 01635-086*2 01635-236*7 01635-148*3 01635-350*2...
- Page 41 5-2 Camera Part Photo Part Code Parts Name Description Q'ty/Unit Toshiba P/N Premier P/N Mechanical Parts A100 Front Cover ASSY P000384450 9E284-0004 A110 Rear Cover ASSY P000384460 9E284-0009 A140 Battery Cover ASSY P000384470 9D344-7000-3DJ A250 Jack Cover P000384480 9E284-0010 A260...
- Page 42 Part Code Parts Name Description Q'ty/Unit Toshiba P/N Premier P/N A600 Battery Terminal P000382790 9D335-013 A900 Screw Kit P000382800 9D384-1635 Module H100 Lens Module ASSY P000384520 9E246-0000 H200 Color LCD P000382820 9D384-0011 Electric View Finder H220 P000382830 9D346-1000 ASSY H310...
- Page 43 Part Code Parts Name Description Q'ty/Unit Toshiba P/N Premier P/N Flex Cable Main- H600 P000382870 9D337-103 Flex Cable Main- H610 P000382880 9D337-105 Mode H620 LCD Wire 2P P000382890 02547-201C Board Assembly U100 Main PCB ASSY P000384530 9E247-4000 U300 Flash PCB KIT...
-
Page 44: Screw List
5-3 Screw List Specification Part Name Position Used Flash PCB kit*5, Main Frame*1, 01635-000 Main PCB*3, Elec. View S:1.7*3*A0.5 BL Finder*2 Mode PCB*2, Battery 01635-010 S:1.7*2.5*A0.5 BL Chamber*1 Color LCD Holder*3, Shutter 01635-042 S:1.7*2*A0.5 BL PCB*2, Battery Chamber*2 01635-086 Card Cover*2 S:1.2*2*A0.4 BL 01635-148 LCD PCB*3... - Page 45 6. Packing Parts Section 6-1 Packing Explode Diagram Y720 Y430 Y440 Y340 Y200 Y220 Y410 Y500 Y400 Y710 Y600 Y900 Y110 Y100 Y700...
-
Page 46: Packing Part List
6-2 Packing Part List Part Code Parts Name Pcs/Set Remark Y100 CD-ROM Y110 Instruction Manual Y200 USB Cable Y220 AV Cable Y340 Alkaline Battery Y400 Camera Case Y410 Shoulder Strap Y430 Lens Cap Y440 Adapter Ring Y500 IR Remote Controller Y600 SD Card Y700... - Page 47 A100 Front Cover ASSY COVER ASSY, FRONT, SILVER, PDR-M500 China 9E284-0004 P000384450 Rubber, Remote Cover, Front LCD Cover, Rating Label, Toshiba Logo and Tripod Holder Cover, Card Cover, 5-key&Menu&Delete A110 Rear Cover ASSY COVER ASSY, REAR, SILVER, PDR-M500 China 9E284-0009 P000384460 Buttons, Zoom Buttons, Flash&Timer Buttons,...
-
Page 48: Specifications
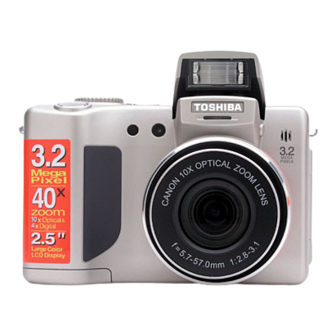
8. Specifications Section Model name PDR-M500 Sensor 1/2.7” CCD sensor (total pixel count: Approx. 2.14 million) Sensitivity Manual setting: Equivalent to ISO 70/100/200/400 Automatic setting: Equivalent to ISO70/100/200/400/70 to 200/70 to 400 Lens 10X optical zoom lens F2.8 - F3.1 Focal distance f=5.7 mm - 57 mm (equivalent to 37 mm - 370 mm on a 35 mm camera)
Need help?
Do you have a question about the PDR-M500 and is the answer not in the manual?
Questions and answers