Table of Contents
Advertisement
Available languages
Available languages
Quick Links
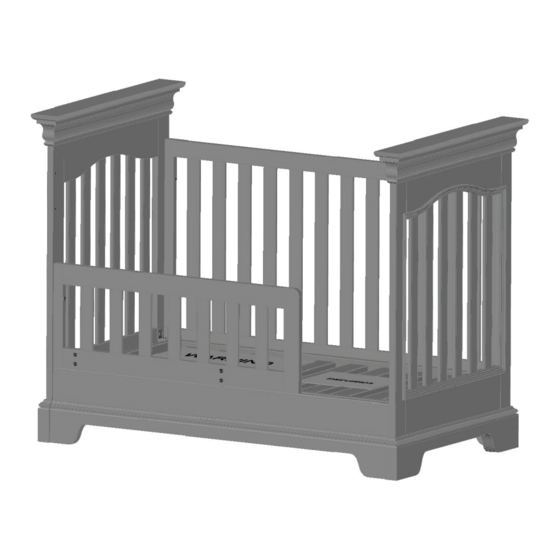
Toddler Bed Assembly Instructions for Stationary Side Crib
IMPORTANT - RETAIN FOR FUTURE REFERENCE - READ CAREFULLY
Model Number:
STK-3435 Toddler Bed Conversion Kit
Your little one will sleep securely in this youngAmerica Toddler Bed. Proper as-
sembly will ensure every effort has been made to design this bed with your child's
safety in mind. It is certified to meet all safety guidelines established by ASTM
International and the CPSC-Consumer Product Safety Commission.
Thank you for purchasing a youngAmerica Toddler Bed. If you find that you are
missing a part or if a part is defective in any way, contact your youngAmerica
retailer for assistance.
Advertisement
Table of Contents

Related Manuals for Young America STK-3435


Summary of Contents for Young America STK-3435
- Page 1 IMPORTANT - RETAIN FOR FUTURE REFERENCE - READ CAREFULLY Model Number: STK-3435 Toddler Bed Conversion Kit Your little one will sleep securely in this youngAmerica Toddler Bed. Proper as- sembly will ensure every effort has been made to design this bed with your child's safety in mind.
- Page 2 missing parts or sharp edges. DO NOT use bed if any parts are missing or broken. Contact your dealer or write to Young America, PO Box 30, Stanleytown, VA 24168 for replacement parts and instructional literature if needed. DO NOT substitute parts. Use only bolts or parts supplied by manufacturer or ...
-
Page 3: Identifying The Parts
Identifying the Parts The conversion kit illustrations in these instructions are generic in nature. The conversion kit you have purchased may not look like the ones illustrated; however, they all assemble in the same manner. Toddler Bed Safety Rail Identifying the Hardware Identify the hardware included using the illustrations below 1 Connector Bolt 2”... - Page 4 Toddler Bed Assembly NOTE: Read all instructions before assembling toddler bed. KEEP INSTRUCTIONS FOR FUTURE REFERENCE. Attached to the mattress platform is a sleeve to store the instruction booklet. After assembly is complete, place this instruction booklet in the sleeve for future reference.
- Page 5 Converting Your Crib Step 1: Before attaching the Toddler Bed Conver- sion Kit your Crib must be converted to a Daybed with the Mattress Platform in the Figure 1. lowest position. See Figure 1. Refer to page 13 in your Crib Instruction Booklet. Do not reattach the Crib Side.
- Page 6 Attaching the Toddler Safety Rail Figure 4. Step 2: The Toddler Bed Safety Rail may attach to either end of the converted Crib to best fit in your room. Align the hole in the end of the Toddler Bed ...
- Page 7 Attaching the Toddler Safety Rail Step 3: Slide the Safety Rail Brackets through the Figure 6. saddle brackets in the Base Rail. See Fig- ure 6. (Note: It may be easier to work from the inside of the bed.) Attach the Safety Rail Brackets using (2) ...
-
Page 8: Final Step
Final Step Step 4: (The final and most important) Checklist. Inspect the bed once again to assure that all bolts are tight and that no hardware is missing. (if you are missing hardware, contact Stanley Furniture immediately for replacement and do not use the bed until the new hardware arrives). -
Page 9: Periodic Maintenance
Cleaning: Mix together a mild solution of gentle dishwashing liquid and water, apply to the Toddler Bed surface using a soft clean cloth lightly dampened in the solution. Rinse with clear water, using a lightly dampened, soft clean cloth, then dry all surfaces thoroughly with a dry cloth. - Page 10 Stanley F u r n i t u r e PO Box 30 Stanleytown, VA 24168 For parts, contact your Stanley Furniture dealer. For additional consumer information call our Customer Service Department at: 1-(276)-627-2100 Mon.-Fri., 8am-5pm Eastern Standard Time...
- Page 11 LÉALAS CUIDADOSAMENTE. Número de modelo: Kit de conversión de cama para niños pequeños artículo STK-3435 Su pequeño dormirá a salvo en esta cama para niños pequeños de youngAmerica. Un ensamblaje adecuado le asegurará que se han tomado todas las precauciones para diseñar esta cama para niños pequeños pensando en la seguridad de su niño.
- Page 12 ADVERTENCIA: PELIGRO DE ATORAMIENTO O ESTRANGULACIÓN Han muerto bebés en las camas para niños pequeños por atoramiento o estrangulación. El incumplimiento de las advertencias y las instrucciones de ensamblaje puede provocar lesiones graves o la muerte. Lea todas las instrucciones antes de ensamblar la cama. CONSERVE LAS ...
-
Page 13: Identificación De Las Partes
Identificación de las partes Las ilustraciones del kit de conversión de estas instrucciones son genéricas. Es posible que el kit de conversión que compró no se parezca a los de las ilustraciones; sin embargo, todos se ensamblan de la misma manera. Baranda de seguridad de la cama para niños pequeños... - Page 14 Ensamblaje de la cama para niños pequeños/sofá cama NOTA: Lea todas las instrucciones antes de ensamblar la cama para niños pequeños/sofá cama. CONSERVE LAS INSTRUCCIONES PARA REFERENCIA FUTURA. Encontrará una funda adosada a la plataforma del colchón para guardar el folleto de las instrucciones.
- Page 15 Cómo convertir la cuna Paso 1: Antes de sujetar el kit de conversión de la cama para niños pequeños, la cuna debe haberse convertido en sofá cama y la Figura 1. plataforma del colchón debe estar colocada en la posición más baja. Consulte la Figura 1. Consulte la página 13 del folleto de instrucciones de la cuna.
- Page 16 Ensamblaje de la baranda de seguridad para niños Figura 4. Paso 2: La baranda de seguridad para niños puede ensamblarse en cualquier extremo de la cu- na convertida que mejor se adapte a la habi- tación. Alinee el orificio del extremo de la baranda ...
- Page 17 Cómo sujetar la baranda de seguridad para niños Paso 3: Deslice los soportes para baranda de Figura 6. seguridad por los soportes de la montura de la baranda de base. Consulte la Figura 6. (Nota: Puede ser más fácil trabajar desde el lado interno de la cama).
- Page 18 Paso final Paso 4: (El paso final y más importante) Lista de verificación. Revise otra vez la cama para asegurarse de que haya ajustado todos los pernos y de que no falte ninguna pieza de tornillería. (Comuníquese inmediatamente con Stanley Furniture para solicitar que le reempla- cen la pieza de tornillería faltante, si este fuera el caso, y no use la cama hasta que la haya recibido).
-
Page 19: Mantenimiento Periódico
Limpieza: Mezcle una solución liviana de líquido lavavajillas suave y agua y aplique a la superficie de la cama para niños pequeños con un paño limpio ligeramente humedecido en la solución. Enjuague con agua limpia usando un paño suave y limpio ligeramente humedecido;... - Page 20 Stanley F u r n i t u r e PO Box 30 Stanleytown, VA 24168 Comuníquese con su representante de Stanley Furniture para solicitar piezas. Si desea información adicional para el consumidor, puede llamar a nuestro Departamento de atención al cliente al: 1-(276)-627-2100 de lunes a viernes de 8:00 a.
Need help?
Do you have a question about the STK-3435 and is the answer not in the manual?
Questions and answers