Table of Contents
Advertisement
Quick Links
Advertisement
Table of Contents

Related Manuals for KMS UEGO


Summary of Contents for KMS UEGO
- Page 1 KMS UEGO Display manual Version 1.01...
-
Page 2: Table Of Contents
Installation of the lambda display ..........3 Installation of the lambda sensor ..........5 Controlling the display ............. 6 What do you see on the display? ..........7 The menu................8 Fault tracing ................12 Appendix ..................13 KMS UEGO Display manual Version 1.01... -
Page 3: Contents Of The Package
• 3 pole connector Pin 1 red : + 12 Volt Pin 2 white : signal out Pin 3 black : ground Connector for power of the display and data output to the KMS management ECU. KMS UEGO Display manual Version 1.01... - Page 4 • 6 pole connector to lambda sensor Connect to wide-band lambda sensor. Place your UEGO controller at a dry place where the temperature don’t exceed 65 °C. (note : don’t place the UEGO controller and wires near any ‘high powered’ cables like the cables for the sparkplugs, because of electrical interference.)
-
Page 5: Installation Of The Lambda Sensor
Recommended material for the thread boss in the exhaust pipe : Temperature resistant stainless steel.) (note : The use of cleaning/greasing fluids or evaporating solids at the sensor plug connection is not permitted.) KMS UEGO Display manual Version 1.01... -
Page 6: Controlling The Display
This is the scrolling button. You can scroll down the menu with this button. By touching the ‘scrolling down button’ you can dim your display for the time being. These adjustments aren’t saved when you start the display again. KMS UEGO Display manual Version 1.01... -
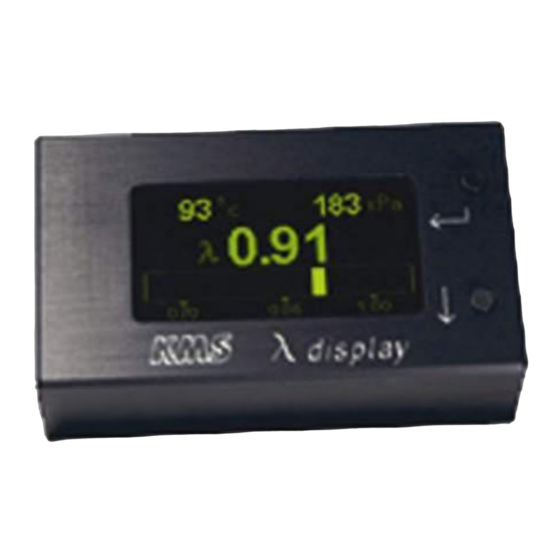
Page 7: What Do You See On The Display
The displayed settings are the default settings. (note : if you want to change these settings you can adjust them in the menu) KMS UEGO Display manual Version 1.01... -
Page 8: The Menu
In the menu you can change the settings of the lambda controller and change the displayed values. You can also change the data-transfer type between the lambda controller and the KMS management system. This is the starting screen of the menu. - Page 9 Scroll down for ‘save and exit’. Afr or lambda In this menu you can select how the lambda value is displayed(A/F or λ). This will be displayed at ‘display in …’ and at the main screen display. KMS UEGO Display manual Version 1.01...
- Page 10 Most systems can’t handle more then 5 Volt so check if your system can handle this high voltage before you set the lambda controller to type C. Check the KMS management manual for additional information KMS UEGO Display manual Version 1.01...
- Page 11 And off course don’t switch your controller off because data may be lost. Set default values You can set your UEGO display controller back to it’s original settings and reset the device. Com port In this part of the menu you can toggle between CAN and RS232 communication.
-
Page 12: Fault Tracing
I/O error reading - Controller wires constructed - Change the place of you near ‘high powered cables’ controller/wires (magnetical interference) - Power supply too low - Check power supply, minimum of 11 Volt KMS UEGO Display manual Version 1.01... -
Page 13: Appendix
Type B 1600 1600 1500 1500 1400 1400 1300 1300 1200 1200 1100 1100 1000 1000 Air Fuel Ratio Lambda kms Controller Type A m.Volt kms Controller Type B m.Volt KmsController Type C m.Volt KMS UEGO Display manual Version 1.01... - Page 14 KMS UEGO Display manual Version 1.01...
- Page 15 KMS UEGO Display manual Version 1.01...
Need help?
Do you have a question about the UEGO and is the answer not in the manual?
Questions and answers