Table of Contents
Advertisement
Advertisement
Table of Contents

Related Manuals for FrontRow CM900


Summary of Contents for FrontRow CM900
- Page 1 CM900 INSTALLER GUIDE...
- Page 2 Welcome to FrontRow — the teacher- and tech-friendly way to improve the learning environment in every classroom. To make your configuration of the FrontRow CM900 as efficient as possible, we recommend that you first read the section in this guide called Before You Begin.
-
Page 3: Table Of Contents
Appendix A: Control Commands for the CM900 ........ -
Page 4: Step 1: Before You Begin
It resides on an IP network so it can be accessed remotely and securely to execute its functions. 1. Visualize your goal When your FrontRow CM900 is installed as part of an ezRoom TRIO, it may look something like this: PROJECTOR HDMI... -
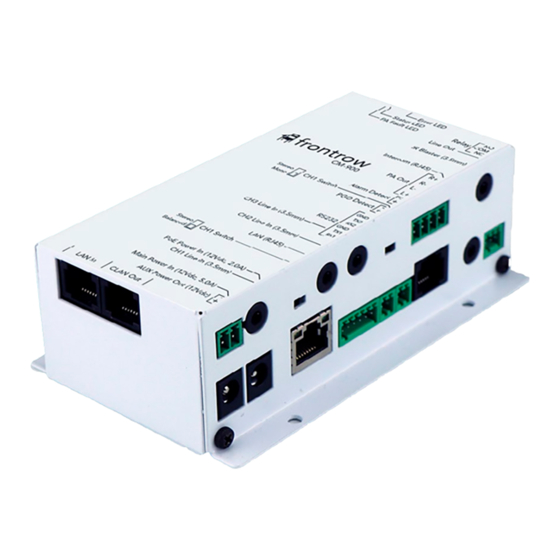
Page 5: Get Familiar With Input And Output Ports
The second serial port can also be config- In” ports). Normal operation: solid amber stereo input or both switches to Balanced ured as an input to allow the CM900 to be (muted), unlit (unmuted). & Mono for mono input. Do NOT have one controlled via RS232. -
Page 6: What Do You Want To Control? How Do You Want To Control It
3. What do you want to control? How do you want to control it? Your CM900 can let teachers control or communicate with practically any device or person. Now is the time to plan what you want to do. Example 1: Typical setup with projector In this example, the CM900 works to turn a projector on and off, switch inputs or execute any command the projector has in it’s control library. -
Page 7: Gathering Information
• Make a list of all rooms to be outfitted and the equipment to be controlled in each one. • The IT department will provide you with IPv4 addresses for each CM900 and other FrontRow IP addressable components (these must be static, or fixed, IP addresses), along with other network information, such as the subnet mask, router IP address and FrontRow server IP address. -
Page 8: Step 2: Getting Your Configuration Files
Your CM900 needs information about the other devices it needs to communicate with, and how. If your configuration — the collection of commands you want to issue from CM900 and the devices you want to control — is the same in each room in your installation, then you will need only one configuration base file which you will modify with specific IP addresses unique to each room. -
Page 9: Step 3: Preparing For Configuration
Step 3: Preparing for Configuration You can reconfigure the CM900 at any point if your setup changes or you make a mistake — but it’s best to plan ahead so that you don’t have to (see Step 1). For greatest efficiency, we recommend configuring all of your CM900 systems all at once in the office prior to going to the installation site, but you can also do it room by room at the school if you prefer. -
Page 10: Step 4: Configuring The Cm900
Step 4: Configuring the CM900 Your CM900 has several parameters that can be configured to tell it how to communicate with other devices in an ezRoom or Conductor installation. While each installation is different most of the default parameters will be appropriate. -
Page 11: About
Password If the project requires it you can password-protect the CM900 configuration screens by setting a password. If setting a password for the first time, the “old password” is calypso. Choose a new one based on the school’s guidelines and record the information. -
Page 12: Pa/Intercom
Master Device Checking Master device tells the Conductor server that this CM900 has a microphone and is allowed to initiate pages. This is set only when the CM900 is part of a Conductor admin station, not when it is simply a part of the intercom system. -
Page 13: Audio Settings
External Page Override For use with 25V, 70V and 100V analog paging systems. The CM900 will mute all audio in the room when an announcement is made over the facility’s paging system. Analog page override requires a connection to the facility’s PA system. For information about connecting the page override function to the PA system, see Juno Page Override Installer Guide. -
Page 14: Network/Com
IT department has a DHCP server online and has set up static (fixed) IP address reservations for FrontRow devices; otherwise manually enter the IP address reserved for the device in the IP Address field. It is highly recommended that static IP addresses be used. -
Page 15: Command Line
Serial Port Configuration COM Port The COM Port menu specifies the COM port number that the parameters on this page apply to; the CM900 has 2 COM Ports. Baud Rate Specifies the data speed at which this device should communicate with the attached serial device; while 9600 and 19200 are typical for projectors, data speeds vary by manufacturer. -
Page 16: Shortcuts
8. Shortcuts Shortcuts Shortcuts are name substitutions. Defining Shortcuts makes deployment of multiple FrontRow devices of the same type easier. Use Shortcuts in defining actions that represent the IP addresses of the devices you’ll control. This means that your configuration file can be written as a template with IP addresses explicitly defined in only one place (the Shortcut), needing to be changed only once rather than repeatedly throughout your Actions. -
Page 17: Event Creator
With your collection of discrete Actions defined, you can now specify what Events will cause one or more of those Actions to be executed. Events can be triggered in a variety of ways, Encore and Teacher Edition software, FrontRow Control panels, a... -
Page 18: Add Actions
Name the Event Triggers can be physical devices such as a non-FrontRow push button connected to the GPI (GPI open / close), or a FrontRow device connected to the RJ45 intercom jack (Wall knob press, release, turn right, or turn left). When that defined trigger is detected by the device the matching Event will be executed. -
Page 19: Appendix A: Control Commands For The Cm900
Appendix A: Control commands for the CM900 1. Action/Network Commands The following are some of the more frequently used commands within Actions or sent over the network. For the complete guide to all such commands, refer to the Calypso Action Control Language (CACL) manual found in the Guides & Resources section of the FrontRow web site, www.gofrontrow.com/guides-resources. - Page 20 Network (NET) Commands Syntax: #NET[Connection, StringType. Device ‘Command’]; Name Required/Optional Data Type Format Description Connection Required Variant Defines the connection type: • TCP/IP (1) where n is 1 or 2 • UDP (2) String Type Optional Variant Defines the string type: •...
- Page 21 Serial (COM) Commands Syntax: #COMn[StringType, “Command”]; Name Required/Optional Data Type Format Description Required Variant Use 1 for COM1; use 2 for COM2. Denotes the COM port to be used, corresponding to the serial device to be controlled. String Type Optional Variant Defines the string type: •...
- Page 22 2. Serial Commands The following commands can be used to control the CM900 via COM port 2 (when set to the appropriate mode): Serial Action Control Protocol (SACP) Version: 2.0 14 February 2019 The Serial Action Control Protocol implemented in some FrontRow devices is intended to be a simple readable protocol for controlling device state, especially for audio control.
- Page 23 Command Description #ACH? channel query The device should return a value between 0 and maxInput (incl). A value of 0 indicates the device is in mixed channels mode, where all input channels are mixed together for output. The return string should be terminated by a carriage-return (hex value 0d).
-
Page 24: Appendix B: Configuration File Settings
Appendix B: Configuration File Settings Setting Saved in Configuration File About Custom Device Name Password Required Password Intercom / PA Audio Intercom/PA Mode Push to Talk Mode GPI Mode Incoming Audio Settings Outgoing Audio Settings Routing for Outgoing Streams External Page Override Settings Audio Settings Volume Aux Input Volume... -
Page 25: Appendix C: Troubleshooting
• Status LED should be flashing once per second • Error LED should not be lit I’ve connected the serial cable from the CM900 to the projector and I’ve verified that baud rate and other settings are correct, but I still can’t control the projector. - Page 26 • Firmware update: rapid blinking. • Fault status: green LED is on and constant (no blinking). Try a power cycle of the device; if it persists, contact Frontrow. • Fault status: rapid blinking randomly or when NOT executing firmware update, contact FrontRow.
-
Page 27: Appendix D: Give Your Computer A Static Ip Address
Appendix D: Give Your Computer a Static IP Address For the duration of the configuration, your computer needs to have a specific IP address. Here’s how to change your com- puter’s wired network adapter from automatic (DHCP) to fixed (static): a. - Page 28 Click OK. Click OK to close each window . If there is no OK button, click on the Close box (X) to close the windows. NOTE: to change your computer back to DHCP follow the same process but select “Obtain an IP address automatically”...
- Page 29 © 2019 FrontRow Calypso LLC Phonic Ear, FrontRow, Calypso and the names of Phonic Ear, Calypso, and FrontRow products are trademarks or registered trademarks of FrontRow Calypso LLC in the U.S. and other countries.
Need help?
Do you have a question about the CM900 and is the answer not in the manual?
Questions and answers