Azden FMX-42a User Manual
4channel portable mixer
Hide thumbs
Also See for FMX-42a:
- Instructions manual (12 pages) ,
- Instructions manual (12 pages) ,
- Instructions manual (12 pages)
Advertisement
Quick Links
FMX-42a / FMX-42u
4CHANNEL PORTABLE MIXER
4チャンネル ポータプル ミキサー
USER MANUAL
取 扱 説 明 書
Thank you for choosing products of Azden.
Before start using this product, you should first thoroughly read this manual.
This manual should be kept for future reference.
この度はアツデンの製品をお買い上げ頂き、誠にありがとうございます。
ご使用になる前に、この取扱説明書を必ずお読み下さい。
お読みになった後は、後日お役に立つことも有りますので、大切に保管して下さい。
Advertisement

Subscribe to Our Youtube Channel
Related Manuals for Azden FMX-42a


Summary of Contents for Azden FMX-42a
- Page 1 4CHANNEL PORTABLE MIXER 4チャンネル ポータプル ミキサー USER MANUAL 取 扱 説 明 書 Thank you for choosing products of Azden. Before start using this product, you should first thoroughly read this manual. This manual should be kept for future reference. この度はアツデンの製品をお買い上げ頂き、誠にありがとうございます。 ご使用になる前に、この取扱説明書を必ずお読み下さい。...
-
Page 2: Safety Introduction
XLR or mini-connector mic/line inputs. The FMX-42a model is equipped with a camera return input/output to allow the user to simultaneously send and receive an audio signal to/from a camera. This same output may also "be used an auxiliary output to send to a second camera or audio recorder. - Page 3 INTRODUCTION ① POWER Indicator When the POWER switch ⑯ is ON, the LED will turn GREEN. When the battery voltage level becomes too low for proper operation, the LED will turn RED. When this happens, replace the batteries with fresh "AA" alkaline batteries.
-
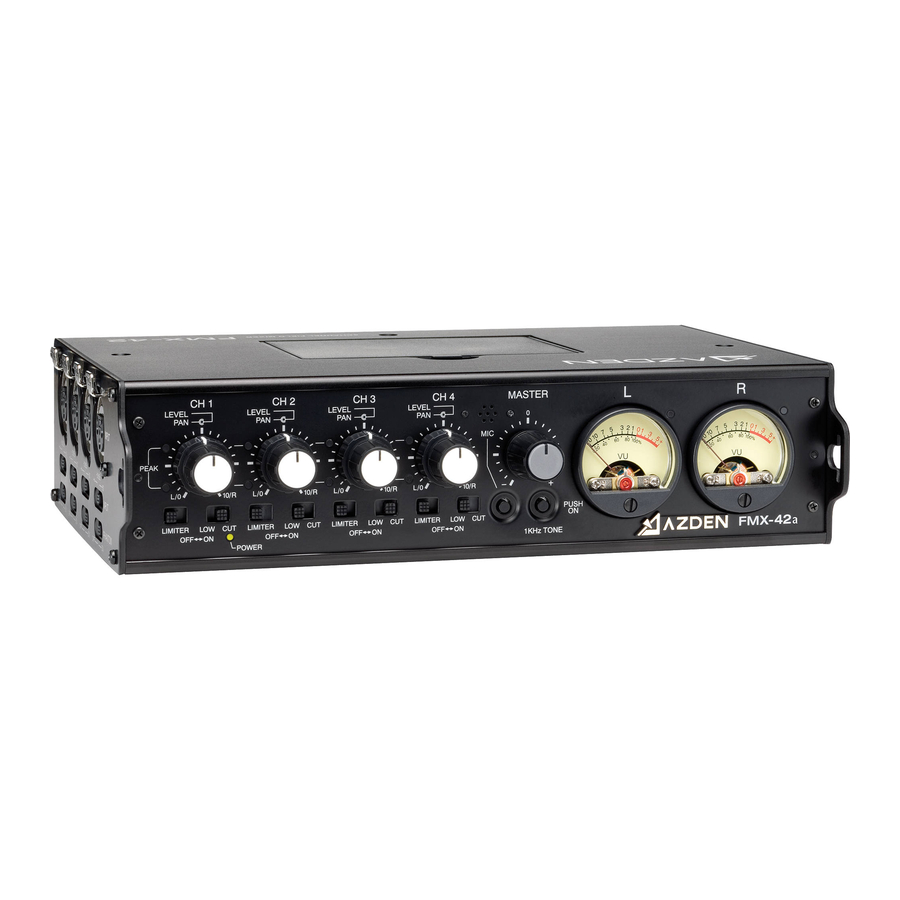
Page 4: Front Control Panel
FRONT CONTROL PANEL When the LINE OUT is selected, while keeping the MASTER control ④ at its midpoint, increase or decrease each channel's LEVEL control ② until the L and/or R VU Meter peaks at 0 dB. If the LEVEL is set too low, sound may be accompanied by background noise. If the LEVEL is set too high, the sound may be distorted. Monitor the sound with headphones and adjust the LEVEL for the best sound. An OUTPUT PEAK Indicator LED ⑨ will light RED if your overall levels are set too high. When the CAMERA RTN is selected, adjust the volume level by the RTN LEVEL switch ㉘ .The VU Meters are set to reflect the selection by the Monitor SELECT Switch ㉒ by the factory. However, if you would prefer, you may change the setting to always show the output volume level of LINE OUT regardless of the Monitor SELECT switch ㉒ setting. Remove the bottom plate by removing the 2 screws on each side and 3 screws on the bottom. Locate the SW2 switch on the circuit board and change the setting from "MONI" to "LINE". The center position is to disconnect the VU Meters altogether. ⑨ OUTPUT PEAK Indicators These indicators monitor the LINE OUT outputs. When the overall levels are set too high, the LEDs will light RED. Adjust the INPUT LEVEL controls ② and/or the MASTER level control ④ accordingly. ⑩ SLATE MIC Press and hold this button to engage the SLATE MIC. The SLATE MIC is used to pick up audio at the mixer's location and is not intended for serious audio recording. It is however, very useful for notating scenes or other on-location documentation. ⑪ 1 kHz TONE Press and hold this button to generate the 1 kHz tone. This output tone is used to set the recording levels of your video camera or audio recorder to their optimum level. While generating the 1 kHz tone, set the recording levels of your video camera or audio recorder to the specified level as recommended by the manufacturers. The signal is generated at +4 dBu. Input LEVEL VU METERS Control Battery Case ② ⑫ ⑧ MASTER OUTPUT CONTROL LEVEL Control PEAK Indicators ③... - Page 5 LEFT-SIDE INPUT/CONTROL PANEL ⑬ Channel 1, 2, 3 & 4 INPUT Connectors Connect the 3-pin XLR output of a microphone, wireless receiver or line level audio component to INPUT CH 1 and/or CH 2 and/or CH 3 and/or CH 4. Push the XLR connector into the INPUT jack until it locks. To remove the XLR connector, press the PUSH tab and pull the connector out. ⑭ INPUT LEVEL Selector The following 3 different settings are available depending on the source connected to the INPUT connectors ⑬: LINE → Standard: +4 dBu → Maximum: >26 dBu (20 kΩ) MIC HI ...
- Page 6 To SELECT either LINE OUT ⑰&⑱ output signals or CAMERA (RTN)㉖input signals for the monitor PHONES output㉑. ㉓LEVEL Volume Control Controls the volume level of the monitor PHONES output㉑ . Zero is the lowest (quietest) setting and 10 is the highest (loudest). ㉔R ILLUM(ination) Switch Turn this switch ON to light up the VU Meters⑧. ㉕IN Connector For external powering of the mixer, connect a 12V AC adapter with a 4-pin Hirose connector to this input. This AC adapter is available for purchase separately. Contact Azden or an Azden dealer for details. Maximum rating of the power supply must not exceed 12 volts DC, 350mA. *Required connecting plug: Hirose HR10A-7P-4P ㉖CAMERA(RTN) Input/Output Connector (FMX-42a only) This Hirose 10-pin connector allows you to connect your video camera to the mixer and send LINE OUT output signals and receive RETURN input signals simultaneously. It will require the Hirose 10-pin plug (part #RM15TD-10P). Using this connector will not cancel out the OUTPUT L & R ⑰&⑱. The LINE OUT out MIC output) by the LEVEL selector ⑳ . AUX OUTPUT Additionally, it is possible to utilize the CAMERA(RTN)㉖as an auxiliary stereo output for recording to a second camera or external audio recorder. To use the CAMERA(RTN)in this way, a cable with a Hirose 10-pin male connector to dual, 3-pin XLR male connectors must be used (sold separately).* *When using the 10-pin camera return as an aux output and the XLR outputs (L&R⑰&⑱) simultaneously, it is recommended with high input impedance (>15kΩ) be used. External recorders / cameras w impedance may not assure optimal ...
- Page 7 RIGHT-SIDE OUTPUT/CONTROL PANE FMX-42a CAMERA(RTN) OUTPUT OUTPUT DC IN CONNECTOR CONNECTOR CONNECTOR L CONNECTOR R ⑰ ⑰ ⑱ ⑳ MONITOR MINI-JACK PHONES ⑳ ⑳ ⑯ ⑳ ⑳ POWER MONITOR LEVEL ⑳ SWITCH ⑳ SELECT ⑳ SELECTOR ⑲ SWITCH METER STEREO MINI LEVEL...
- Page 8 FMX-42u CONNECTING TO USB DEVICES The USB output allows you to connect the FMX-42u to a computer, smart-phone or tablet with USB compatibility. This output provides a line level, stereo (Left & Right) digital audio signal. NOTICE: In order to use a device with the FMX-42uʼ s USB output, it must be USB OTG (On The Go) compatible. The installation of additional software or apps may also be required in order to record and edit audio. The FMX-42u can only be used as a digital output; monitoring playback from your external recording device will not be possible through the mixer. The user should also be aware that connecting USB devices to the mixer will significantly reduce battery life. It is off or USB devices be unplugged when not in use to preserve battery life. An optional AC power adapter is also available for purchase. Recording On A Computer 1) With the mixer still OFF, connect the USB Output㉙to your computerʼs USB port using a mini-B male to A male cable. 2)For Windows: Open the Control Panel and under “Sound,” click and open “Manage audio devices.” For Mac: Open the System Settings and click on “Sound.” 3)Turn ON the FMX-42u 4)The mixer will appear as a device named “USB AUDIO CODEC.” Select it as an Input Device. 5)Open recording software on your computer and begin recording. It may be necessary to also edit the settings in your recording software and choose the FMX-42u as an input device before you an record. USBホスト変換ケーブル (メス) (オス) (オス) (オス) (メス) (オス) (オス) (オス)
- Page 9 FMX-42a/FMX-42u SPECIFICATIONS GENERAL Frequency Response Balanced or Unbalanced Output: 20 Hz - 30 kHz (+0/-1.5 dB) Monitor Output: 30 Hz - 30 kHz (+0/-2 dB) Signal-to-Noise Balanced Output: -120 dBu (A weighted, input equivalent level) T.H.D. Balanced Output: < 0.005% @ 1 kHz (at LINE position +19 dBu output) Phantom Power Voltage: 48V (±1.5V) Sample Tone Frequency: 1 kHz Battery Requirement: 6 Alkaline "AA" External Power: 10.5 ~ 17V DC @ 200mA Dimensions: 220mmW x 160mmD x 56mmH (without protrusions) 9"W x 6 1/2" D x 2 1/4"H (without protrusions) Weight: 1.3 kg / 2.9 lbs (without batteries) INPUT Balanced Input: XLR 3-pin Female x 4 (CH1, 2, 3 & 4) Level LINE Standard: +4 dBu Maximum: > +26 dBu ...
-
Page 10: Two Year Warranty
- 81-0-422-55-5115(Japan) • fax - 81-0-422-55-0131(Japan) www.azden.co.jp Customers in the North/South American and European markets contact: Azden Corp., 200 Valley Rd. Ste 101, Mt. Arlington, NJ 07856" phone - +1 973.810.3070 • fax - +1 973.810.3076 • email - sales@azden.com "www.azden.com"... - Page 11 安全 上 の ご 注 意 必 ずお 守り くださ い お使いになる人や他の人への危害、財産への損害を未然に防止するために、必ずお守りいただくことを次のように説明しています。 ■表示内容を無視して誤った使い方をした時に生じる危害や損害の程度を、次の表示で区分し、説明しています。 警 告 こ の 表 示 の 欄 は 「 死 亡 ま た は 重 傷 を 負 う 可 能 性 が 想 定 さ れ る 」 内 容 で す 。 危...
- Page 12 注 意 ■調理台や加湿器のそばなど、 油煙や湯気が当たるような場所に置かないでください。火災 ・ 感電の原因となることがあります。 ■湿気やほこりの多い場所に置かないでください。火災・感電の原因となることがあります。 ■電源コードを熱器具に近づけないでください。コードの被ふくが溶けて、火災・感電の原因となることがあります。 ■この機器の上に重いものを置かないでください。バランスが崩れて倒れたり、落下して、けがの原因となることがあります。 ■電源プラグ(またはACアダプター)を抜くときは、電源コードを引っ張らないでください。コードに傷がつき、火災・感 電の原因となることがあります。必ず電源プラグ(またはACアダプター本体)を持って抜いてください。 ■濡れた手で電源プラグ(またはACアダプター)を抜き差ししないでください。感電の原因となることがあります。 ■移動させる場合は、電源を切り、必ず電源プラグ(またはACアダプター)をコンセン トから抜き、機器間の接続コードなど外部の接続コードをはずしてから行ってください。 コードが傷つき、火災・感電の原因となることがあります。 ■お手入れの際は、安全のため電源プラグ ( またはACアダプター ) をコンセントから抜 いて行ってください。 電源プラグを ■旅行などで長期間、この機器をご使用にならないときは、安全のため必ず電源プラグ(ま コンセントから抜くこと たはACアダプター)をコンセントから抜いてください。 ■指定以外の電池は使用しないでください。 また, 新しい電池と一度使用した電池を混ぜて使用しないでください。 電池の破裂、 液もれにより、火災・けがの原因となることがあります。 ■電池を機器内に挿入する場合は, 極性表示 ( プラス+とマイナス−の向き ) に注意し, 機器にある表示通りに入れてください。 間違えますと電池の破裂、液もれにより、火災・けがや周囲を汚損する原因となることがあります。 ■長期間使用しないときは、電池を取り出しておいてください。電池から液がもれて火災・けが,周囲を汚損する原因となる ことがあります。もし液がもれた場合は、電池ケースについた液をよく拭き取ってから新しい電池を入れてください。また、...
- Page 13 4ch の XLR バランスマイクまたはバランスライン入力、 XLR バランスラインL/R出力、φ3.5 ジャックアンバランス出力、φ6.3 ジャックヘッドホンモ ニター出力、ビデオカメラ接続用 10 ピンマルチコネクター入出力 (FMX-42a)、φ3.5 ステレオジャックリターン入力 (FMX-42a)、ディジタル信号出力 (FMX-42u) を備えた、多用途ポータブルミキサー。 ON / OFF スイッチ付きのファンタム電源、リミッター、ローカットフィルター、レベル監視は入力ピークインジケーター、ライン出力ピークインジケー ター付きVUメーター、 さらにパン機能、 マイクを内蔵、 1kHz 基準信号を内蔵、 ライン出力 / リターン信号モニター機能 (FMX-42a) 搭載。 電源は 単三乾電池または外部電源の2系統。 ●4ch の XLR バランス入力 ●2ch の XLR バランスライン出力、φ3.5 ステレオジャックアンバランス出力、φ6.3 ステレオジャックヘッドホンモニター出力...
- Page 14 各 部名称と は た らき ( フロントコントロール部 ) ●フロン トコン トロール部 (FMX-42a/FMX-42u) 入力調整 VUメーター 電池ケース (上面) ボリューム ⑫ ⑧ ② MASTER OUTPUT ボリューム ボリューム PEAKインジケーター ③ ④ ⑨ PEAK 2 インジケーター ⑦ PEAK 1 インジケーター ① ⑩ POWER SLATE MIC インジケーター スイッチ ⑪ ⑤...
- Page 15 本機は、INPUT 1及びINPUT 2の2つのインジケーターを装備しています。各インジケータが点灯した時は以下の様な状態を表しています。 PEAK 1インジケーター点灯:過大な信号が入力されています。入力ソースに対する本機の基準入力設定、INPUT LEVEL SWの設定が不適切 です。INPUT LEVEL SWにより設定切替を行っても、インジケーターが点灯し続ける場合は 、本機へ過大な信号 が入力されています。この場合は接続機器側の出力レベルを調節してください。PEAK 2インジケーター点灯:ミキ シング信号レベルが高すぎる状態です。入力調整ボリュームで信号レベルを調節して下さい。 ⑧ CH L、R VUメーター モニターSELECTスイッチで選択された、LINE アウト出力またはリターン入力を表示するアナログVUメーター。 LINE アウト出力表示の場合はVUメーターが振り切れない、且つOUTPUT PEAKインジケーターが点灯しないよう、入力調整ボリュームで入力 信号レベルを調節するか、MASTERボリュームで出力信号レベルを調節して下さい。 (FMX-42aのみの仕様) リターン入力表示の場合はVUメーターが振り切れないよう、RTN LEVELボリュームで入力信号レベルを調節してお使い下さい。 セット出荷時には、モニターSELECTスイッチの選択に連動してVUメーターの表示も切替わるよう設定されていますが、常にLINE アウト出力表 示に固定させることも出来ます。常にLINE アウト出力表示に固定させる場合は、以下の方法で可能です。 セットの底板を固定している両サイドのネジ各2本、底面のネジ3本をゆるめて底板を外し、基板上の「SW2」を「LINE」側に切替えて下さい。 「SW2」のセンター位置はメーターOFFになります。 ⑨ CH L、R OUTPUT PEAKインジケーター LINEアウト出力を監視するピークインジケーターです。出力信号レベルが高過ぎて歪み始めると、赤く点灯します。 インジケータが赤く点灯した場合は、入力調整ボリュームで入力信号レベルを調節するか、MASTERボリュームで出力信号レベルを調節してお 使い下さい。...
- Page 16 各部の名称とはたらき (側面部) ●左サイド入力部(FMX-42a/FMX-42u) 入力コネクター ⑬ INPUT LEVEL スイッチ ⑭ ⑮ PHANTOM スイッチ ●右サイド出力部(FMX-42a) CAMERA(RTN) CH L XLR CH R XLR DC IN コネクター 入出力コネクター 出力コネクター 出力コネクター ⑰ ⑰ ⑱ ⑳ MONITOR 入力ジャック 出力ジャック ⑳ ⑳ ⑯ ⑳ ⑳ POWER モニター...
- Page 17 各部の名称とはたらき(FMX-42a/FMX-42u共通) (左サイ ド) ⑬ CH 1、2、3、4 XLR 入力コネクター INPUT LEVELスイッチで入力ソースに適した入力感度が設定可能です。 ⑭ INPUT LEVELスイッチ 入力コネクターに接続するソースにより基準入力レベルを3種類選択可能です INPUT LEVEL (LINE)設定時 → 基準入力レベル +4dBu 最大入力レベル +26dBu以上 (20kΩ) INPUT LEVEL (MIC HI)設定時 → 最大入力レベル +4dBu (2kΩ) INPUT LEVEL (MIC LO)設定時 → 最大入力レベル -15dBu (2kΩ) ⑮ PHANTOMスイッチ...
- Page 18 各部の名称とはたらき(FMX-42u) (右サイ ド) ⑯ POWERスイッチ 電源をON/OFFするスイッチ ⑰ CH L XLR出力コネクター MIXしたL CH信号を出力するXLR出力コネクター。LEVELスイッチで出力基準レベルをLINE出力/MIC出力に切替が可能です。 (L CH/R CH個別に切替設定は出来ません) ⑱ CH R XLR出力コネクター MIXしたR CH信号を出力するXLR出力コネクター。LEVELスイッチで出力基準レベルをLINE出力/MIC出力に切替が可能です。 (L CH/R CH個別に切替設定は出来ません) ⑲ STEREO MIC OUT出力ジャック Φ3.5のアンバランスステレオ出力ジャックです。出力基準レベルは-36dBu、MIC出力固定となり出力レベル基準切替は出来ません。 ⑳ LEVELスイッチ XLR L CH/R CHの基準出力レベルを切替を行うスイッチです。 LEVEL (LINE) → 出力基準レベル +4dBu LINE出力レベルが出力されます LEVEL (MIC) → 出力基準レベル -36dBu MIC出力レベルが出力されます ㉑...
- Page 19 パソコンまたはスマートホン、 タブレッ トとの接続 本機をUSBケーブル(別売)でパソコンまたはスマートホン、タブレット等と接続することによって、LINE出力オーディオ信号を、接続した機器にオー ディオファイルとして録音することが可能です。 但し、USBホスト機能(USB・OTG)に対応していないスマートホン、タブレットでは録音出来ません。 録音するためには、接続する機器内に、予め、オーディオ信号の録音/再生ソフトをインストールしておく必要があります。 また、録音したオーディオ信号を再生する場合、本機で再生音を聴くことは出来ませんので、録音した機器のオーディオ再生出力として聴くことに なります。 本機が内部電池駆動の場合、本機とパソコンまたはスマートホン、タブレット等とUSB接続状態で、本機の電源スイッチをON にしますと、USB接続 していない場合に比べて、電池の消費量が多くなります。 電池の消耗を防ぐため、録音動作時以外は、本機の電源スイッチをOFFにするか、USB接続している機器との接続を切り離して下さい。 屋内で使用する場合は、電池の消耗を防ぐため、ACアダプター(別売)の使用をお勧めします。 (オス) (オス) ・ 本機の電源スイッチを OFF の状態で、USBケーブルを使ってパソコンに接続します。 ・ パソコンのコントロールパネルでオーディオデバイスの管理を開きます。 ・ 本機の電源スイッチをON にすると、本機が、オーディオデバイス「USB AUDIO CODEC」として認識表示されますので、録音デバイスとして 「USB AUDIO CODEC」を選択します。 ・ パソコンにインストールされている録音/再生ソフトを立ち上げて録音を行います。 ・ 録音したオーディオ信号を再生する場合は、パソコンの再生デバイスを「USB AUDIO CODEC」以外のデバイスに設定して下さい。 パソコンのオ ーディオ再生出力として聴くことが出来ます。 ・ 再生時には、本機が内部電池駆動の場合は、 電池の消耗を防ぐため、本機の電源スイッチをOFFにするか、パソコンとのUSB接続を 切り離して下さい。...
- Page 20 仕 様 (FMX-42a) 入力部 バランス入力 XLR-3ピン(メス)×4 (CH 1、CH 2、CH 3、CH 4) 入力レベル(電子バランス入力) LINE 基準入力 : +4 dBu 最大入力 : +26 dBu 以上 入力インピーダンス : 20kΩ MIC HI 最大入力 : +4 dBu 入力インピーダンス : 2kΩ MIC LO 最大入力...
- Page 21 仕 様 (FMX-42u) 入力部 バランス入力 XLR-3ピン(メス)×4 (CH 1、CH 2、CH 3、CH 4) 入力レベル(電子バランス) LINE 基準入力 : +4 dBu 最大入力 : +26 dBu 以上 入力インピーダンス : 20kΩ MIC HI 最大入力 : +4 dBu 入力インピーダンス : 2kΩ MIC LO 最大入力...
- Page 22 保 証 書 本書は下記の保証規定により、無料修理を行なう事をお約束するものです 機種名 FMX-42a / FMX-42u ご 住 所 お 客 e-mail 様 お 名 前 保 証 期 間 一 ヶ 年 住 所 取 扱 販 売 店 名 店 お 買 い 上 げ 日 年 月...
- Page 23 PRINTED IN JAPAN 060-36009C01...
Need help?
Do you have a question about the FMX-42a and is the answer not in the manual?
Questions and answers