Table of Contents
Advertisement
Advertisement
Table of Contents

Related Manuals for Fostex X-34


Summary of Contents for Fostex X-34
- Page 1 Owner’s Manual Model Multitracker...
-
Page 2: Safety Instructions
12. Power Cord Protection - Power supply cords should be routed so that they are not likely to be walked on or pinched by items placed upon or against them, paying particular attention to cords at plugs, convenience receptacles, and the point where they exit from the appliance. -
Page 3: Table Of Contents
The X-34 contains a “Rehearsal” mode, which is convenient for punching in and out. You can practice until you are ready to record. Please read this owner’s manual thoroughly before using the X-34 to make the best use of its features and extend the useful life of the unit. -
Page 4: Cautions For Using The X-34
As shown in the figure below, a cassette tape is divided into four tracks: two for side A, two for side B. On the other hand, a multitracker, such as the X-34, records to all four tracks on the same side of the tape. -
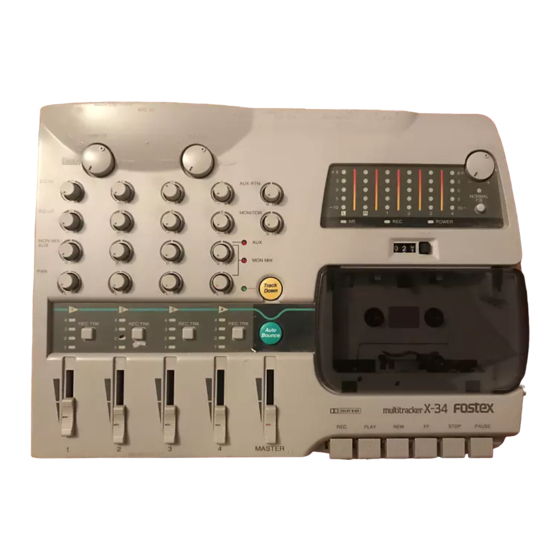
Page 5: Top Panel
AUX bus. 8. Equalizer control knobs [EQ HI, EQ LO] The X-34 is equipped with a two-band, shelving-type EQ. These knobs are used to adjust tonal quality of the signals routed to the channel faders. The... - Page 6 This indicator lights up in green when you turn on the DOLBY NR switch on the rear panel. 19. Record indicator [REC] This indicator lights up in red when the X-34 is placed in record mode. It also flashes in Punch in/ out rehearsal mode.
-
Page 7: Front Panel
MIC IN 2/4 jack and one from the LINE/ INSERT 2 and 4 jacks) onto the same track at the same time. Refer to page 10 and 11 for more information. 2. Headphone jack [PHONES] Plug in monitor headphones here. Model X-34 Owner’s Manual... -
Page 8: Rear Panel
(STANDBY), a small amount of current continues to flow through the X-34. Therefore, if the X-34 is not going to be used for a long period of time, disconnect the AC adapter from the wall socket. -
Page 9: Basic Operation: "Let's Record
Track Down indicator lights up as shown below. Please refer to the following “Initial setup of the X-34” section to reset the X-34 before you proceed to the next session. * For information on Track Down mode, refer to page 18. -
Page 10: Remember The Following Before You Start To Record
Model X-34 Owner’s Manual Remember the following before you start to record! The X-34 includes jacks (or connectors) for musical instrument and mic inputs on the front and rear panels. The functions of these input jacks (or connectors) are explained below:... - Page 11 Channel 3 Channel 1 DOLBY NR TAPE OUT MIC IN jack 1/3 (Sound source C) Model X-34 Owner’s Manual Sound source A will be recorded to a track selected by the REC TRK switch on channel 1. Channel 1 TAPE OUT...
-
Page 12: Basic Recording - 1 (Recording From The Front Panel Line In/Insert Jack)
X-34 and the X-34 is powered on. * Before proceeding to the next step, set the X-34 to its “initial settings” as explained on page 9. Also, make sure that the Track Down indicator is turned off. - Page 13 14. Press REC TRK switch 1 repeatedly to turn off the record track indicator. 15. Press the REW button and rewind the tape to counter [000]. Try recording on tracks 2-4 in the same way. Model X-34 Owner’s Manual...
-
Page 14: Basic Recording - 2 (Recording With The Rear Panel Mic In Jack)
This section describes how to record a vocal on track 1 by plugging a microphone into the rear panel MIC IN jack 1/3. * Before proceeding to the next step, remember to reset the X-34 to its “initial settings.” (See page 9.) Also, make sure that the Track Down indicator is turned off. -
Page 15: Basic Playback Procedure
This procedure assumes different sounds have been recorded to tape on tracks 1 - 4. * Before proceeding to the next step, reset the X-34 to its “initial settings.” (See page 9.) Make sure that the Track down indicator is turned off. -
Page 16: Multitrack Recording
Model X-34 Owner’s Manual You should now have a good understanding of the basic recording and playback operation of the X-34. Now let’s try the X-34’s multitrack recording functions. The following sections explain overdubbing, which is a fundamental function in multitrack recording, and also the mixdown process, in which the sound recorded to four tracks is mixed and copied (dubbed) to a master recorder. - Page 17 6. Adjust the overall headphone or monitor volume using the MONITOR knob and the channel 2 MON MIX/AUX knob. Model X-34 Owner’s Manual Overdubbing Take 7. Make sure that the record track indicator on channel 2 is lit. Otherwise, press the REC TRK switch 2 to set track 2 in REC READY mode.
-
Page 18: Mixdown (Track Down Mode)
Down mode, all track sounds are routed to the corresponding channel level faders. * Before proceeding to the next step, set the X-34 to its “initial settings.” (See page 9.) Make sure that the Track Down indicator is turned off. -
Page 19: Advanced Operation
“Punching in and out refers to recording “over” a section of an already-recorded tape. You can use this technique to fix mistakes or improve previously-recorded takes. Also, you can use the X-34’s rehearsal mode to practice and adjust the recording level and the punch in/out timing before you actually record the take. - Page 20 Model X-34 Owner’s Manual For example, part of the electric bass recorded on track 2 will be replaced during overdubbing. We assume that you have already loaded a prerecorded tape in the X-34 and rewound to the beginning of the recorded tracks.
-
Page 21: Ping-Pong Recording (Using The Auto Bounce Function)
14. Step on the foot switch at the punch in point. Track 2 will enter input monitor mode and recording mode (the REC indicator lights up continuously). The X-34 starts recording the electric bass on track 2. You can monitor your performance along with the playback from other tracks. - Page 22 In this section, the sounds recorded on tracks 1 - 3 will mixed and ping-pong recorded to track 4. * Before proceeding to the next step, set the X-34 to its “initial settings” as explained on page 9. Also, make sure that the Track Down indicator is turned off.
-
Page 23: Tape Sync
MIDI/FSK converter is required. For details, please refer to the MIDI equipment operating manual. After you record the FSK signal to track 4, be sure to de-select track 4 and completely retard the channel 4 fader before proceeding to mixdown. Model X-34 Owner’s Manual <Monitoring> <Notes on Auto Bounce recording>... -
Page 24: Recording A Sync Signal
Before starting mixdown, lower the channel 4 fader to the minimum level and de-select all recording tracks. 4. Stop the sequencer. 5. Press the REC button on the X-34 to start 6. Start playing the MIDI sequencer. <Tape Sync connection example>... -
Page 25: Applying Effects
AUX SEND and AUX RTN connectors on the rear panel. The MON MIX/AUX knobs are used to adjust the amount of signal sent to the effects processor. The processed signals are returned to the X-34 via the AUX RTN connectors and mixed with the dry (no effect) sound. - Page 26 The INSERT jack accepts a TRS (tip, ring, sleeve) 1/4" connector for bi-directional connection. The tip sends out the X-34 signal to the effects unit, and the ring inputs the processed signal from the effects unit to the X-34. This connection requires a special insert cable as shown in the figure below.
-
Page 27: Troubleshooting
Unable to apply effects during mixdown. Tape does not transport. Power is not turned on. The MIDI sequencer does not synchronize with the X-34. Model X-34 Owner’s Manual Points to check Are the capstan and pinch roller dirty? Is the tape damaged? -
Page 28: Maintenance
* Record/playback head As the X-34 is used, the record/playback head will become coated with oxide residue from tapes. If this residue is allowed to build up, recordings will contain more noise, and dropouts may occur during playback. To prevent this, regular cleaning is important. -
Page 29: Specifications
Dolby Laboratories Licensing Corporation. * Dolby and the double-D symbol are trademarks of Dolby Laboratories Licensing Corporation. Model X-34 Owner’s Manual : C - 9 0 ( T Y P E - 2 o r H I G H position) or shorter : 4 tracks, one direction : 9.5 cm/s, 4.75cm/s... -
Page 30: Declaration Of Ec Directive
Model X-34 Owner’s Manual This equipment is compatible with the EMC Directive (89/336/EEC) – Directive on approximation of member nation’s ordinance concerning the electromagnetic compatibility and with the Low Voltage Directive (73/23/EEC) – Directive on approximation of member nation’s ordinance concerning electric equipment designed to be used within the specified voltage range.
Need help?
Do you have a question about the X-34 and is the answer not in the manual?
Questions and answers