Advertisement
Quick Links
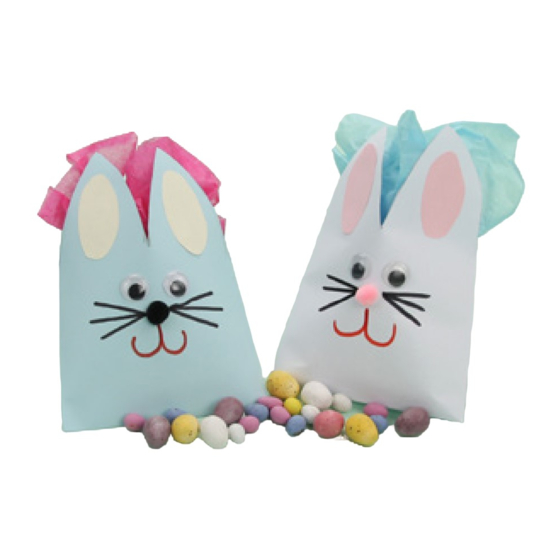
Supplies
– Pink paper
– White
envelope or
coloured
envelope
– Glue stick
Seal the envelope shut
1
then turn the envelope so
that it is portrait.
Then using a pencil draw
two bunny ears onto the
top half of the envelope,
joining the ears in
the middle.
Using the pencil, draw
3
two oval shapes onto the
pink paper. These need to
be small enough to fit
inside the bunny ears.
Add googly eyes and a
5
pom-pom nose to the face
of the bunny.
Put some tissue paper and
7
mini chocolate eggs into
the opening at the top
of the ears.
Craft Instructions
Bunny Envelope
– Pencil
– Black and
pink felt tip
– Scissors
– Googly eyes
– Pom-pom
– Tissue paper
– Mini chocolate
eggs
Using the scissors, cut
2
around the bunny ears.
Using the glue, stick the
4
ovals to the inside of the
bunny ears on the envelope.
Draw some whiskers using
6
the black felt tip pen and
a mouth using the pink
felt tip pen.
Advertisement

Subscribe to Our Youtube Channel
Related Manuals for twinkl Bunny Envelope


Summary of Contents for twinkl Bunny Envelope
- Page 1 Craft Instructions Bunny Envelope Supplies – Tissue paper – Pencil – Pink paper – Mini chocolate – Black and – White eggs pink felt tip envelope or – Scissors coloured – Googly eyes envelope – Pom-pom – Glue stick Seal the envelope shut...
- Page 3 Craft Instructions Bunny Envelope Step 1 . Seal the envelope shut then turn the envelope so that it is portrait. Then using a pencil draw two bunny ears onto the top half of the envelope, joining the ears in the middle. twinkl.com...
- Page 4 Craft Instructions Bunny Envelope Step 2 . Using the scissors, cut around the bunny ears. twinkl.com...
- Page 5 Craft Instructions Bunny Envelope Step 3 . Using the pencil, draw two oval shapes onto the pink paper. These need to be small enough to fit inside the bunny ears. twinkl.com...
- Page 6 Craft Instructions Bunny Envelope Step 4 . Using the glue, stick the ovals to the inside of the bunny ears on the envelope. twinkl.com...
- Page 7 Craft Instructions Bunny Envelope Step 5 . Add googly eyes and a pom-pom nose to the face of the bunny. twinkl.com...
- Page 8 Craft Instructions Bunny Envelope Step 6 . Draw some whiskers using the black felt tip pen and a mouth using the pink felt tip pen. twinkl.com...
- Page 9 Craft Instructions Bunny Envelope Step 7 . Put some tissue paper and mini chocolate eggs into the opening at the top of the ears. twinkl.com...
Need help?
Do you have a question about the Bunny Envelope and is the answer not in the manual?
Questions and answers