Table of Contents
Advertisement
Available languages
Available languages
Quick Links
WS1060
WIRELESS WEATHER STATION, DCF CLOCK, OUTDOOR SENSOR
DRAADLOOS WEERSTATION MET DCF-KLOK EN BUITENSENSOR
STATION MÉTÉO SANS FIL, HORLOGE DCF ET CAPTEUR EXTERNE
ESTACIÓN METEOROLÓGICA INALÁMBRICA CON RELOJ DCF Y
SENSOR EXTERIOR
DRAHTLOSE WETTERSTATION MIT DCF-UHR UND AUßENSENSOR
ESTAÇÃO METEOROLÓGICA SEM FIO, RELÓGIO DCF, SENSOR
EXTERNO
BEZPRZEWODOWA STACJA POGODOWA, ZEGAR DCF, CZUJNIK
ZEWNĘTRZNY
USER MANUAL
GEBRUIKERSHANDLEIDING
NOTICE D'EMPLOI
MANUAL DEL USUARIO
BEDIENUNGSANLEITUNG
MANUAL DO UTILIZADOR
INSTRUKCJA OBSŁUGI
4
14
24
34
44
54
64
Advertisement
Table of Contents

Related Manuals for Velleman WS1060


Summary of Contents for Velleman WS1060
- Page 1 WS1060 WIRELESS WEATHER STATION, DCF CLOCK, OUTDOOR SENSOR DRAADLOOS WEERSTATION MET DCF-KLOK EN BUITENSENSOR STATION MÉTÉO SANS FIL, HORLOGE DCF ET CAPTEUR EXTERNE ESTACIÓN METEOROLÓGICA INALÁMBRICA CON RELOJ DCF Y SENSOR EXTERIOR DRAHTLOSE WETTERSTATION MIT DCF-UHR UND AUßENSENSOR ESTAÇÃO METEOROLÓGICA SEM FIO, RELÓGIO DCF, SENSOR...
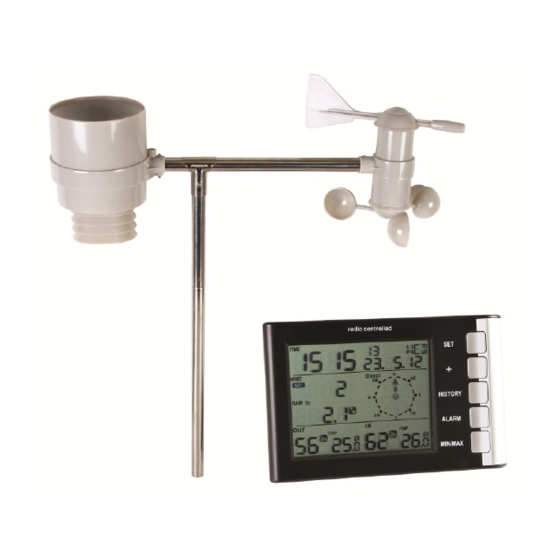
- Page 2 WS1060 Base station – Basistation – Station de base – Outdoor unit – Buitenstation – Estación de base – Basisstation Station extérieure – Unidad exterior – Außengerät V. 02 – 26/04/2013 ©Velleman nv...
- Page 3 WS1060 V. 02 – 26/04/2013 ©Velleman nv...
-
Page 4: Safety Instructions
If in doubt, contact your local waste disposal authorities. Thank you for choosing Velleman! Please read the manual thoroughly before bringing this device into service. If the device was damaged in transit, don't install or use it and contact your dealer. -
Page 5: Installation
WS1060 set includes: receiver 4 outdoor sensors: thermo-hygrometer, wind speed sensor, wind direction sensor, and rain sensor. Overview Refer to the illustrations on page 2-3 of this manual. Base station display Time alarm enabled Rainfall unit: mm or inch... - Page 6 WS1060 Installing batteries in the outdoor unit 1. At the bottom side of the rain collector, loosen the screw and slide the metal catch sideways to free the battery compartment [G]. 2. Pull out the battery compartment [H]. 3. Insert 2 x AA 1.5V LR6 batteries according to the polarity markings in the compartment [I].
-
Page 7: Configuring The Base Station
WS1060 Install the weather station as follows: 1. Make sure the outdoor unit is fully assembled and batteries are installed in outdoor unit and base station. 2. Place the outdoor unit and base station in the locations where you want them, and check if the communication is working. -
Page 8: History Mode
WS1060 Setting Description Time format Choose between 12h or 24h formats for displaying the time [27]. Time If the DCF signal cannot be detected, you can set the current time (hours/minutes) manually. Date format Choose between day-month-year (DM) or month-day-year (MD) formats for displaying the date [4]. -
Page 9: Minimum And Maximum
WS1060 5. Press ALARM to enable/disable the alarm. If the alarm is enabled, the corresponding alarm indicator HI AL (or LO AL for a low alarm) appear on the display. 6. Press SET to confirm the current setting and go to the next. -
Page 10: Troubleshooting
WS1060 4. Press + repeatedly to display the minimum values for: outdoor humidity, outdoor temperature, wind chill temperature, dew point, indoor humidity, indoor temperature. 5. Press HISTORY to return to normal mode. Resetting a minimum or maximum To reset a minimum or maximum: 1. -
Page 11: Cleaning And Maintenance
WS1060 3. Allow the installation to stabilise for 48 hours. 4. Compare the temperature reading on the display to the temperature reading on the thermometer, and adjust the setting in calibration mode to match the thermometer. Humidity calibration The hygrometer sensor’s accuracy is ±5%. You can improve the accuracy by calibrating indoor and outdoor humidity measurements. -
Page 12: Replacing The Sensors
WS1060 11.2 Replacing the sensors Refer to the illustrations on page 2-3 of this manual. Replacing the rain collector and thermo-hygro sensor To replace the rain collector and thermo-hygro sensor, proceed as follows: 1. Loosen the three screws [O] at the bottom of the rain collector. - Page 13 Note: this is only an estimation that you can use as a guideline. Actual battery life depends on several factors, such as ambient temperature. Use this device with original accessories only. Velleman nv cannot be held responsible in the event of damage or injury resulted from (incorrect) use of this device.
-
Page 14: Algemene Richtlijnen
Veiligheidsinstructies Houd buiten het bereik van kinderen en onbevoegden. Algemene richtlijnen Raadpleeg de Velleman® service- en kwaliteitsgarantie achteraan deze handleiding. Gebruik het toestel enkel binnenshuis. Bescherm tegen regen, vochtigheid en opspattende vloeistoffen. Bescherm tegen stof en extreme temperaturen. -
Page 15: Montage
WS1060 gesynchroniseerde en directe dataontvangst inhoud: ontvanger 4 buitensensoren: thermo-hygrosensor, anemometer, windrichtingmeter en neerslagmeter. Omschrijving Raadpleeg de afbeeldingen op pagina 2-3 van deze handleiding. Display basisstation Icoon alarm ingesteld Eenheid neerslag: mm of inch Ontvangst RCC-signaal Hoog/laag alarm buitentemperatuur ingesteld... - Page 16 WS1060 Respecteer de polariteit bij het plaatsen van de batterijen. Een verkeerde polariteit kan het toestel beschadigen. Alkalinebatterijen hebben een typisch operationeel temperatuurbereik tussen -20°C~+54°C. Gebruik het toestel niet buiten dit temperatuurbereik. Batterijen plaatsen in het buitenstation 1. Aan de achterzijde van de regencollector, draai de schroef los en schuif het metalen plaatje opzij om het batterijvak te openen [G].
- Page 17 WS1060 Voor nauwkeurige temperatuurmetingen, houd het toestel buiten bereik van warmtebronnen zoals gebouwen of de grond, en vermijd directe blootstelling aan zonlicht zonder voldoende afscherming. Voor nauwkeurige vochtmetingen, houd het toestel buiten bereik van de grond, gras of andere vochtige plaatsen.
-
Page 18: Alarmen Instellen
WS1060 Eenheden, datum en tijd Ga als volgt te werk om eenheden, datum en tijd in te stellen: 1. In normale weergavemodus, houd SET ingedrukt gedurende 2 seconden. Het station is nu in instellingsmodus. 2. Druk op SET om de huidige instelling te bevestigen en om naar de volgende instelling te gaan; druk op + of MIN/MAX om de waarden te wijzigen. - Page 19 WS1060 Onderstaande alarmen zijn instelbaar: hoge alarmpeilen: het alarm gaat af wanneer de gemeten waarde het alarmpeil overschrijdt, bijvoorbeeld als de windsnelheid groter wordt dan 20 m/s. lage alarmpeilen: het alarm gaat af wanneer de gemeten waarde onder het alarmpeil zakt, bijvoorbeeld als de buitentemperatuur lager wordt dan -5°C.
-
Page 20: Problemen En Oplossingen
WS1060 Laag alarm Omschrijving Vochtigheid binnen Stel de waarde in voor vochtigheid binnenshuis (1%~99%). Het alarm gaat af wanneer de vochtigheid binnenshuis lager is dan de ingestelde waarde. Binnentemperatuur Stel de waarde in van de binnentemperatuur (-9.9C~+60°C). Het alarm gaat af wanneer de binnentemperatuur lager is dan de ingestelde waarde.
Need help?
Do you have a question about the WS1060 and is the answer not in the manual?
Questions and answers