
Subscribe to Our Youtube Channel
Related Manuals for BOOM TRIKES V1 AUTOMATIC


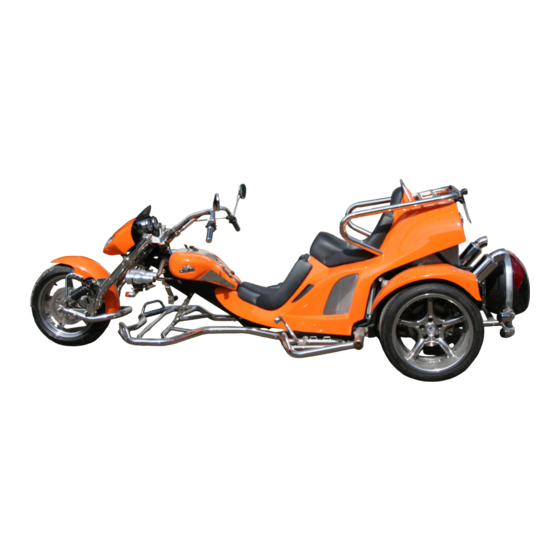
Summary of Contents for BOOM TRIKES V1 AUTOMATIC
- Page 1 V1 AUTOMATIC OWNER'S HANDBOOK SERVICE ITINERARY Certificated Management Edition 04/13 System...
- Page 2 RAME AND ENGINE NUMBERS The frame number is stamped on the right-hand side of the frame. The engine number is stamped on the drive belt housing at the rear. IT IS ILLEGAL TO ALTER A FRAME NUMBER. DOING SO MAY RENDER THE VEHICLE LIABLE TO CONFISCATION Vehicle details Technical specifications...
-
Page 3: Table Of Contents
Page General information and safety considerations 5 – 6 2.1 Controls, switchgear, warning lights and instruments 7 – 8 2.2 Parking lock 2.3 Checks before you ride your trike 2.4 Running in 2.5 Starting the engine 2.6 Automatic gearbox 2.7 Frame, front fork, rear dampers, rear axle 12 –... - Page 4 Fahrzeugbau GmbH OBSERVE PERSONAL SAFETY CAUTION Failure to observe these rules fully and correctly can seriously endanger your personal safety and health. PROTECT THE ENVIRONMENT CAUTION The following are hints and tips to prevent use of the vehicle having a negative effect on the environment.
-
Page 5: General Information And Safety Considerations
Original BOOM TRIKES accessories have been specially developed and tested to be compatible with your trike. BOOM TRIKES have not tested any accessories made by other manufacturers for the effects that they may have on the handling characteristics of your vehicle. - Page 6 As a result of continuous improvement to BOOM trikes, certain details of your trike may deviate from the specifications contained in this handbook.
-
Page 7: Controls, Switchgear, Warning Lights And Instruments
2.1 C ONTROLS SWITCHGEAR WARNING LIGHTS AND INSTRUMENTS Handlebar controls: (Fig. 1) Functions: 1. Headlight flasher (at front) 2. Light switch 3. Parking light 4. Dipped beam 5. Main beam 6. Horn Fig. 1 7. Indicator Fuel tank instruments / standard specifications (Fig. - Page 8 If this light goes on, top up the brake fluid reservoir to the “Max” marking immediately. Take the vehicle to your nearest BOOM TRIKES dealer or any other specialist dealer to carry out a check on the braking system. Stop the vehicle immediately and have it towed!
-
Page 9: Parking Lock
ARKING LOCK To activate the parking lock, turn the handlebars to the right. Insert the key, turning the barrel of the lock to the right, press and then lock. To unlock it, insert the key and proceed in reverse order. (Fig. -
Page 10: Checks Before You Ride Your Trike
HECKS BEFORE YOU RIDE YOUR TRIKE Caution: Failure to observe the section "Checks before you ride your trike" can lead to accidents or damage to the vehicle. Check your trike regularly before you ride it. The checks listed below take very little time to complete and in the long run will save you time and help to protect both your wallet and your life. -
Page 11: Starting The Engine
TARTING THE ENGINE This vehicle is equipped with an ignition cutout operated by the handbrake. If the handbrake is on, then the engine will not start. This vehicle is equipped with a CVT automatic gearbox which engages directly with the rear wheels. -
Page 12: Automatic Gearbox
2.6 A UTOMATIC GEARBOX The V1 is equipped with a CVT automatic gearbox. To ensure the most comfortable ride possible the vehicle is equipped with an automatic gearbox, a centrifugal clutch and electronic engine management. This system was developed to obtain best possible acceleration and lowest possible fuel consumption both on even roads and up hills. - Page 13 ADJUSTING THE REAR DAMPERS An adjuster wheel at the lower end of the unit allows continuous adjustment of the spring pre-load. SPRING PRE-LOAD WHICH IS INCORRECT FOR THE RESPECTIVE WEIGHT OF THE VEHICLE CAN IMPAIR THE QUALITY OF THE RIDE AND MAKE IT UNSAFE TO USE THE TRIKE.
-
Page 14: Bodywork
Normally available in 500 ml bottles. This spray cleaner is available from your BOOM trikes dealer. We also recommend that you use a soft rag to clean other plastic parts – not a microfibre rag – and that you do not use sponges or rags which have rough cleaning surfaces. - Page 15 After unlocking, press the body section up. The liftomatic raises the body and holds it in place. To lower the body section, first press the body up to release the locking mechanism of the liftomatic. Fig. 10 Make sure that the handlebars are straight, i.e. the front wheel is pointing straight ahead, and that the handbrake is on.
-
Page 16: Braking System
RAKING SYSTEM A) B RAKE PEDAL To adjust the brake pedal, remove the cotter pin 1 and undo the nut 2 securing it (arrow). Now the pedal can be adjusted. Undo the nut on the footrest mounting and remove the screws. Now the footrest mounting can be adjusted. - Page 17 D) H ANDBRAKE The full effect of the handbrake should be felt at the fourth click. If not, then access the linkage nuts depicted below to re-adjust. If this produces no results, then the brake pads will need to be replaced (Fig.
-
Page 18: Fuel System, Fuel
BOOM TRIKES accept no responsibility for damage caused by the use of leaded petrol. Such damage shall be excluded from the conditions of warranty. If by mistake you have filled the tank with leaded fuel ,... -
Page 19: Catalytic Converter
- Never turn off the ignition while the vehicle moving Caution: If the ignition system malfunctions, or if performance is below normal, contact an authorised BOOM TRIKES dealer, or a specialist dealer. Do not use full throttle. The catalytic converter is built into the exhaust silencer. Exhaust system temperatures can reach 1000 °C. -
Page 20: Battery
(12V-18AH) ATTERY The battery is the part of the electrical system requiring closest attention and care. The most important rules for maintaining a battery are as follows: Maintenance-free batteries First-time use of a maintenance-free battery: Caring for a maintenance-free battery is confined to checking the battery voltage and if necessary charging the battery. -
Page 21: Engine Oil Level
NGINE OIL LEVEL On 4-stroke engines, engine oil lubricates the drive components, main bearings and all of the engine’s moving parts. Running an engine with insufficient oil can cause severe engine damage. On all 4- stroke engines, both oil consumption (to a certain degree) and gradual deterioration of oil properties are normal occurrences. -
Page 22: Changing The Oil Filter
3. Oil pressure warning light (insufficient oil pressure) The vehicle has an oil pressure warning light which goes on when you turn the ignition key. After the engine has started this warning light must go off. If the oil pressure warning light goes on during braking, in neutral, or when you ride the trike around bends, then you should check the oil level and if necessary top up. -
Page 23: Differential Gearbox
IFFERENTIAL GEARBOX 1. Gearbox oil level To check the oil level in the differential gearbox (contains 1 litre), proceed as follows: 1. Place the vehicle on an even and level surface. 2. Unscrew inspection plug “A“ (Fig. 21). If oil begins to run out then no topping up is required. If no oil runs out, then unscrew oil filler plug “B“... -
Page 24: Removing The Spark Plugs
EMOVING THE SPARK PLUG To remove the spark plug proceed as follows: 1.) Open up the body section and lift. 2.) Remove the spark plug cap (Fig. 22). 3.) Unscrew the spark plug. 4.) Screw the plug back in at the correct angle by hand. 5.) Only use the plug spanner to tighten the plug down. -
Page 25: Removing The Air Filter
EMOVING THE AIR FILTER To remove the air filter proceed as follows: 1.) Undo the 9 screws holding the filter cover and remove them along with the cover. 2.) Remove the air filter and replace it with a new part. Replace the cover and the screws. Retighten. Fig. -
Page 26: Checking The Cooling System
HECKING THE COOLING SYSTEM The engine cooling system runs on a mixture of water and coolant, maintained under high pressure. Total capacity is approximately 3.0 litres. The coolant used is ready-mixed and consists of 50% distilled water and 50% coolant, which is an ethylene glycol mixture and contains anti-corrosion additives. -
Page 27: Adjusting The Headlamps
DJUSTING THE HEADLAMPS To adjust the headlamps proceed as follows: 1. Place the unladen and complete vehicle with correct tyre pressures on an even surface 10 metres away from a white wall slightly in the shade. The vehicle should point at right angles to the wall. 2. -
Page 28: Top Box And Carrier
TOP BOX AND CARRIER Releasing and removing the top box from its carrier. Fig. 29 To access the top box compartment insert the red key inside the lock and turn it to the right through 90°. To open the top box, press button “B“ to release the flap. Now the top box can be opened. -
Page 29: Tyres
YRES Regularly check the tyre pressures. FITTING TYRES OTHER THAN THOSE RECOMMENDED CAN LEAD TO UNSTABLE HANDLING. WE URGENTLY RECOMMEND THAT YOU ALWAYS FIT TYRES WHICH CONFORM TO THE ORIGINAL VEHICLE SPECIFICATIONS. The tyres have tread markers to indicate the degree of wear. Replace the tyres as soon as these markers become visible on the tread. -
Page 30: Cleaning The Vehicle
LEANING THE VEHICLE Use water from a low-pressure hose to loosen road dirt and deposits on painted surfaces. When water has loosened the deposits, use a soft sponge along with ample water and a car shampoo (2-4% of shampoo to in the water). Rinse off thoroughly with clear water and wipe down with a chamois leather rag. -
Page 31: Fuses, Relays
USES ELAYS ALWAYS FIND AND RECTIFY THE FAULT THAT LED TO A FUSE BLOWING BEFORE YOU REPLACE IT: NEVER USE ALTERNATIVE METHODS OF BRIDGING THE ELECTRICAL CIRCUIT (E.G. WIRE). Fig. 30 Fuses and relays are located beneath the fuel tank. Relays: K1 = Power supply... -
Page 32: Troubleshooting
4.9 T ROUBLESHOOTING SYMPTOM POSSIBLE CAUSE SOLUTION ENGINE WILL NOT START Handbrake on Release handbrake Fuse blown Replace fuse and contact specialist dealer STARTING DIFFICULTIES Fuel tank empty Fill up with petrol Fuel injection system Contact specialist dealer malfunction Damaged petrol pump Contact specialist dealer Flat battery Charge battery... -
Page 33: Magcode Powersystempro 12/24 V
12/24V OWER YSTEM Important information for the outdoor use of the Power System 12/24 V (Hints by Company MagCode): To extend the operational life span of this product, the following measures should be taken: - after the outdoor use of the Port clean it quickly with a cloth - from time to time remove cutting debris on the side of the contact of Port and Clip with an adhesive strip. -
Page 34: Wiring Diagrams - Legend
5.1 W – L IRING DIAGRAMS EGEND Power supply Warning lights / additional Ignition switch instruments Alternator Battery Sensor handbrake warning light Fuse, parking light, left Sensor brake fluid level Fuse, parking light, right Water temperature gauge – additional instrument Fuse, dipped beam, left Brake fluid control light Fuse, dipped beam, right... -
Page 35: Wiring Diagram, Relays And Fuses
5.2 W – R IRING IAGRAM ELAYS AND USES... -
Page 36: Wiring Diagrams Control Unit
5.3 W – E IRING DIAGRAM NGINE MANAGEMENT... -
Page 37: Wiring Diagram, Lights And Instruments
5.4 W IRING DIAGRAM IGHTING AND INSTRUMENT... -
Page 38: Terms Of Warranty / General Conditions And Terms Of Business
ERMS OF WARRANTY ENERAL CONDITIONS AND TERMS OF BUSINESS I: Conditions – scope of application Deliveries, services/performances and offers made by us shall be governed solely by the following general terms and conditions of business. These shall also be valid for all future business dealings, even if no express reference is made to them. These conditions shall be sonsidered as accepted, at the latest, at the time of acceptance of the service rendered. - Page 39 VI: Acceptance of the object of purchase 1. The buyer is obliged to accept delivery of the object of purchase within 8 days following notification of delivery. In the event that the buyer does not accept delivery of the object of purchase the vendor is entitled to assert his legal rights in this connection.
- Page 40 a) General notes and instructions: All fibreglass parts are laminated by hand, therefore minor irregularities in shape and deviations in colour must necessarily be tolerated by the customer. Uneven tyre wear is inherently caused by the nature of the vehicle's constructional design.
-
Page 41: Service Booklet
ERVICE BOOKLET Warranty* Detachable stub for manufacturer 2 years (to be sent to BOOM TRIKES at the *except vehicle rentals: latest 2 weeks after the service date) 1 year - - - - - - - - - - - - - - - - - - - - - - - - - ... - Page 42 - - - - - - - - - - - - - - - - - - - - Name Name Street Street Post code/ city Post code/ city Tel. Tel. registration registration Purchased on Purchased on - - - - - - - - - - - - - - - - - - - - Name Name Street...
- Page 43 - - - - - - - - - - - - - - - - - - - - - - - - - 40,000 km service 40,000 km service Dealer’s stamp: Dealer’s stamp: ...
- Page 44 - - - - - - - - - - - - - - - - - - - - Name Name Street Street Post code/ city Post code/ city Tel. Tel. registration registration Purchased on Purchased on - - - - - - - - - - - - - - - - - - - - Name Name Street...
- Page 45 - - - - - - - - - - - - - - - - - - - - - - - - - 80,000 km service 80,000 km service Dealer’s stamp: Dealer’s stamp: ...
- Page 46 - - - - - - - - - - - - - - - - - - - - Name Name Street Street Post code/ city Post code/ city Tel. Tel. registration registration Purchased on Purchased on - - - - - - - - - - - - - - - - - - - - Name Name Street...
-
Page 47: Maintenance And Service Intervals
Your authorised BOOM TRIKES dealer will be able to advise you on an appropriate service itinerary for your trike. Regular servicing will ensure that your trike maintains its value and roadworthiness. A worldwide network of over 100 BOOM Trikes dealers and several thousand car and motorcycle dealers is at your disposal to ensure that your trike can always be properly maintained. - Page 48 , 4- , 500 ECHNICAL SPECIFICATIONS LIQUID COOLED STROKE VALVE ENGINE ENGINE Type: Single cylinder 4-stroke Bore: 92 mm Stroke: 69 mm Cubic capacity: 460 c.c. Compression ratio: 10.5 : 1 Valve train: Single overhead camshaft, chain-driven from the alternator side, integrated camshaft sensor (tone wheel), 4 valves and automatic valve lifter for starting Valve clearances:...
- Page 49 Checking for top dead centre (TDC) Use a Torx key to open the inspection cover on the alternator cover. Remove the drive belt cover and its damping material. Remove the rocker cover on the cylinder head. Rotate the crankshaft at the pulley until the marking at the magnet holder points to the marking on the alternator cover (TDC).
- Page 50 Recommended torque settings Standard torque settings All values in Nm Thread diameter of bolt Bolted to plastic Bolted to bronze, Bolted to iron and steel surfaces with a metal copper, aluminium surfaces washer surfaces and various alloys 10.5 10.5...
- Page 51 V1 Automatic Recommended torque settings Vehicle component Quantity Torque setting (Nm) Motor Clutch securing nut 65 – 75 Bolts securing shaft bearing, driven belt pulley 23 – 26 Belt tensioner roller, securing bolt 17 – 20 Drive pulley, nut 160 – 175 Alternator, nut ( 115 –...
- Page 52 Body and crankshaft Components Torque reference values (Nm) 3 ÷ ÷ ÷ ÷ 4 Locking plate gear 11 ÷ ÷ ÷ ÷ 13 Connecting screw body (M6) 25 ÷ ÷ ÷ ÷ 28 Connecting screw body (M8)
-
Page 53: Pre-Delivery Vehicle Checks
DELIVERY VEHICLE CHECKS Vehicle checks Paintwork Panel gaps, bodywork parts Vehicle damage All surfaces clean Torque settings Torque settings in safety-relevant areas Securing bolts Electrical system Ignition switch Headlamp angle in accordance with legal requirements Tail light, parking light, brake light Indicators and indicator warning light Instrument panel lights Instruments: petrol gauge and water temperature gauge...
Need help?
Do you have a question about the V1 AUTOMATIC and is the answer not in the manual?
Questions and answers