Table of Contents
Advertisement
Quick Links
Advertisement
Table of Contents

Summary of Contents for FlyTech M276
- Page 1 M276 & M278 Quick Start Guide...
- Page 2 Packing Standard Tablet (11.6" or 13.3") Premium docking station 19V/120W power adapter (standard, for premium docking station) Power cord 12V/36W power adapter (optional, for tablet only) Optional RFID Fingerprint iButton Shoulder strap...
- Page 3 Features Speaker 9. MSR/RFID/Fingerprint/iButton dummy Trigger key (middle) cover Power On/Off 10. Hand strap 2D scanner 11. 5MP AF camera Trigger key (right) 12. Trigger key (left) Full HD P-CAP multi-touch screen 13. DC-in 14. Should strap screw Battery status indicator 15.
-
Page 4: Getting Started
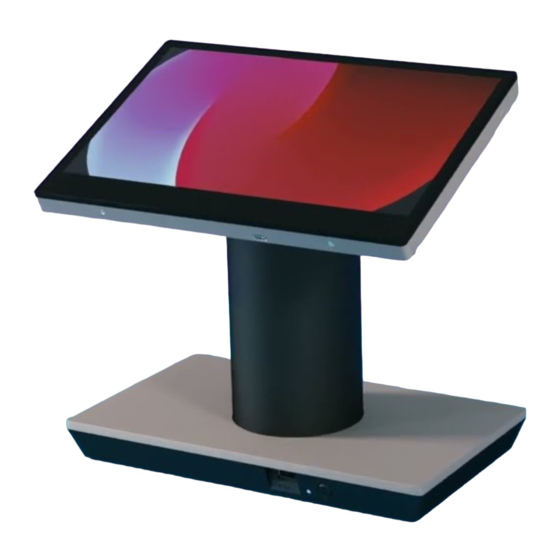
Getting Started 1. Power-on / Power-off 2. Installing the Peripheral Kits Remove the dummy cover first. Remove the rubber pads (x2) and screws (x2) Press the power button for 2 seconds to turn to release the top cover of the MSR module. on the system and press it for 6 seconds to turn off the system. - Page 5 3. Using the Premium Docking Station The premium docking station provides additional connectors and interfaces to support other devices and is also designed to allow the tablet to charge its battery via the dock. To power outlet To use the premium docking station, firstly connect the AC adapter to the DC-in input and connect the other end to the power outlet.
- Page 6 17° 180° • Adjusting the tablet angle • Removing the tablet from the dock T h e p r e m i u m d o c k i n g s t a t i o n o f f e r s Press the lock release button on the front of adjustment of viewing angle.
-
Page 7: Attaching The Shoulder Strap
I/O Specification 4. Attaching the Shoulder Strap Premium Docking Station P-2DK10 P-2DK11 Front I/O 1x USB2.0 Rear I/O Serial port 2x DB9 (0V; 5V or 12V) 2x USB3.0 2x USB2.0 Powered USB 1x 12V, 1x 24V Align and attach the shoulder strap to the 1x RJ45 1x RJ45 tablet as shown and fasten the screws (x2) to... - Page 8 Configuration 1. COM Port Power ❶ ❷ Step 1: Double click P-2DK10_ConfigTool.exe to run the setup tool. Step 2: By default, both left and right COM port power are 0V. To change the default COM port power, select power and tap on Write COM Port Power to confirm. * L/R COM port power can be set to different voltage individually, e.g., L:5V and R:12V.
- Page 9 2. Cash Drawer COM Port ❶ ❷ Step 1: Click on New Port COM and enter 7 in the column. Step 2: Tap on Set COM Port to confirm.
- Page 10 Step 3: Right-click the Windows icon/Start button. From the results, click on Device Manager. Step 4: Click on Ports (COM & LPT), you will see the current serial USB port is changed from COM 4 to COM 7.
- Page 11 Step 5: You can check the current setup condition by tapping on Read. * If the device is not connected or the setup process hasn’t been completed yet, the Read / Write column will be highlighted.
- Page 12 3. USB over IP • The Premium Docking Station P-2DK10 is designed with the feature of USB over IP that offers a convenient way to extend and share a USB device over long distance, and it also works with multiple tablet-dock pairs. •...
- Page 13 ❶ ❸ ❷ Step 2: Double click P-2DK10_ConfigTool.exe to run the setup tool. Step 3: Specify the MAC address of the server in your VirtualHere by clicking on Setp IP. The process may take up to 2~3 minutes showing the message Set IP..If all was done correctly, a popup window should appear indicating Set IP success!
- Page 14 ❶ ❷ Step 4: The default setting of the system is Mode 1: POS Mode. To change the de- fault mode, select Mode 2: All USB over IP and tap on Write USB over IP. Step 5: Restart your computer to confirm changes. *Always dock your tablet on the premium docking station before changing the Mode.
-
Page 15: Led Indicator
5 seconds See technical manual in the Driver Bank to reset the system. • Always plug in the AC adapter when updating the BIOS. Setting up and using the M276/M278 See technical manual in the Driver Bank... -
Page 16: Safety Information
Safety Information Battery Caution Risk of explosion if battery is replaced by an incorrectly type. Dispose of used battery according to the local disposal instructions. Safety Regulatory Information Caution: Only use approved and UL Listed accessories, battery packs and battery chargers. Do NOT attempt to charge damp/wet mobile computers or batteries.
Need help?
Do you have a question about the M276 and is the answer not in the manual?
Questions and answers