Advertisement
Quick Links
Advertisement

Related Manuals for Weltevree Framehouse


Summary of Contents for Weltevree Framehouse
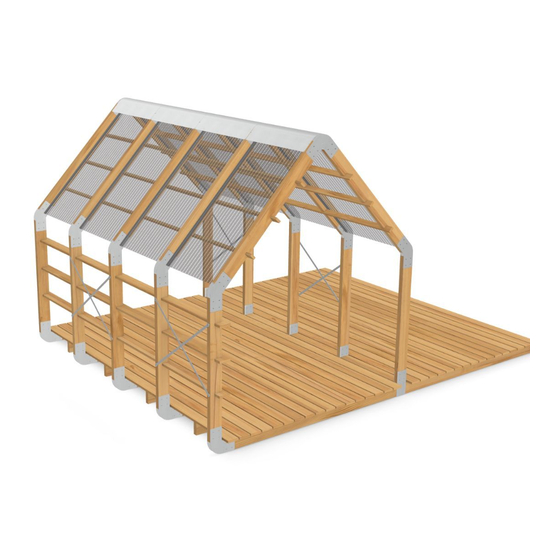
- Page 1 Framehouse PRODUCT MANUAL...
- Page 2 At the same time it at any makes the construction easy to assemble and adjust it to your needs.” According to the designer, that’s what the Framehouse offers most of all: a feeling of flexibility. Floris: “It offers the possibility to create your location own space at any location.
-
Page 3: Specifications
The aging varnish, wood stain is easy to main- Material process gives the house a tough tain. If the Framehouse is treated, and robust appearance. The steel maintenance depends on the type Connectors will lose it shine overtime and gets a of coating used to treat it. - Page 4 343 cm / 135 inch 449 cm / 177 inch Both 4 and 5 arc Framehouses are available in the following configurations: Framehouse base Framehouse floor inside & outside 303 cm / 119 inch 554 cm / 218 inch Framehouse floor inside...
- Page 5 Before building the Framehouse, make sure the surface where the Framehouse is placed is even and level. When placing the Framehouse with a platform on a field it is advised to place a root cloth underneath the floor to keep plants from growing through the platform.
- Page 6 FASTENERS Depending on the configuration, a selection of the following fasteners will be delivered: (see the page on the right for the quantity) Drill tool for the floor 6 x 30 mm - wood screw 6 x 50 mm - wood screw 6 x 100 mm - wood screw 8 x 40 mm - wood screw M10 x 12 mm - bolt...
- Page 7 4 arcs base floor floor floor inside roof inside outside & outside Drill tool for the floor 6 x 30 mm - wood screw 6 x 50 mm - wood screw 6 x 100 mm - wood screw 8 x 40 mm - wood screw M10 x 12 mm - bolt 5 x 60 mm - wood screw 6 x 90 mm - wood screw...
- Page 8 Depending on the chosen configuration, the following arc shape needs to be build: Framehouse floor inside & outside Framehouse base Framehouse floor outside...
- Page 9 WOOD FOR ARCS The beams that are used in the arcs are the following: The position of the wood is the same for every con- figuration of the Frame- house...
- Page 10 There are different scenarios depending on each configu- ration. When placing the Framehouse indoors it is possible to use plugs to fix it to the floor. It depends on the situation if this is necessary or not.
- Page 11 Framehouse floor inside & outside For a Framehouse with the floor inside & outside, 4 or 5 anchors are needed, depending on a 4 or 5 arc Framehouse. The way to prepare the ground fixtures is shown here for the 5 arc ver- sion.
- Page 12 Framehouse. The way to prepare the ground fixtures is shown here for the 5 arc version. When you have a 4 arc Framehouse just leave one out. A ground anchor needs to be placed under- neath every type c connector. Mark the areas using the following dimensions: Framehouse floor inside.
- Page 13 HAMMERTIME When completely sure about the marked areas and when you are sure there is no pipe work that is not at least 50 cm or 20 inches underground, the anchors can be placed. Note: If the anchors are not positioned correctly, the beams will not stand straight later. Step 1 Use a rubber hammer to hammer in the ground...
- Page 14 BUILDING THE ARCS This manual tells you how to build an arc for a Framehouse with a floor inside & outside. Depending on the purchased configuration you might need to use different connectors. Step 1 Place the first connector over the wooden beam type f.
- Page 15 Step 3 Place the type e beam into the other side of the connector and fixate with the same screws and rings. Step 4 Attach the type a connector to the other end of the type e beam.
- Page 16 Step 5 Place another connector on the other end of the type f beam. It depends on the configuration which one needs to be placed. See page 8 which connector you need. When using the type c connector make sure the hole at the bottom is pointed towards the inside of the arc.
- Page 17 Step 8 Assemble the other side of the arc. Use the type b and c connector in combination with type g and e wood. Note: make sure the hole in the type c connector is pointed towards the inside of the arc.
- Page 18 6 mm rings. Step 12 Lift the arc slightly with two people and screw in the last four screws from the bottom. The arc is now finished. Depending on your Framehouse make 3 - 4 more.
- Page 19 PURLINS AND SHELVES purlins shelves letter used for shelf 5 arcs shelf 4 arcs purlin 5 arcs purlin 4 arcs...
- Page 20 Note: If the configuration you are making is a base, place both connectors over the anchors. If it is a Framehouse with flooring inside only, there are no ground anchors in place and this will be done later. Step 2 While two people hold the arc upright.
- Page 21 Step 3 Get the second arc upright and place it in the right position. When the ground anchors are already installed, place the type c connector over one of the anchors. While two people hold the arcs upright. Have one person screw in the M10 bolt, through the hole in the type c connector and into the...
- Page 22 Step 5 Place the third arc and fixate the shelf to it with the 6 x 100 mm long screws and 6 mm ring. If used, fixate the ground anchors with the M10 bolt. After this step it’s still needed to hold up the arcs with at least two people.
- Page 23 6 mm ring. After this step it should be safe to let go of the arcs. However, the Framehouse is still unstable in this phase, so be careful. 4x - (or 5x for 5 arcs) Step 8...
- Page 24 Step 9 Now place the roof purlins on the other side of the roof. It might be necessary to move the arcs a bit to get all the notches to line up. When placed fixate with the 6 x 50 mm wood screw together with a 6 mm ring.
- Page 25 Step 11 If you bought a Framehouse with a floor please continue to the next page. If you only purchased the base please continue to page 61.
- Page 26 WOOD FOR FLOOR Depending on the type of floor in the configuration of your Framehouse you will have received a selection of the following beams and boards: letter used for floor board middle piece (only for inside & outside configuration)
- Page 27 BUILDING THE FLOOR Depending on the configuration of the floor there are different instructions, see below to find out which one to follow: Floor Inside Continue to page 28. Floor Outside Continue to page 38. Floor Inside & Outside Continue to page 47.
- Page 28 Floor Inside Advice If the Framehouse is placed outside, all k-beams should be stained from the bottom and sides with the supplied stain to protect them from moisture. Step 1 Place the first beam k between the connectors. Step 2...
- Page 29 Step 3 Fasten the connectors to the beam using the 6 x 30 mm wood screw with a 6 mm ring. Step 4 Repeat this for the other beams.
- Page 30 Place them on the inside of the Framehouse. This way they won’t be visible later. Use the rubber hammer to hammer the ground anchor into the ground. Make sure to keep the anchor straight.
- Page 31 Step 8 Use the M8 x 40 mm wood screw to secure the ground anchor to the Framehouse. This is easier if you predrill a hole in the wood with a 4 mm wood drill.
- Page 32 Step 9 Between each floor beam, place another floor beam. Make sure each beam has the right distance from the others. Find the correct distance in the drawing below. Measure this for all the beams. After measuring, make sure not to move the beams anymore.
- Page 33 Step 10 Place the first floor board onto the beams. Use the drill tool to get the right distance from the beams. Make sure the board overlaps 10 cm on both sides. Determine the distance of 10 cm / 3,93 inch the board to the beam by placing the floor tool over the connector and against...
- Page 34 The holes in de drill tool mark the correct screw position. To start, only screw in the screws on both ends of the Framehouse. Step 12 When the floorboard is placed correctly, now screw the board to the other beams.
- Page 35 Step 13 Place the second floor board on top of the beams on the other side of the Framehouse.. Use the drill tool to get the right distance from the beams. Make sure the board overlaps 10 cm on both sides.
- Page 36 Step 15 Place the third floor board next to the first floor board. Use the drill tool to get the right distance between both boards and to position the screws. After making sure both boards have the same overlap, fixate with the 6 x 60 mm screws on both ends.
- Page 37 Step 17 When all floor boards are positioned correctly and the distance between each board is even, screw in all the other screws; two 6 x 60 mm screws, for each crossing between floor board and floor beam. You can use the drill tool to position the screws.
- Page 38 Floor Outside Advice If the Framehouse is placed outside, all k-beams should be stained from the bottom and sides with the supplied stain to protect them from moisture. Step 1 Place the first type k beam between the connectors and secure with the 6 x 30 mm screw, don’t forget to...
- Page 39 Step 2 Repeat this step for the other arcs. Step 3 Make sure the distance between the arc is correct. If not, move the beams until it is.
- Page 40 Step 4 Between each floor beam, place another floor beam. Make sure each beam has the right distance from the others. Find the correct distance in the drawing on the right. Measure this for all the beams. After measuring, make sure not to move the beams anymore.
- Page 41 Step 5 Place the first floor board onto the beams. Use the drill tool to get the right distance from the beams. Make sure the board overlaps 10 cm on both sides. Determine the distance of the board to the beam by 10 cm / 3,93 inch placing the floor tool over the connector and against...
- Page 42 The holes in the drill tool mark the correct screw position. To start, only screw in the screws on both ends of the Framehouse. Step 7 When the floor board is placed correctly, screw the board to the other beams.
- Page 43 6 x 60 mm wood screws. The holes in the drill tool mark the correct screw position. To start, only screw in the screws on both ends of the Framehouse. 5 mm / 0,2 inch...
- Page 44 Fixate with the 6 x 60 mm screws. Note: Only fixate it on both ends of the Framehouse. The other screws will be put in place later.
- Page 45 Step 11 Using the same method as in step 10, place all the other floor boards and screw in on both ends. Step 12 When all floor boards are positioned correctly and the distance between each board is even, screw in all the other screws;...
- Page 46 Step 13 Make sure you didn’t miss any screws. The floor is done now. Proceed to page 61.
- Page 47 Floor Inside & Outside Advice If the Framehouse is placed outside, all k-beams should be stained from the bottom and sides with the supplied stain to protect them from moisture. Step 1 Place the first beam k between the connectors.
- Page 48 Step 3 Place another type k beam through the straight connector and against the other beam. When using a ground anchor, a hole of at least 20 mm needs to be drilled into the beam to make room for the head of the M10 bolt. The hole needs to be around 2 cm deep.
- Page 49 Step 4 Repeat step 3 for the other arcs. Step 5 Place the type L beams on the inside of the arcs, against the type d connectors.
- Page 50 Step 6 Secure the beams with four 6 x 90 mm screws in each beam. 3x - (or 4x for 5 arcs)
- Page 51 Step 7 Between each floor beam on the inside of the house, place another floor beam. Make sure it has the right distance from the others. See the correct distance in the drawing on the right. Measure this for all the beams.
- Page 52 Step 8 Place the first floor board onto the beams. Determine the distance of the board to the beam by place the drill tool over the connector and against the beam. The floor board should fit in between. When the floor board is in the right place and overlaps both sides by 10 cm (or 3.93 inch) fixate with the 6 x 60...
- Page 53 Step 10 Place the second floor board onto the beams on the other side of the Framehouse.. Use the drill tool to get the right distance from the beams. Make sure the board overlaps 10 cm on both sides. To start, only screw in the screws on both ends of the Framehouse.
- Page 54 Step 12 Place the other type k beams in between each beam on the outside of the house. Make sure each beam has the right distance from the others. Find the correct distance in the drawing on the right. Measure this for all the beams.
- Page 55 Step 13 Place the first floor board on the outside beams. Determine the distance of the board to the beam by placing the drill tool over the connector and against the beam. When the floor board is in the right place and overlaps both sides by 10 cm (or 3.93 inch), fixate with the 6 x 60 mm screws on both ends.
- Page 56 Use the drill tool to get the correct distance between boards and the screw position. Fixate with the 6 x 60 mm screws. Note: Only fixate it on both ends of the Framehouse. The rest of the screws will be put in later.
- Page 57 Step 17 Repeat step 16 until all floor boards on the inside of the house are in place. Step 18 Repeat for the floor on the outside of the house. Only screw in the screws on the outer ends of the boards. Use the drill tool for the position of the screws and to determine the distance...
- Page 58 Step 19 Place the last floor board onto the floor beams and determine the distance with the drill tool. Because the last board overlaps on the end, the screw closest to the edge needs to be screwed in on an angle, otherwise it won’t drill into the beam below.
- Page 59 Step 20 Place the short floor boards (type h) in between each arc of the Framehouse and fixate with six 6 x 60 mm screws. Make sure the board has the same distance between each adjacent board. For the screws in the middle you can use the drill tool to position the screws.
- Page 60 Step 21 When all floor boards are positioned correctly and the distance in between is even between each board, screw in all the other screws; two 6 x 60 mm screws, for each crossing between floor board and floor beam. You can use the drill tool for the position of the screws.
- Page 61 PLACING THE CROSSES To make sure the Framehouse stays sturdy throughout all seasons, steel crosses need to be placed on the vertical beams. Find the different steps below. Cross location 4 arcs This drawing shows where the three crosses need to be placed in the 4 arcs Frame- house.
- Page 62 Step 1 For the top holes of the crosses, mark each beam where the screw needs to go. The drawing on the previous page will show you on which beams a cross needs to be placed. Predrill the marked holes with a 4 mm wood drill bit.
- Page 63 Drill about 45 mm (or 1.8 inches) deep. 6x - (or 8x for 5 arcs) Step 4 After the crosses are placed, the Framehouse is done. When a roof was purchased continue on page 64. 6x - (or 8x for 5 arcs)
- Page 64 OPTIONAL - PLACE THE ROOF It’s optional to install a roof on to the Framehouse, this will provide a dry place outdoors during rainy days. Find the different steps below. Components sheetmetal cam aluminum profile wood screw 3 x 30 mm...
- Page 65 Step 1 Pre drill the holes in the aluminum profile with a 4 mm drill on the locations as shown on the right. Note: Start with the two holes on the outside of the profile.
- Page 66 Step 3 Place the first aluminum profile on to the framehouse. It should lie on top of the roof purlins and be positioned with beginning and end at the welds of the...
- Page 67 Step 4 Fix the profile to the wood using eight of the 3 x 30 mm wood screws. Step 5 Place the other profiles using the same method as in step 1 - 4.
- Page 68 Step 6 Place the first sheet metal cam on the Framehouse. Make sure that the end is places roughly in the middle of the wooden beam.
- Page 69 Step 7 Attach the sheetmetal cam to the Framehouse using the 6 x 30 mm screws. Step 8 Place the other sheet metal cams using the same method.
- Page 70 Now place the roof panels in to the profiles. It can be useful to wet the edges of the panels with soapy water so that they glide more easily through the profiles. Step 10 The Framehouse is now finished and ready to be used.
-
Page 71: Warranty
Bedankt voor je Thank you for your Vielen Dank für Ihren aankoop! purchase! Einkauf! Weltevree levert kwaliteit Weltevree delivers quality Weltevree liefert Qualität Mocht er toch iets mis zijn, dan Nonetheless, if you encounter any Gibt es etwas an Ihrem Produkt zu...
Need help?
Do you have a question about the Framehouse and is the answer not in the manual?
Questions and answers