Table of Contents
Advertisement
Quick Links
Advertisement
Table of Contents

Related Manuals for Milesight LoRaWAN WS136

Summary of Contents for Milesight LoRaWAN WS136
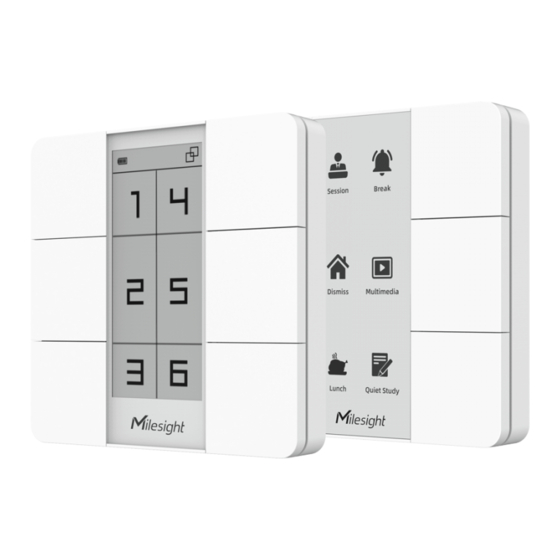
- Page 1 Smart Scene Panel Featuring LoRaWAN ® WS136 & WS156 User Guide...
- Page 2 Safety Precautions Milesight will not shoulder responsibility for any loss or damage resulting from not following the instructions of this operating guide. The device must not be modified in any way. In order to protect the security of the device, please change device the password when first ...
-
Page 3: Table Of Contents
Contents 1. Product Introduction..........................4 1.1 Overview............................4 1.2 Features............................4 2. Hardware Introduction..........................4 2.1 Packing List............................4 2.2 Hardware Overview.........................5 2.3 Dimensions............................5 2.4 LED Patterns............................ 5 3. Operation Guide............................5 3.1 NFC Configuration.......................... 5 3.2 LoRaWAN Settings..........................6 3.3 General Settings..........................9 3.4 LoRa D2D Settings.......................... -
Page 4: Product Introduction
Without any additional cable, WS136 & WS156 can be easily installed anywhere and control devices via LoRaWAN or Milesight LoRa D2D communication protocol. Besides, it’s equipped a user-definable E-ink screen to suit different scenes. WS136 & WS156 can be widely used in smart home, smart office, hotel, school, etc. -
Page 5: Hardware Overview
2.2 Hardware Overview 2.3 Dimensions (mm) 2.4 LED Patterns Indicator Action Indication Always on until the button is Button Light Press the button being released Send join network requests Blinks as requests Joined the network successfully Blinks twice Status Indicator Receive ACK packages from NS Blinks once 3. -
Page 6: Lorawan Settings
2. Download and install “Milesight ToolBox” App from Google Play or App Store. 3. Enable NFC on the smartphone and open Milesight ToolBox. 4. Attach the smartphone with NFC area to the device to read device information. 5. Basic information and settings of the device will be shown on ToolBox if it’s recognized successfully. - Page 7 Parameters Description Device EUI Unique ID of the device which can also be found on the label. App EUI Default App EUI is 24E124C0002A0001. Application Port The port is used for sending and receiving data, the default port is 85. Join Type OTAA and ABP modes are available.
- Page 8 1) Please contact sales representative for device EUI list if there are many units. 2) Please contact sales representative if you need random App keys before purchase. 3) Select OTAA mode if you use Milesight IoT Cloud to manage devices. 4) Only OTAA mode supports rejoin mode.
-
Page 9: General Settings
Change the password for ToolBox App to write this device. 3.4 LoRa D2D Settings LoRa D2D protocol is developed by Milesight and used for setting up transmission among Milesight LoRaWAN devices without gateway. When the LoRa D2D setting is enabled, WS136 &... -
Page 10: E-Ink Screen Display Settings
select the frequency and spreading factor. (Default LoRa D2D Key: 5572404C696E6B4C6F 52613230313823) 3. Enable one of WS136 & WS156 button mode and configure a 2-byte hexadecimal command (This command is pre-defined in LoRa D2D agent device). When you press this button, WS136 & WS156 will send the control command to corresponding LoRa D2D agent devices. -
Page 11: Maintenance
2) WS156 do a full-screen refresh once a week in order to remove ghosting. 3.6 Maintenance 3.6.1 Upgrade 1. Download firmware from Milesight website to your smartphone. 2. Open ToolBox App and click “Browse” to import firmware and upgrade the device. -
Page 12: Backup
Note: 1) Operation on ToolBox is not supported during the upgrade. 2) Only Android version ToolBox supports the upgrade feature. 3.6.2 Backup WS136 & WS156 supports configuration backup for easy and quick device configuration in bulk. Backup is allowed only for devices with the same model and LoRa frequency band. 1. -
Page 13: Reboot And Reset
Note: Slide the template item to the left to edit or delete the template. Click the template to edit the configurations. 3.6.3 Reboot and Reset Via Hardware: Hold on the button inside the device for 3s to reboot, 10s to reset. Via ToolBox App: Go to “Device ->... -
Page 14: Installation
1 Byte N Bytes 1 Byte 1 Byte M Bytes 1 Byte For decoder examples you can find them at https://github.com/Milesight-IoT/SensorDecoders. 5.1 Basic Information WS136 & WS156 report basic information of panel whenever joining the network. Channel Type Description 01(Protocol Version) -
Page 15: Button Message
09 (Hardware Version) 01 40 => V1.4 0a (Software Version) 01 14 => V1.14 0b (Power On) Device is on 16 (Device SN) 16 digits Example: ff0bff ff0101 ff166592b32851010013 ff090100 ff0a0102 Channel Type Value Channel Type Value ff (Reserved) 01 (V1) (Power On) (Protocol Version) Channel... -
Page 16: Downlink Commands
5.3 Downlink Commands WS136 & WS156 supports downlink commands to configure the device. Application port is 85 by default. Note: Since the device type is class A, it only receives downlinks when the device upload battery level or button message to network server. Channel Type Description...
Need help?
Do you have a question about the LoRaWAN WS136 and is the answer not in the manual?
Questions and answers