Table of Contents
Advertisement
Quick Links
Advertisement
Table of Contents

Related Manuals for National Luna Portable Power Pack II

Summary of Contents for National Luna Portable Power Pack II
- Page 1 Portable Power Pack II Dual Battery System & Isolator...
-
Page 2: Table Of Contents
Index Introduction Safety Information Features Wiring Diagram Preparing for Installation Installing Battery Control Panel Changing Start Timer Selecting Voltage Profile Dedicated Charger Port External Chargers & Inverters USB Ports System Operation CONNECT Application APP Dashboards Adjusting Alarm & Timer values STATUS Messages Set a Custom Name Specifications... -
Page 3: Introduction
Introduction The Portable Power Pack II is a dual-battery system and isolator for use in automotive applications. It allows an auxiliary battery to charge when the vehicle is running and isolates it from the main battery when the vehicle is turned off. This prevents the main battery being drained by accessories such as fridges, lights, pumps, fans, etc. -
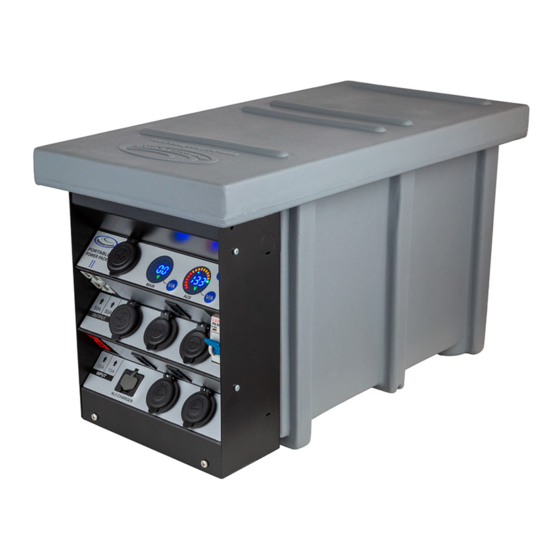
Page 4: Features
Features Battery Compartment Serial number Sliding Lid Control Panel Output sockets MAIN battery gauge USB Charge ports AUX battery gauge PORTABLE POWER PACK MAIN 50A Heavy-duty Output fuses IN/OUT connectors Main Switch OUTPUT Hella-type DC sockets MAIN BATT input Output fuses Secondary charge input INPUT NL5 CHARGER... -
Page 5: Wiring Diagram
Wiring diagram - Typical Installation Loads (eg fridge / lights) Fuse 100A To vehicle MAIN battery Preparing for Installation The Portable Power Pack is a complete dual-battery system, it does not require any isolator, solenoid or other battery system. If there any pre-existing dual-battery systems or isolators, they should be removed or bypassed for the Power Pack to function properly. -
Page 6: Installing Battery
Installing Battery To hold a battery securely in the Power Pack, install the U-bolt and hold-down bracket. It is best to lay the Power Pack on its side or end to do this. Insert the U-bolt through the holes drilled into the bottom of the Power Pack. -
Page 7: Control Panel
Control Panel PORTABLE POWER PACK MAIN The Portable Power Pack control panel comprises of two displays marked as MAIN and AUX. The MAIN display can show the input voltage or charge current. The AUX display can show the auxiliary battery voltage or discharge current. The low-battery alarm voltage and start timer can be adjusted from the control panel. -
Page 8: Changing Start Timer
Changing Start Timer The Start Timer defines the delay after starting the vehicle when the Power Pack connects the auxiliary battery and allows charge to flow to it. This delay can be adjusted for various vehicles and applications. A longer delay is useful for vehicles with Ÿ... -
Page 9: Dedicated Charger Port
Dedicated Charger Port The Portable Power Pack has a charge port specifically for use with National Luna Intelligent Battery Chargers. Insert the charger quick-connector into the charge port labeled "NL5 CHARGER" until it clicks securely. In order to connect other brands of chargers to this input, a quick-connector cable is available separately. -
Page 10: Usb Ports
USB charge ports The Portable Power Pack offers multiple USB charge ports ideal for charging smart devices (mobile phone, tablet, GPS, cameras, power bank, etc) Each port is able to deliver up to 18W of power compatible with QuickCharge 3. 5V : 3A 9V : 2A 12V : 1.5A... -
Page 11: Connect Application
CONNECT Mobile APP The Portable Power Pack can communicate with a mobile device using the NL CONNECT application. This application is available for iOS and Android systems and can be downloaded from the respective APP stores. Once installed, open NL CONNECT. It will start to scan for nearby compatible Select device SCAN devices. -
Page 12: Adjusting Alarm & Timer Values
Adjusting Alarm and Timer values To adjust the low-battery alarm To adjust the start timer, tap the voltage, tap the alarm button. timer button. The alarm voltage can be The start timer can be adjusted adjusted by pressing the + or - by pressing the + or - buttons. -
Page 13: Set A Custom Name
Set a custom device name A custom name can be set for your Power Pack in the settings. Press the icon to access the settings page. A custom name is associated with this specific device and will appear in the device scan list and on the selected dashboard whenever the device is connected. -
Page 14: Specifications
Specifications Inputs MAIN BATTERY input 10V - 15V 50A max Secondary charge input 5V - 15V 15A fused NL5 Charge port 5V - 15V 15A fused Supported Battery Battery voltage 12V lead-acid Battery types (Wet, Gel, AGM, VRLA) ON Voltage 13.0V - 13.5V user selectable OFF Voltage 12.4V - 12.9V user selectable... - Page 15 495mm 258mm 448mm 215mm 292mm Maximum Battery Size 350mm 180mm...
-
Page 16: Warranty
: 1. At any time within THREE YEARS from the date of purchase by the original purchaser, National Luna will at its discretion replace or repair without cost to the owner, through an authorised service agent, any part found to be defective by National Luna. - Page 17 Any labour and parts required for repairs would incur costs in foreign currency and be for the owner’s account. 4. In the event of a National Luna product being fitted as standard equipment in caravans and trailers and subsequently being exported from South Africa, the warranty must be carried by the persons responsible for the importing into a country other than South Africa.
- Page 18 National Luna sales and support : www.nationalluna.com Patents & Design registrations South Africa : 2018/06290 ; F2017/01515 ; F2017/01516 Australia : 2018232986 ; 201811491 ; 201811492 BMS-20321 SEP 2021...
Need help?
Do you have a question about the Portable Power Pack II and is the answer not in the manual?
Questions and answers