Table of Contents
Advertisement
Quick Links
Advertisement
Table of Contents

Subscribe to Our Youtube Channel
Related Manuals for National Luna DC25 Distribution Box

Summary of Contents for National Luna DC25 Distribution Box
- Page 1 DC25 Distribution Box...
-
Page 3: Table Of Contents
Index Introduction Safety Information Features Wiring Diagram Preparing for Installation Connecting Auxiliary battery Connecting remote temperature sensor Selecting Battery Type Connecting Solar Panels Connecting External Battery Chargers Ignition Over-ride System Operation Remote Monitor Remote Monitor Status Messages Specifications Warranty... -
Page 4: Introduction
Ÿ Unauthorized disassembly, repairs or modifications will void any warranty. Ÿ Attempts to use the DC25 Distribution Box for purposes other than indicated in this manual will void Ÿ the warranty. Ensure all connections are secure and cables are installed in a safe manner. -
Page 5: Features
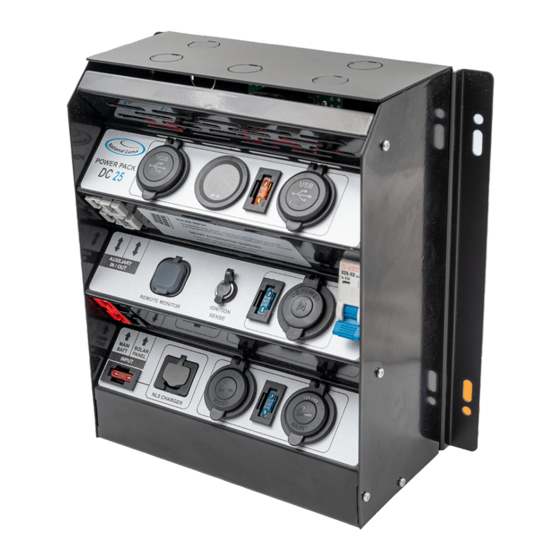
Features Cable entry ports Mounting Base Control Panel USB Charge Modules Battery Gauge 50A Heavy-duty IN/OUT connectors Fuses Remote Monitor port Main Switch IGNITION sense port Hella-type DC Socket MAIN BATT input SOLAR PANEL input Charger input fuse 12V DC Sockets External Charger input... -
Page 6: Wiring Diagram
To vehicle MAIN battery Preparing for Installation The DC25 Distribution Box should be mounted securely on a flat surface using the mounting frame. (Fig 1). Locate the DC25 Distribution Box such that the cables are not restricted or under strain. -
Page 7: Connecting Auxiliary Battery
Connecting Auxiliary battery cables Cables to the auxiliary must be connected internally. It is necessary to remove the main cover for this. With the cover open, the remote temperature probe can be connected and battery type selected. Remove the screws holding the cover on the left and Open the cover slightly and unplug the remote right-hand sides of the enclosure. -
Page 8: Connecting Remote Temperature Sensor
Connecting battery cables ... cont. Feed the positive battery cable through the grommet Feed the negative cable to the terminal indicated. and connect it to the top terminal of the main switch. Loosen the screw and insert the battery cable on top of the existing cable. -
Page 9: Selecting Battery Type
Changing battery type With the cover still removed, the auxiliary battery type can be selected. Ensure the main breaker switch is in the OFF position then connect a 12V power source to the MAIN BATTERY or SOLAR inputs. The system will indicate the current battery type. Press the "Battery"... -
Page 10: Connecting Solar Panels
This will bypass the Power Pack solar MPPT system. Connecting external Battery Chargers The Distribution Box has a charge port specifically for use with National Luna Intelligent Battery Chargers. Insert the charger quick-connector into the charge port labeled "NL5 CHARGER" until it clicks securely. -
Page 11: System Operation
System operation Main Switch In order to charge or supply power to accessories connected to any of the plugs & sockets, the main switch on the Distribution Box must be in the ON position. When not in use then it is best to turn the switch OFF. This will isolate the auxiliary battery from all loads. -
Page 12: Remote Monitor
Remote Monitor - (Optional accessory) The Remote Monitor provides status about the system on a high-contrast LCD screen. Information such as Main and Auxiliary battery voltages, charge mode, charge current, battery type, battery temperature and error conditions are displayed in a choice of 3 user-selectable display modes. - Page 13 Remote monitor operation The remote monitor can be turned ON or OFF by pressing the POWER button. The display will turn off automatically after a short delay if there is no active charge cycle. The display brightness can be increased or decreased by pressing the UP or DOWN buttons. The remote monitor has 3 display modes that represent the status of the charging system in different ways.
-
Page 14: Remote Monitor Status Messages
Remote monitor STATUS messages The remote monitor will show the charge status during an active charge cycle. During the normal bulk and absorption charge stage, the charge current will be shown as well as the input source. During the Analysis stage, “TEST” will be shown. This stage helps to detect a defective battery. During the Float stage, “FLOAT”... -
Page 15: Specifications
Specifications Voltage Range MAIN BATT input 11V - 32V SOLAR PANEL input 9V - 42V Solar Regulator Type MPPT Output Current Output Power 375W 12V Alternator Input Turn ON 13.2V Turn OFF 12.6V Over-Voltage 14.8V - 16V 24V Alternator Input Turn ON 26.4V Turn OFF... - Page 16 257 mm 120 mm 20 mm 239 mm Mounting hole locations...
-
Page 17: Warranty
This National Luna Warranty supersedes any other advertised Guarantee or Warranty provided with this appliance by any wholesaler or retailer. National Luna warrants this product to be free from defects in materials and / or workmanship under normal use and service to the original purchaser subject to the following : 1. - Page 18 Replaceable Modules The Distribution Box is designed to allow some of the plugs & sockets to be replaced with other compatible modules within the 29mm range. The lower group can accommodate the following 29mm modules : Dual USB charger Screw-in DC socket (Engel plug compatible) Hella-type socket 12V DC socket...
- Page 19 Optional Accessories Remote Monitor NL5 Intelligent Battery Charger Ignition Sense cable Charge Port adapter cable (1m)
- Page 20 National Luna sales and support : www.nationalluna.com BMS-20300 DEC 2020...
Need help?
Do you have a question about the DC25 Distribution Box and is the answer not in the manual?
Questions and answers