Table of Contents
Advertisement
READ BEFORE USE
Visit www.sanlidaco.com for
our complete line of products
and Use and Care Guides – as
well as delicious recipes, tips,
and to register your product
online.
Stand Mixer
Questions
Please
mail us – our
friendly associates are ready
to help.
Email:
Batteur sur socle
Service@sanlidaco.com
Batidora de
Pedestal
Advertisement
Table of Contents

Related Manuals for Sanlida SM-1507BM


Summary of Contents for Sanlida SM-1507BM
- Page 1 READ BEFORE USE Visit www.sanlidaco.com for our complete line of products and Use and Care Guides – as well as delicious recipes, tips, and to register your product online. Stand Mixer Questions Please mail us – our friendly associates are ready to help.
- Page 2 IMPORTANT S A F E G U A R D S When using electrical appliances, basic safety precautions should always be followed to reduce the risk of fire, electric shock, and/or injury to persons, including the following 1. Read all instructions. 10.
- Page 3 Other Consumer Safety Information This appliance is intended for household use only. WARNING!Electrical Shock Hazard: WARNING!Moving Parts Hazard. This appliance is provided with a polarized plug (one wide blade) to To reduce the risk of personal injury, always unplug mixer reduce the risk of electric shock.
-
Page 4: Technical Data
Technical Data Mode No. SM-1507BM SM-1551 SM-1522NM SM-1515 power 660W 660W 800W 600W consumption Rated voltage AC120V 60Hz AC120V 60Hz AC120V 60Hz AC120V 60Hz *All product outward appearance, the color take the material object as, the picture only supply the reference. -
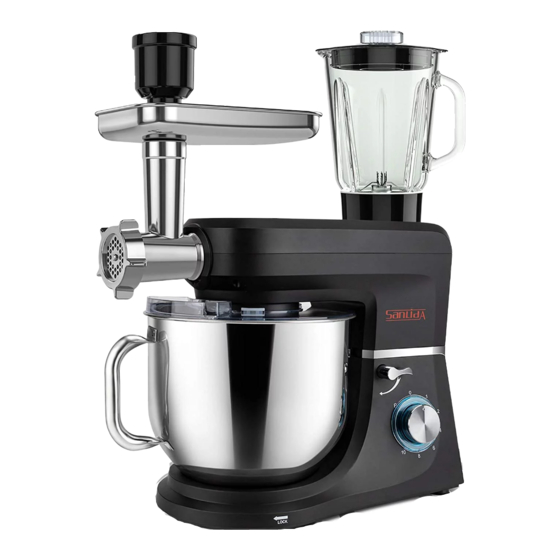
Page 5: Parts And Features
Parts and Features BEFORE FIRST USE: Wash bowl and attachments in warm, soapy water; rinse and dry. Always unplug before inserting or removing attachments. To order parts: Mail us for more info: service@sanlidaco.com www.sanlidaco.com *All product outward appearance, the color take the material object as, the picture only supply the reference. - Page 6 Parts and Features (cont.) *All product outward appearance, the color take the material object as, the picture only supply the reference.
- Page 7 Parts and Features (cont.) Main Components and Standard Accessories: Output shaft Sieve Rise knob Lock Speed knob Meat mincer presser Power Cord Filling tray Mixing bowl Pusher Dough hook Cutter housing Beater Coarse shredder Whisk Slicer Front cover Fine shredder Rear cover Sausage plate segmentation Measuring cup...
-
Page 8: How To Use
How to Use BEFORE FIRST US E : Please wash bowl and attachments in warm, sudsy water; rinse and dry. Always unplug before inserting or removing attachments. NOTE: During using this machine, please use the function of Mixer(Beater, Dough Hook, Whisk), Blender, and Meat Grinder separately. -
Page 9: Mixing Guide
Mixing Guide The following mixing guide i s a suggestion for selecting mixing speeds. Begin on Speed 1 and increase to desired speed, depending on the recipe consistency. SPEED 1–10 MIX GUIDE ATTACHMENT FOOD 1–4 Stirring Flat Beater Instant Pudding 2–4 Folding Flat Beater... - Page 10 Flat Beater Tips Flat beater i s used for most of your mixing needs. Use the flat beater attachment to mix cakes, cookie dough, frosting, or potatoes. Cookie dough i s one of the thickest doughs to mix. Make it easier by following these tips: •...
-
Page 11: Whisk Tips
Whisk Tips • The whisk is designed to whip liquids, such as egg whites and cream. Do not use the whisk for mixing thick mixtures, such as dough, fudge, or mashed potatoes. • Your mixer is designed to whisk a minimum of 2 large egg whites or 1 cup (237 ml) of cream. Mixer performance is enhanced as the tip of the whisk is immersed into the liquid. - Page 12 Blender Function Important: How to use the blender: Before use: do not insert the main plug into the socket until Remove the Rear Cover.(FIG.1) • the mixing barrel and the mixing barrel cover are correctly Put the ingredient in the jar. installed.
- Page 13 Meat Grinder Function How to use the mincer: Install the Blade(16) at the end of the Helix(15), put on the required Sieve (17). Please pay attention to the sieve and the recesses on the Helix Housing(14). Screw the Lock (18) until it is “hand-tight”.(FIG.1) Remove the front cover (FIG.2) from the machine.
- Page 14 Vegetable Cutter Function How to use: Remove the Front Cover (9) from the machine. Insert the Cutter [Coarse Shredder(23a)/ Slicer(23b)/ Fine Shredder(23c)] into the Cutter Housing(22).(FIG.1&2) Press the fixed button and attach the cutter housing into the machine. Turn anticlockwise to lock. (FIG.3) Now the appliance is ready for slicing/shredding.
- Page 15 Sausage Function How to use: Use the Meat Grinder Function to process the ingredients. Remove the Meat Grinder Function components, and assemble related accessories in sequence according to illustration A. Make sure that the nut(18) is tightened. Put the sausage casing into the accessory 25. Start the machine, put the ingredients into the Helix housing(14), and start making sausages.
- Page 16 Hollow Sausage Function How to use: Install the 14.15.26.27.18 components in sequence according to illustration B to ensure that the meat grinder is installed completely and tighten the lock nut. Method of use is the same as the sausage accessories. NOTE: •...
-
Page 17: Cookie Function
Cookie Function How to use: Install 14, 15, 24, 28a, 18, 28b accessories in sequence according to illustration C. Then install the entire accessory to the output of the unit's meat grinder. Make sure the nuts are tight. Please pay attention to align the notch of sausage segmentation plate with the fixing pin of the helix housing as shown in the upper left part of the above figure. - Page 18 Pasta Maker Function How to use: Align the slot of the pasta maker with the helix housing. Install accessories 14, 15, 29, and 18 in sequence according to the illustration D, and ensure that the nuts are tightened. After correctly installed the accessory of a pasta maker, cut the dough to bars, and put into the helix housing, set up the speed, noodles will squeeze out from the output end slowly.
-
Page 19: Care And Cleaning
Care and Cleaning Troubleshooting Food is not mixed. WARNING! Electrical Shock Hazard. • Place liquid ingredients in bowl before adding dry ingredients. Do not immerse mixer, cord, or plug in water or any other liquid. 1. Turn speed control dial to OFF ( 0 ). Unplug. •... - Page 20 Troubleshooting (cont.) Troubles Solution Check if the plug is in good contact with the socket. · The machine doesn't work Check if the rise button springs back in place. · Check if the machine works continuously more than 6 minutes, ·...
- Page 21 Recipes Chocolate Velvet Layer Cake Bittersweet Chocolate Frosting Ingredients: Ingredients: 2 cups (473 ml) cake flour 1/3 cup (79 ml) butter, room temperature 2 1/2 cups (591 ml) confectioners’ sugar 1/2 cup (118 ml) unsweetened baking cocoa 2 teaspoons (10 ml) baking soda 3/4 cup (177 ml) unsweetened baking cocoa 1/4 teaspoon (1.3 ml) salt 1/4 cup (59 ml) milk...
- Page 22 Recipes (cont.) Best Ever Sugar Cookies Cowboy Cookies Ingredients: Ingredients: 1 cup (237 ml) butter 2 1/2 cups (591 ml) all-purpose flour 1 cup (237 ml) sugar 1 teaspoon (5 ml) baking powder 1/2 teaspoon (2.5 ml) baking soda 1cup (237 ml) light brown sugar 1/4 teaspoon (1.3 ml) salt 2 eggs 2 cups (473 ml) flour...
- Page 23 Recipes (cont.) Sour Cream Coffee Cake Crumb Topping: In a small bowl, combine flour, butter, brown sugar, Ingredients: granulated sugar and cinnamon; mix with fork until large crumbs are Crumb Topping formed. Add pecans and mix to incorporate. 1 1/2 cups (355 ml) all-purpose flour 1 1/2 sticks (3/4 cup [177 ml]) unsalted butter, softened Streusel: In another small bowl, combine flour, brown sugar, 1/3 cup (79 ml) packed light brown sugar...
- Page 24 Recipes (cont.) Simple Yeast Rolls Sponge Mixture (Basic Recipe) Ingredients: Ingredients: 1 cup (237 ml) warm water, 100° to 110°F (38° to 43°C) 200grams soft butter or margarine, 200grams sugar, 1 packet .25-ounce (8-g) package active dry yeast vanilla sugar or 1 bag Citro-Back, 1 pinch of salt, 4 eggs, 1/4 cup (59 ml) butter, melted and cooled 400grams wheat flour, 1 packet baking powder, approx.
- Page 25 Recipes (cont.) Linseed Bread Rolls Pizza Dough Ingredients: Ingredients: 500-550g wheat flour, 50g linseed, 3/8 liter water, 1 cube of 400g plain flour, 250ml warm water, 1/2 tsp sugar, 1sacher active yeast (40g), 100g low-fat curds, well-drained, 1 tsp salt. dried yeast (about 2-1/2 tsp), 1-1/2 tsp olive oil and 1 tsp salt.
- Page 26 Recipes (cont.) Basic White Bread Soft Poppy Seed Rolls Ingredients: Ingredients: 570g strong white bread flour 1 sachet active dried yeast (about 600g strong white bread flour 1 sachet active dried yeast 2½ tsp) 300ml milk (warmed slightly) 2 eggs (room temperature) (about 2½...
- Page 27 Recipes (cont.) Italian Herb Bread Coffee & Brandy Ice Cream Ingredients: Ingredients: 575g strong white bread flour,1 sachet active dried yeast 3 eggs 75g caster sugar, 300ml single cream 2 tbsp instant (about 2½ tsp), 290ml water 2 tbsp olive oil, 2 tsp sugar 2 tsp coffee powder, 300ml double cream 2½...
-
Page 28: Limited Warranty
Limited Warranty This warranty applies to products purchased and used in the U.S. and Canada. This is the only express warranty for this product and is in lieu of any other warranty or condition. This product is warranted to be free from defects in material and workmanship for a period of five (5) years from the date of original purchase in Canada and five (5) year from the date of original purchase in the U.S.