Table of Contents
Advertisement
Quick Links
Advertisement
Table of Contents

Subscribe to Our Youtube Channel
Related Manuals for Swift Navigation Duro

Summary of Contents for Swift Navigation Duro
- Page 1 Duro User Manual Revision 3 2021-12-14...
-
Page 2: Table Of Contents
Features and Benefits Technical Information Physical and Environmental Enclosure Connectors Power Connector Ethernet Connector Serial Connector AUX Connector GNSS Antenna Connector Standards and Certifications Environmental Testing Shock Vibration support.swiftnav.com Copyright © 2021 Swift Navigation, Inc. All Rights Reserved. Page 2 of 35... - Page 3 Serial Ports GNSS Tracking Accuracy Connecting to Duro Ethernet Connection Serial Connection Firmware Upgrades Swift Console Swift Navigation Technical Support Support Site Supporting Tools Contact Us support.swiftnav.com Copyright © 2021 Swift Navigation, Inc. All Rights Reserved. Page 3 of 35...
-
Page 4: Notice To Users
User instructions/antenna/etc.—see FCC section above. Industry European Union Statement Swift Navigation hereby declares that Duro is in compliance with the essential requirements and other relevant provisions of the 2014/30/EU Directive and UN/ECE Regulation 10. Duro is compliant with the European Community Restriction of Hazardous Substances Directive 2002/95/EC, (RoHS 1) and the Directive 2012/19/EU on waste electrical and electronic equipment (WEEE) and is marked with the WEEE symbol and RoHS logo. -
Page 5: California Proposition 65
The symbol on the product or its packaging indicates that this product must not be disposed of with other household or office waste. Instead, it is the owner’s responsibility to dispose of Duro waste equipment by handing it over to a designated collection point for the recycling of waste electrical and electronic equipment. -
Page 6: Antenna Placement Guidelines
Duro’s high-precision, multi-band GNSS antenna is sensitive to its environment. Since Duro needs to track carrier phase information from GNSS satellites, it is much more sensitive to obstructions than standard consumer GNSS receivers found in, for example, smartphones. Thus, the Duro antenna must be kept away from any obstructions to its sky view. -
Page 7: Limited Warranty Terms And Conditions
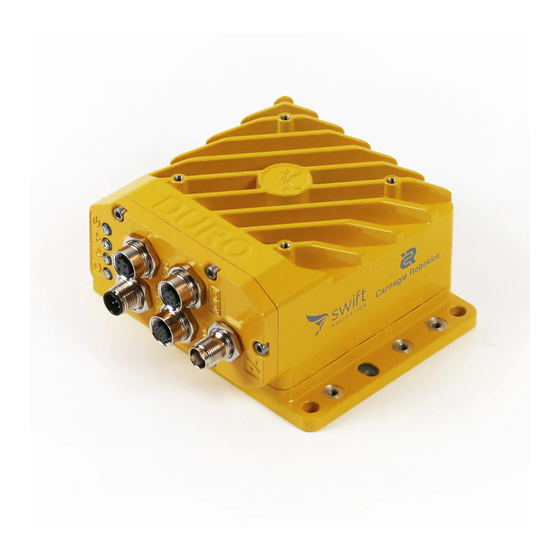
Product Introduction Overview Duro® is a ruggedized version of the Piksi® Multi RTK GNSS receiver. Built to be tough, Duro is ideal for mining, agricultural, robotics, maritime and outdoor industrial applications. Duro is designed for integration into or mounting on top of existing equipment. With its cast aluminum housing, this easy-to-deploy GNSS sensor is protected against weather, moisture, vibration, dust, water immersion and the unexpected that can occur in outdoor long-term deployments. -
Page 8: Technical Information
Physical and Environmental The following outline provides an overview of the physical and environmental aspects of Duro. Enclosure The Duro ruggedized enclosure offers a series of mounting options, making it flexible to adapt to your mounting requirements: ● Pin Holes/Slots ●... - Page 9 Duro User Manual UM-110021-03 ________________________________________________________________________________________________________________________________________________________________ support.swiftnav.com Copyright © 2021 Swift Navigation, Inc. All Rights Reserved. Page 9 of 35...
-
Page 10: Connectors
GNSS Antenna The sections that follow explain the signal description for each connector and the cables provided with the Duro Evaluation Kit. Importantly, the connectors or their respective caps need to be mated to provide sealing functionality to meet IP67 standards. -
Page 11: Power Connector
Duro User Manual UM-110021-03 ________________________________________________________________________________________________________________________________________________________________ Power Connector The power connection provides power input to Duro from a DC source. It also provides a chassis ground pin and digital input and output. M12-A/M: Duro M12 5 Pin Male Connector, A Keying Name... -
Page 12: Ethernet Connector
The Ethernet connector is provided as the de-facto standard for industrial Ethernet with M12 circular connectors. There are many off-the-shelf cables available to mate with this connector. For reference, the mating cable provided with the Duro Evaluation Kit is provided below. M12-D/F: Duro M12 4P Female Connector, D Keying support.swiftnav.com... -
Page 13: Serial Connector
Note, the serial connection on this connector corresponds to UART0 on Piksi Multi, which support.swiftnav.com Copyright © 2021 Swift Navigation, Inc. All Rights Reserved. Page 13 of 35... - Page 14 12 Volt Power Output (+- 10% Output 10.8 13.4 Depending on Vin) Pulse Per Second Digital Output Output UART0 Request to Send Output +/-5 Control Output / Handshake Signal support.swiftnav.com Copyright © 2021 Swift Navigation, Inc. All Rights Reserved. Page 14 of 35...
- Page 15 Receive Asynchronous Data Input Black Device Ground Supply Input Brown Clear to Send Control Input / Handshake Signal Output Green Request to Send Control Output / Handshake Signal support.swiftnav.com Copyright © 2021 Swift Navigation, Inc. All Rights Reserved. Page 15 of 35...
-
Page 16: Aux Connector
________________________________________________________________________________________________________________________________________________________________ AUX Connector The AUX connection on Duro is intended to be used for more full-featured applications on the device. It provides serial and additional digital inputs and outputs. It also provides both 12 Volt and 5 Volt power output for downstream devices. - Page 17 DI / Event B Input Input Event B Signal, reported as pin 1 in the SBP EXT EVENT message DO / PV Position Valid Digital Output Output support.swiftnav.com Copyright © 2021 Swift Navigation, Inc. All Rights Reserved. Page 17 of 35...
- Page 18 Duro User Manual UM-110021-03 ________________________________________________________________________________________________________________________________________________________________ AUX Cable (Par#90-M12A17/09+15-03) Descriptions support.swiftnav.com Copyright © 2021 Swift Navigation, Inc. All Rights Reserved. Page 18 of 35...
-
Page 19: Gnss Antenna Connector
DO / PV GNSS Antenna Connector A TNC female connector is provided to connect GNSS antennas to Duro. Active antennas are required for Duro operation and the 4.8 V 100 mA maximum current antenna bias is software enabled. Active antennas with an LNA gain between 28 dB and 45 dB are recommended. -
Page 20: Standards And Certifications
Duro User Manual UM-110021-03 ________________________________________________________________________________________________________________________________________________________________ Standards and Certifications Duro and typical cabling have been verified to be compliant with applicable regional standards for radiated emissions: ● IEC 60950-1 ● IP67 ● FCC Part 15B ● ICES-003 ● 2014/30/EU Directive ●... -
Page 21: Environmental Testing
During the sinusoidal vibration test, Duro was subjected to Sine Sweep Vibration at 5 G Peak from 10 Hz to 2 kHz with a sweep rate of 0.25 oct/min. Duro navigated and operated before, during and after all vibration tests with no faults and little degradation of navigation performance. -
Page 22: Mounting Duro Antenna
The following section will illustrate two scenarios in which Duro antennas can be mounted and deployed. With Top-Mounted GNSS Antenna Duro comes with a top-mounting GNSS antenna bracket that is easy to install. The following images describe the installation steps, measurements and technical names for the mounting parts. - Page 23 Duro User Manual UM-110021-03 ________________________________________________________________________________________________________________________________________________________________ 1. The following kit parts are required for GNSS antenna mounting on the top of Duro: Duro Top Mounting Base GNSS Antenna GNSS Antenna Cable Antenna Mounting Screw TNC-M to SMA-F Adapter TNC L Adapter support.swiftnav.com...
- Page 24 Obtain GNSS antenna, ⅝” x 11 screw and antenna bracket. Thread black ⅝ x 11 screw into antenna through mounting bracket. Thread right angle TNC adapter onto antenna. Mount antenna bracket on Duro with thumb screws. support.swiftnav.com Copyright © 2021 Swift Navigation, Inc. All Rights Reserved.
-
Page 25: Grounding Duro
Attach the TNC side of the coaxial cable to the antenna. Stow excess antenna cable. Long GNSS Antenna Cable Duro Starter Kit comes with a 4 m (13’) GNSS antenna cable allowing connection of the antenna away from the Duro. -
Page 26: Power
“Input” and “Output” sections, to make clear from where to obtain or provide energy. Duro requires a minimum of 5 watts of power for its own operation. When powering Duro, ensure the power supply can meet Duro’s power requirements plus the power requirements for any downstream devices powered by Duro’s outputs. -
Page 27: Interfaces
Duro User Manual UM-110021-03 ________________________________________________________________________________________________________________________________________________________________ Interfaces LED Indicators The LEDs are located in the front left side of Duro. The operation mode is described in the table below. LED Description Color State Description Name POWER LED Off No power or voltage outside range... -
Page 28: Serial Ports
Default Baud Rate 115200 By default, UART0 only sends SBP RTK corrections if Duro is configured as the base station. Enable UART0 for use with the Swift Console or other software through the settings interface by removing the message whitelist for the UART. -
Page 29: Accuracy
< 10 s Initialization Reliability >99% Solution Latency <30 ms Time to First Fix (TTFF) Hot Start < 7 s Cold Start < 60 s Reacquisition <2 s support.swiftnav.com Copyright © 2021 Swift Navigation, Inc. All Rights Reserved. Page 29 of 35... -
Page 30: Connecting To Duro
UM-110021-03 ________________________________________________________________________________________________________________________________________________________________ Connecting to Duro Ethernet Connection Swift Console 1. Proceed to connect the Ethernet Cable from your computer to Duro. Set up a local IP as shown below: a. IP Address: 192.168.0.10 b. Subnet Mask: 255.255.255.0 support.swiftnav.com Copyright © 2021 Swift Navigation, Inc. All Rights Reserved. - Page 31 Duro User Manual UM-110021-03 ________________________________________________________________________________________________________________________________________________________________ 2. Ensure you can reach Duro from your computer. The default Duro IP Address is 192.168.0.222. 3. Open Swift Console by clicking on icon: support.swiftnav.com Copyright © 2021 Swift Navigation, Inc. All Rights Reserved. Page 31 of 35...
-
Page 32: Serial Connection
________________________________________________________________________________________________________________________________________________________________ 4. The Swift Console Connection Interface will pop up. Proceed to select TCP/IP and then click “OK”. 5. It can take up to 90 seconds to acquire a signal(s). The “Tracking” Tab confirms the signals Duro has acquired: Serial Connection Duro comes with two Serial ports, one enabled by default (UART1) and the other one requires configuration to be used (UART0). -
Page 33: Firmware Upgrades Swift Console
Please proceed to execute the following steps: 1. You should be able to see information in the Swift Navigation Console Tracking tab: 2. Go to the Firmware Upgrade tab, Select the Binary File to be uploaded into Piksi Multi and click Upgrade FW. - Page 34 Duro User Manual UM-110021-03 ________________________________________________________________________________________________________________________________________________________________ 3. An “Upgrade Completed” message will be shown and your Duro will restart. Then close your Swift Console. 4. Connect again to the Swift Console and go to the Firmware Update tab. Verify the firmware version.
-
Page 35: Swift Navigation Technical Support
Further Swift product support information is available at support.swiftnav.com. The support site also allows Duro users to get in touch with Swift technical support and to ask public questions to the community. Specifically, the following support documents are useful for integration support of Duro.
Need help?
Do you have a question about the Duro and is the answer not in the manual?
Questions and answers