Table of Contents
Advertisement
辘脚车
Automatic bottom hemmer
(MB5004E-IM)
使用说明书
Instruction Manual
常州智谷机电科技有限公司
CHANGZHOU WISDOM & VALLEY ELECTRICAL TECHNOLOGY CO.,LTD
在使用本设备之前请先阅读本使用说明书.
Please read the operation manual of the touch
screen interface before using the device
版本信息/ Version
请将本使用说明书放在便于查阅的地方保管
Please keep this operation manual of touch screen
2020.03
interface in convenient place for reference
Advertisement
Chapters
Table of Contents

Related Manuals for IMB MB5004E-IM


Summary of Contents for IMB MB5004E-IM
- Page 1 辘脚车 Automatic bottom hemmer (MB5004E-IM) 使用说明书 Instruction Manual 常州智谷机电科技有限公司 CHANGZHOU WISDOM & VALLEY ELECTRICAL TECHNOLOGY CO.,LTD 在使用本设备之前请先阅读本使用说明书. Please read the operation manual of the touch screen interface before using the device 版本信息/ Version 请将本使用说明书放在便于查阅的地方保管 Please keep this operation manual of touch screen 2020.03...
- Page 2 感谢购买 IMB 工业用缝纫机。 在使用此机器之前,请仔细阅读以下的说明,这样可以更好地帮到您了解此机器的相关 操作。 这些说明是根据现行的条例明确阐述了正确的工作方法。 Thank you for purchasing this industrial sewing machine from IMB Before using this automatic unit, please read the following instructions, which will help you to understand how the machine operates. These instructions illustrate the correct working methods to comply with current regulations.
- Page 3 中文...
-
Page 4: Table Of Contents
目录 一、设备基本信息............................1 二、设备技术参数............................2 三、安全注意事项............................3 四、按键功能说明............................4 4.1.按钮功能说明............................4 4.2.操机界面说明............................5 4.3 急停复位操作............................. 6 五、操作说明..............................7 5.1. 操作前准备工作..........................7 5.2. 操作过程说明..........................7 六、调试方法..............................9 6.1.气压调试............................9 6.2.骨位检测调整..........................10 6.3.卷边宽度的调整..........................11 6.4.止口宽度的调整..........................12 6.5.尺码的调整............................13 七、附件箱明细..............................14 八、常见问题及解决方法..........................15 九、日常保养要求............................16 十、知识产品保护声明..........................17... -
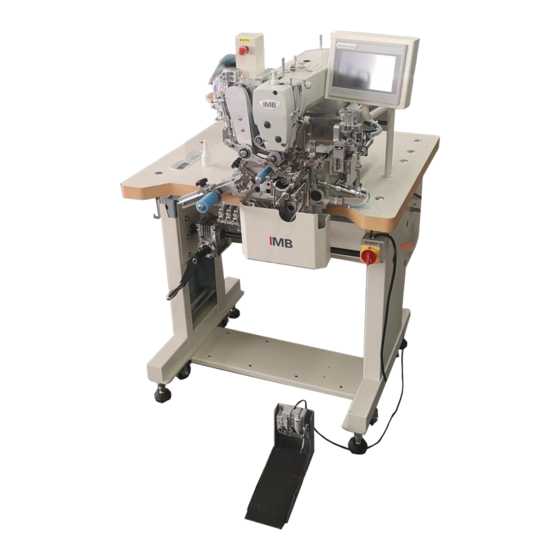
Page 5: 一、设备基本信息
一、设备基本信息 1:标准-GC6770 缝纫机头 2:触摸屏 3:电控箱 4:电源开关 5:升降机架 6:脚踏板 7:勾料、检测骨位组 8:撑料组 9:大尺码调整组 10:送料组 11:压料组 12:急停... -
Page 6: 二、设备技术参数
二、设备技术参数 MB5004E 辘脚车 机头配置 标准-GC6770 最快缝纫速度/rpm 4000 工作电压/V 工作气压/Mpa 主轴 AC 伺服马达 缝制针距长度/mm 卷边宽度/mm 9-53 裤脚周长/mm 280-800 设备尺寸/mm 950L×1000W×1300H 设备重量/kg... -
Page 7: 三、安全注意事项
三、安全注意事项 为了安全地使用自动机的注意事项 1. 为了防止因触电造成的事故,在接通了电源的状态下,请不要打开马达电气箱的盖 子,也不要触摸电气箱内的零件。 1. 为了防止对人身的伤害,请不要在卸下了皮带护罩、手指防护器等安全装置的状态 下运转机器。 2. 为了防止被卷入机器的人身事故,缝纫机运转中,请不要让手指、头发、衣服靠近 皮带轮、V 型皮带、马达附近,也不要把物品放到上面。 3. 为了防止对人身的伤害, 打开电源时或缝纫机运转中, 请不要把手指放到机针附近。 4、为了防止对人身的伤害,踩下脚踏开关前请将手远离撑料组。 5. 为了防止对人身的伤害,缝纫机运转中,请不要把手指放到挑线杆护罩内。 6. 为了防止对人身的伤害,更换机线时,请一定关闭电源。 7. 为了防止对人身的伤害,缝纫机上下动作时或返回原来位置时,请一定注意不要夹 到手指。 8. 缝纫机运转中,请不要切断电源或切断空气供给源。 9. 为了防止因触电造成的事故,在卸下电源地线的状态下,请不要运转缝纫机。 10. 为了防止因触电和电气零件损坏造成的事故,插拔电源插头时,请一定先关掉电 源开关。 11. 为了防止因电气零件损坏造成的事故,打雷时,为了安全请停止作业,并拔掉电 源插头。 12. 为了防止因电气零件损坏造成的事故,从寒冷的地方立即移动到温暖的地方等时 会发生结露现象,因此请待水滴万全干燥之后再接通电源。 13. 因为本产品属于精密机器,所以操作时请充分注意,不要把水、油溅到机器上面, 也不要让机器掉落给与机器冲击。 14. -
Page 8: 四、按键功能说明
四、按键功能说明 4.1.按钮功能说明 (1):电源开关---90°旋转电源开关至 ON,设备通电、通气。 (2):急停开关---遇紧急突发情况可按此按钮使机器紧急停止。 (3):脚踏开关--- 前踩:缝纫开始 松开:缝纫停止 后踩:前后压脚上抬,撑料杆收缩 (4):触摸屏---详见《MB5004E-IM -界面说明》。... -
Page 9: 操机界面说明
4.2.操机界面说明 a:欢迎界面 b: 监控界面... -
Page 10: 急停复位操作
按钮 功能/状态 操作 产量计数 记录产量 点击“清零”按钮可清零 1、(前)踩一下脚踏板启动缝纫 2、检测到骨位时机器停止, ON-(骨位确认 ON) 3、(前)踩一下脚踏板继续缝纫至自动结束并上抬前 后压脚 、收缩撑料杆 (前) 踩一下脚踏板启动缝纫至自动结束并上抬前后压 自动缝纫 ON-(骨位确认 OFF) 脚、收缩撑料杆 1、长(前)踩脚踏板进行缝纫动作 2、松开脚踏结束缝纫动作 3、(后)踩一下脚踏上抬前后压脚、收缩撑料杆 左裤脚和右裤脚循环切换 (细分左右脚模式可提高缝纫 质量 裤脚切换 不分左右裤脚,在同一模式下缝纫 1、点击“穿线”按钮后前后压脚下压,空出穿线空间 穿线 便于穿线 2、点击“复位”按钮可使前后压脚上抬 1、点击“绕底线”按钮 2、将绕线器摆放到位 绕底线 绕底线 3、长(前)踩脚踏进行绕底线 4、松开脚踏结束绕底线 4.3 急停复位操作 1、按下急停按钮后,显示屏跳出急停对话框 2、急停复位:首先右旋急停按钮使之弹出,其次点击显示屏上“复位”按钮。... -
Page 11: 五、操作说明
五、操作说明 5.1. 操作前准备工作 √ 操作人员检查时机头需处于停止状态 √ 检查车缝线是否已经正确穿好 √ 检查机针是否已经安装完成 √ 清理机器台面上的杂物,确保机器运行过程中不会有杂物阻碍运行 √ 检查气压表压力,使其符合机器使用要求 5.2. 操作过程说明 5.2.1 启动设备 90°旋转电源开关至 ON 位置,设备通电开机。 5.2.1 布料摆放... - Page 12 5.2.3 前踩一下脚踏 开始缝纫至结束 5.2.4 关机 操作完毕,90°旋转电源开关至 OFF 位置,设备关机。...
-
Page 13: 六、调试方法
六、调试方法 6.1.气压调试 气压调试表 调压阀序号 气缸名称 气压范围(单位:Mp) 拖轮气缸 0.4-0.5 前压脚气缸 0.1-0.2 后压脚气缸 0.3-0.4 下弯勾气缸 0.1-0.2 中撑杆气缸 0.1-0.2 下撑杆气杆 0.3-0.4 气压调试图... -
Page 14: 骨位检测调整
6.2.骨位检测调整 骨位检测接近开关 骨位检测感应开关 检测骨位的压轮 撑料杆滚套 当布料厚薄变化较大时,若不能及时准确检测到骨位时需对其进行调整。调试方法:裤脚卷边后套 在撑杆上,前踩一下脚踏,撑杆撑开后裤脚逆时针旋转时,此时骨位检测接近开关为亮灯状态,当 骨位经过检测骨位的压轮与撑料杆滚套之间时,骨位检测接近开关灯会灭,此时就获取了骨位信号。 机器以此信号做为起针和结束的依据。 6.2.1 布料偏薄时, 若检测不到信号,此时需将骨位检测接近开关向上进行微调。然后看试缝结果 进行调整,以求达到最佳状态。 6.2.2 布料偏厚时,若检测不到信号,此时需将骨位检测接近开关向下进行微调。然后看试缝结果 进行调整,以求达到最佳状态。... -
Page 15: 卷边宽度的调整
6.3.卷边宽度的调整 6.3.1 当卷边宽度发生变化时,勾料杆和后压脚需与之相匹配,如下表所示: 6.3.2 操作步骤(参见下图) 第一步:依据上表根据需要的卷边宽度来选择合适的勾料杆和后压脚 第二步:松开下图中的内六角螺钉 1 后将布料后限位板向后拉至最后的位置 第三步:将选好的后压脚装配到位(安装于后压料件安装板之上,如图所示)。 第四步: 将布料后限位板向前移动至后压脚,并留有 0.2mm 的间隙,然后将内六角螺丝 1 拧紧。 第五步:将选好的勾料杆装入勾料杆固定块,确保前后位置如上表中的描述与图片一致,然后拧紧 内六角紧定螺钉 1。 后压料件安装板 内六角螺钉 1 后压脚 勾料杆固定块 内六角紧定螺钉 1 布料后限位板 勾料杆... -
Page 16: 止口宽度的调整
6.4.止口宽度的调整 图(1) 图(2) 机针 前压脚挡边 内六角紧定螺钉 6.4.1 止口宽度是指如图(1)所示的尺寸,它是由图(2)中机针距离前压脚挡边的距离来决定的 6.4.2 根据上述定义可知止口宽度的调整方法是:松开图(2)中内六角紧定螺钉后,用手拨动前压 脚向前后移动,到达需要的位置后拧紧内六角紧定螺钉。... -
Page 17: 尺码的调整
6.5.尺码的调整 小胶轮挡片 手旋螺钉 1 手旋螺钉 2 手旋螺钉 3 轴点 大胶轮挡片 布料后挡圈 滑轨 尺码 传动轮组合 小码 1+2+3+4+5 中码 1+2+3+4+5+6 大码 1+2+3+4+5+6+7 说明: (1)、1、2、3 和 4 号撑料杆是由气缸在开始缝纫前做撑开动作,缝纫结束后做收紧动作。 (2)、5 号为送料轮,它的位置固定不变。 (3)、6 与 7 可同时在滑轨上进行调节(方法:松开手旋螺母即可进行调整),并且 6 还可以绕轴 点做 60°范围内的调整(方法:松开轴点及其左右螺钉即可进行调整)。 总结: 针对具体的裤脚用哪一种传动轮组合可通过尝试法来选择,例如:1、2、3 和 4 收紧装态下,将 裤脚套在撑料杆上,触摸屏关闭自动缝纫,前踩一下脚踏板,此时撑料杆就处撑开装态。那么可以... -
Page 18: 七、附件箱明细
七、附件箱明细 序号 附件名称 规格 数量 《使用说明书》 《零件手册》 《触摸屏界面操作说明》 机头附件 02500450301300-小胶轮 02500450301400-固定芯棒 02500450301500-固定芯棒端面挡片 02500450301600-固定芯棒上轴向限位圈 02500451300100-2 号撑料杆选配件 1 02500451300200-2 号撑料杆选配件 2 050201409006-自润滑含油轴套 1215 02500451300300-勾料杆安装选配件 1 02500451300400-勾料杆安装选配件 2 02500451300500-前压脚选配件 02500451300600-后压脚选配件 1 02500451300700-后压脚选配件 2 02500451300800-后压脚选配件 3 02500451300900-后压脚选配件 4 02500451301000-后压脚选配件 5 02500451301100-后压脚选配件 6 02500451301200-后压脚选配件 7 02500451301300-后压脚选配件... -
Page 19: 八、常见问题及解决方法
02500451301400-后压脚选配件 9 02500451301500-勾料杆选配件 1 02500451301600-勾料杆选配件 2 02500451301700-勾料杆选配件 3 02500451301800-布料后限位板选配件 八、常见问题及解决方法 10.1.常见问题及解决方法详见下表 10.2.其他更多页面问题,请见《MB5004E-触摸屏界面操作说明》 现象 原因分析 解决措施 1.压脚压力过小; 1.调整压脚压力; 断线/跳线 2.机针损坏; 2.更换机针; 3.梭床与机针的位置不正确。 3.调整梭床与机针位置。 1.修磨定刀 剪线不良 切刀磨损 2.更换定刀/动刀 止口大小不良 拉勾位置不合适 调整拉勾位置 骨位不齐 上下送料轮不同步 调整上下送料轮至速度一致... -
Page 20: 九、日常保养要求
九、日常保养要求 11.1.设备保养清单及要求详见下表 11.2.其他更多关于机头的保养要求请参照《标准 GC6770-C 说明书》 时间 序号 项目 要点描述 每天 每周 每月 半年 √ 清理灰尘 清除设备表面及零部件灰尘 √ 清理油污 清理台板、针板、梭芯油污 √ 气管接口 气管接口紧密,不漏气 √ 机头油量 机头油量不低于警戒线 √ 梭芯 检查机头梭芯是否刮花 √ 滑动件 检查滑动件润滑,如有需要则添加润滑剂 √ 电控箱 散热风扇运转正常,及时清理灰尘... -
Page 21: 十、知识产品保护声明
十、知识产品保护声明 MB5004E 全自动辘脚车是常州智谷机电科技有限公司独立自主完成的设计成果。该成果知识产权属 于常州智谷机电科技有限公司,受国家知识产权相关法律法规的保护。未经权利人书面许可,不得 实施该成果的专利技术,不得复制、销售或通过信息网络传播和该成果有关的信息。任何违法侵权 行为,常州智谷机电科技有限公司将依法追究其法律责任。... - Page 22 ENGLISH...
- Page 23 Catalog 1、Basic information of the equipment......................1 2、Technical parameters of equipment......................2 3、Safety precautions............................3 4、Key function description..........................5 4.1. Button function description........................5 4.2. Operator interface description....................6 4.3 Emergency stop reset operation......................7 5、Operating instructions..........................8 5.1. Preparation before operation......................8 5.2.
-
Page 24: 1、Basic Information Of The Equipment
1、Basic information of the equipment 1:Typical-GC6770 Head 2:Touch screen 3:Control box 4:Power switch 5:Lifting stand 6:Pedal 7:Detector device 8:Stretch fabric group 9:Large size adjustment group 10:Feeding group 11:Pressing group 12:Emergency stop... -
Page 25: 2、Technical Parameters Of Equipment
2、Technical parameters of equipment MB5004E Automatic bottom hemmer Machine head 标准-GC6770 Maximum speed/rpm 4000 Voltage/V Air pressure/Mpa Motor AC 伺服马达 Stitch length/mm Hemming width/mm 9-53 Leg circumference /mm 280-800 Size/mm 950L×1000W×1300H Weight/kg... -
Page 26: 3、Safety Precautions
3、Safety precautions Considerations for safe use of automata 1. In order to prevent accidents caused by electric shock, please do not open the cover of the electrical box of the motor or touch the parts in the electrical box when the power is connected. 1. - Page 27 * important safety information: improper operation of the machine may cause personal injury. Please read this √ instruction carefully and operate correctly before operation. √Please ventilate the machine before it is officially powered on. √ do not turn on the internal parts of the electric cabinet or touch screen while the power is on.
-
Page 28: 4、Key Function Description
4、Key function description 4.1. Button function description (1) : Power switch -- turn the power switch to on at 90 ° to power and ventilate the equipment。 (2):Emergency stop switch: in case of emergency, press this button to stop the machine。 (3):Pedal --- Step forward: sewing begins Loosening: sewing stops Back stepping: the presser foot are lifted up, and the Stretch fabric... -
Page 29: Operator Interface Description
4.2. Operator interface description a:Power on interface b: Main interface... -
Page 30: Emergency Stop Reset Operation
Button Function / status operation Production Record production Click the "clear" button to clear count 1、Step on the pedal to start sewing 2、The machine stops when cross position is ON-(cross detected, position confirmation ON) 3、step on the foot pedal to continue sewing until the end of sewing automatically, and lift up the presser feet、Retract the Stretch fabric group... -
Page 31: 5、Operating Instructions
5、Operating instructions 5.1. Preparation before operation √ When the operator checks, the machine head should be in the stop state √ Check whether the sewing thread is properly put on √ Check whether the needle has been installed √ Clean up the debris on the machine table to ensure that there will be no debris obstructing the operation of the machine √... - Page 32 5.2.3 Step forward Start to finish sewing 5.2.4 Shut down After the operation, turn the power switch 90 ° to the off position, and the equipment will be shut down。...
-
Page 33: 6、Debugging Method
6、Debugging method 6.1. Air pressure adjustment Air pressure adjustment meter Name Range(:Mp) Roller cylinder 0.4-0.5 Front presser foot cylinder 0.1-0.2 Rear presser foot cylinder 0.3-0.4 Lower hook cylinder 0.1-0.2 Middle strut cylinder 0.1-0.2 Lower strut cylinder 0.3-0.4 Air pressure adjustment diagram... -
Page 34: Cross Position Detection And Adjustment
6.2. Cross position detection and adjustment Switch 1 Switch 2 roller bearing When the cloth thickness changes greatly, if the cross position cannot be detected timely and accurately, it needs to be adjusted. Debugging method: The hem of the trousers is rolled and put on the stretch fabric group. -
Page 35: Adjustment Of Hemming Width
6.3. Adjustment of hemming width 6.3.1 When the hem width changes,The hook bar and the back presser foot should be matched with it,As shown in the table below: 6.3.2 Operation steps (see the figure below) Step 1: according to the table above, select the right hook bar and rear presser foot according to the required curling width Step 2: loosen the screw 1 in the figure below, and then pull back the Limit plate to the final position... -
Page 36: Adjustment Of Seam Width
Mounting plate Screws 1 Rear presser foot Fixed block Screw 2 Limit plate Hook bar 6.4. Adjustment of seam width 图(1) 图(2)... -
Page 37: Size Adjustment
Needle Sidewall screw 6.4.1 The seam width refers to the dimension as shown in figure (1),It is determined by the distance between the needle and the front presser foot edge in figure (2) 6.4.2 According to the above definition, it can be seen that the adjustment method of the stop width is:After loosening the screw in figure (2),Move the front presser foot forward and backward by hand,After reaching the required position, tighten the screws。... - Page 38 Size Combination Small 1+2+3+4+5 Medium 1+2+3+4+5+6 Large 1+2+3+4+5+6+7 Explain: (1)No.1. No. 2, No. 3 and No. 4 stretch fabric group are stretched by the air cylinder before sewing and tightened after sewing (2)、No. 5 is the feeder wheel, and its position is fixed。 (3)、6 and 7 can be adjusted on the slide rail at the same time(Method: loosen the nut to adjust),...
-
Page 39: 7、Common Problems And Solutions
7、Common problems and Solutions 7.1. Common problems and solutions are shown in the table below phenomenon Cause analysis Solution 1. Too low presser foot 1. Adjust the presser foot pressure; pressure; Disconnection 2. Needle damage; 2. Change needle; / jumper 3. -
Page 40: 9、Knowledge Product Protection Statement
9、Knowledge product protection statement MB5004E was designed by Changzhou wisdom & valley Electric Technology Co., Ltd.。The intellectual property rights of this achievement belong to Changzhou wisdom & valley Electric Technology Co., Ltd. and are protected by national intellectual property laws and regulations.
Need help?
Do you have a question about the MB5004E-IM and is the answer not in the manual?
Questions and answers