
Related Manuals for Herutu 21D-429C

Summary of Contents for Herutu 21D-429C
- Page 1 Wireless Production Control Indicator Controller 21D-429C Instruction Manual V1.80 Please use this Instruction manual correctly on reading well. Please keep it carefully to be able to read immediately, when required.
- Page 3 [21D] Notational Conventions for Series Model Set (Controller+Display) Machine Items Communica Display type LED color types tion 1523 1524 For the Controller only, the contents of 3 Communication are as follows: 429C 265C For the Display only, the contents of 3 Communication are as follows: 429D 265D 485D...
- Page 4 To use this product in safety and comfort, (Be sure toread) Thank you very much for purchasing our product. This operation manual contains the precautions necessary for preventing an accident caused by the use in an improper ways. Read it carefully while thoroughly understanding the meanings of pictorial symbols. Using in an improper way while ignoring this pictorial symbol might !...
- Page 5 ! Warning ■ For handling this machine: ● Do not use this product for the application needing the high reliability related to human lives. ● Do not use this product in a place where it is uncertain about whether or not radio waves reach.
- Page 6 ※This operation manual is translated a product for Japan into English/ This product is based on Japanese Wireless law. Before use: This machine is awarded the certificate of conformance as the wireless equipment for “specific small-current wireless station telemeter and tele-control”. About the wireless equipment for telemeter and tele-control: Wireless equipment for telemeter: Wireless equipment for transmitting the signal intended for automatically displaying or...
-
Page 7: Table Of Contents
Contents 1. General Description ......................1 1-1. Scope ..........................1 1-2. Outline .......................... 1 1-3. Type selection ....................... 1 2. Specifications ........................3 3. Names and Functions of each section ................6 3-1. Names and Functions of each section ................. 6 3-2. - Page 8 6-6. Setting the Plans Key [1] or [2] ................40 6-7. Setting the Actual Key[2] or [3] ................41 6-8. Setting the Advancement Key [3] ..............42 6-9. Setting the Accomplishment rate Key [3] ............. 43 6-10. Setting the Clear time Key [7] ................
-
Page 9: General Description
21D-429C General Description 1. General Description 1-1. Scope This operation manual describes about the Controller [21D-429C] (hereinafter called “the machine”) of Wireless Production Control Indicator [21D-429] Series. For the Wireless Production Control Indicator [21D-429] Display, see another operation manual. 1-2. Outline The Production Control Indicator unit [21D-429] series consists of the Controller section and Indicator section. - Page 10 21D-429C General Description Types Numeric notation Alphabetical notation Target/Actual/Advancement Plan/Actual/Advancement Target/Actual/Accomplishment rate Plan/Actual/Accomplishment rate Target/Plan/Actual Target/Plan/Actual/Advancement 1523 TPAa Target/Plan/Actual/Accomplishment rate 1524 TPAt ●How to calculate each item “Plan” =Elapsed time within working hours ÷Tact “Accomplishment rate”(%) =(Actual÷Plan) x100 “Advancement” =Actual-Plan * Decimal places of the Accomplishment rate are all cut off.
-
Page 11: Specifications
21D-429C Specifications 2. Specifications Items Descriptions Remarks Model 21D-429C Optional one wave of 40 waves ranging Frequency 429.2500-429.7375MHz(12.5KHz in step) Transmit output 10mW Cannot be removed from main Antenna 1/4λ Whip antenna body DC12V(DC11.0-28.0V) Input power Current amount of 300mA or ①DC Jack for AC adapter x1... - Page 12 21D-429C Specifications Also, use an extreme care when controlling the lamp load and etc having a high inrush current. Even if only slightly exceeding the maximum output current, it may damage the drive circuit.
- Page 13 21D-429C Specifications Operating specifications Items With working hour Without working hour Labor hour Max 23 hours 59 minutes Max 1 month For 20 working hours Working hour Impossible to set Number of sets: 40 Working hour 6 patterns Impossible to set...
-
Page 14: Names And Functions Of Each Section
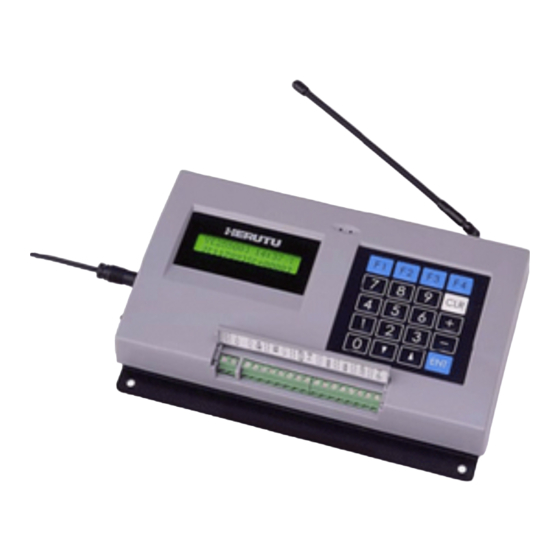
21D-429C Names and Functions of each section 3. Names and Functions of each section 3-1. Names and Functions of each section ⑪Nameplate seal ①Antenna ⑫ ②LCD display ③Buzzer slot ④Keyboard Certification label ⑨DC Jack IN ⑤Terminal block cover ⑩Power switch ⑧Mounting slot... - Page 15 21D-429C Names and Functions of each section 1/4λ whip antenna ①Antenna (Set it perpendicular to the installation face during use.) ②LCD Display 16-digit x 2-line display LCD ③Buzzer slot Slot for buzzer sound ④Keyboard Membrane switch with 20 keys ⑥ Power input terminal...
-
Page 16: Terminal Block
21D-429C Names and Functions of each section 3-2. Terminal block [Terminal block layout] Top face ↑ Power Input Output source ■ ■ ■ ■ ■ ■ ■ ■ ■ ■ ■ ■ ■ ■ ■ ■ ■ ■ DC12V Power input Input the power voltage. -
Page 17: Ac Adapter
21D-429C Names and Functions of each section *1:When switching from the final reserve No, the reserve No. 1 comes back. *2:This is only effective when “Yes” for use of working hour is set while “Yes” for use of Tact reserve function is set. -
Page 18: Installation Methods
21D-429C Installation methods 4. Installation methods 4-1. Installation of Controller ①Install the machine in a place near each I/O signal as far as possible using the mounting slots while the machine can be easily controlled and its antenna on the Display can be easily overlooked. -
Page 19: I/O Circuit
21D-429C Installation methods 4-2. I/O circuit [Configuration of Input circuit] [Configuration of Output circuit] TD62308 OUTPUT INPUT PS2701 Absolute max rating DC50V 1.5A ● Connecting to the input terminal For the Non-voltage contact input to be connected to the Actual input, use the circuit with less chattering which can steadily turn on/off the voltage/current of 5V/15mA. - Page 20 21D-429C Installation methods [Terminal block rating] 2 Cable size to be connected :0.14-1.5mm (AWG26-AWG16) Electric cable naked length :6mm Terminal screw nominal dia :M3 Absolute max rating :DC50V 1.5A...
-
Page 21: Function Settings
21D-429C Function settings 5. Function settings Function setting of this machine is already done depending on the customers’ needs before shipment; however, if you need to change about the following contents, proceed as follows. If those descriptions are unwanted, see the Basic operation. -
Page 22: Setting The Equipment No
21D-429C Function settings 5-2. Setting the equipment No. Command[0] ①Select [0]key, and press [ENT] key . The equipment no selection screen appears. If there is no need to change the setting contents, press [ENT] key to return to the Command selection screen. - Page 23 21D-429C Function settings Channel No. Frequency (MHz) Channel No. Frequency (MHz) 429.2500 429.5000 429.2625 429.5125 429.2750 429.5250 429.2875 429.5375 429.3000 429.5500 429.3125 429.5625 429.3250 429.5750 429.3375 429.5875 429.3500 429.6000 429.3625 429.6125 429.3750 429.6250 429.3875 429.6375 429.4000 429.6500 429.4125 429.6625 429.4250 429.6750...
-
Page 24: Setting The Operation Type Command [2]
21D-429C Function settings 5-4. Setting the operation type Command [2] Set the operation type. Selective Types Numeric notation Alphabetical notation value Target/Actual/Advancement Plan/Actual/Advancement Target/Actual/Accomplishment rate Plan/Actual/Accomplishment rate Target/Plan/Actual Target/Plan/Actual/Advancement 1523 YKJS Target/Plan/Actual/Accomplishment 1524 YKJT rate ①Select [2] key and press [ENT] key, and type setting screen appears. -
Page 25: Setting The Digit-Number Command [3]
21D-429C Function settings 5-5. Setting the digit-number Command [3] Set the digit-number. Set it to fit on the digit-number of Indicator unit. ①Select [3] key and press [ENT] key, and Digit-number setting screen appears. If there is no need to change the setting contents, press [ENT] key to get back to the Command selection screen. -
Page 26: Setting With Or Without Tact Reserve Function Command [5]
21D-429C Function settings 5-7. Setting with or without Tact reserve function Command [5] Set with or without of Tact reserve function. Setting Contents Tact reserve function is enabled. Maximum 20 working hour tact can be reserved. Set the “(Tact-Production quantity-Setup time) x Max 20 working hours” in normal screen using the [F1] key. - Page 27 21D-429C Function settings Cumulative display Individual display Commands (“Yes”is selected) (“No”is selected) Displays target production quantity of Displays total target production Target reserve No. being executed at present quantity today. time. Displays total planned production Displays total planned production Plan quantity of reserve No.
-
Page 28: Setting With Or Without Working Hours Command [6]
21D-429C Function settings 5-8. Setting with or without working hours Command [6] Set with or without working hours. Setting Contents Planned calculation is carried out based on the registered contents of working hour. Register the working hour with the [5] key in normal screen. -
Page 29: Setting The Password Function Command [7]
21D-429C Function settings 5-9. Setting the password function Command [7] Setting Contents 0000 Password function disabled Other Password function enabled than To control all the keys in normal screen, password should be inputted. 0000 ①Select [7] key and then press [ENT] key, and the Password function setting screen appears. -
Page 30: Setting The Pre-Scale Command [8]
21D-429C Function settings 5-10. Setting the pre-scale Command [8] Set the pre-scale function. Selective Contents Pre-scale function is disabled. The Pre-scale function is set to “Multiple number”. Set the pre-scale value with [8] key in normal screen. The Pre-scale function is set to “Batch number”. -
Page 31: Setting With/Without Advancement Judging Command [9]
21D-429C Function settings 5-11. Setting with/without Advancement judging Command [9] Setting with/without Advancement judging Setting Contents Advancement judging function is enabled. Set the Advancement judging value of + side and - side with the [9] key in normal screen. Advancement judging function is disabled. -
Page 32: Setting The Transmit Mode Command [10]
21D-429C Function settings 5-12. Setting the Transmit mode Command [10] Set the transmit mode. Setting Contents Continuous Transmits the data continuously. Transmits the data intermittently. Intermittent Set the No of telegram to be transmitted, and send data intermittently. ①Select [1][0] key and then press [ENT] key, and Transmit method setting screen appears. - Page 33 21D-429C Function settings *In intermittent transmit mode, data is randomly transmitted at interval of 0 to 7 seconds (8 types in total at interval of 1 second) regardless of any number of telegram. However, when impossible to transmit due to the radio wave receiving from others at transmitting timing,...
-
Page 34: Setting With/Without Latch Display Command [11]
21D-429C Function settings 5-13. Setting with/without latch display Command [11] Setting with/without latch display Setting Contents Indicator unit keeps displaying the received final data. Indicator unit keeps displaying the received final data only for 30 seconds. Once no data is received, display lights off after 30 seconds. -
Page 35: Basic Operation
21D-429C Basic operation 6. Basic operation To operate the machine, you need to carry out various settings before use. Execute those settings according to the explanation to precisely operate this machine. Since the keys and commands vary with the types, implement the settings with this understanding. - Page 36 21D-429C Basic operation *[5] [6] keys are only effective when “Yes” for working hour setting is set in Function settings. *[9] key is only effective when “Yes” for “With/Without Advancement judging function” is set in the Function settings. *[F1] key is only effective when “Yes” for “With/Without Tact reserve function” is set in Function settings.
- Page 37 21D-429C Basic operation [Normal screen] After power ON, the following screen appears, and then normal screen appears. Name:21D-429C-E [Opening screen] Ver:*.**-****** ↓ About 2 seconds later normal screen appears. T[12345] 19:31 1 [Normal screen] A[12345]a[+0000] Left column is for type 123.
- Page 38 21D-429C Basic operation “Internal clock”・・・・・・・・Indicates the time of internal clock. “With/without of carrier”・・・・・Indicates whether the machine receives an electric wave from outsides When “CD” is displayed, it is impossible to communicate, and so the communication channel should be changed or the channel existing nearby should be eliminated.
- Page 39 21D-429C Basic operation ■ [Normal screen]/[Operating status screen] display the contents of working setting depending on each set contents. Descriptions of working setting to be displayed(normal screen) Setting contents Display methods(flashing) Without Tact reserve function With Tact reserve function “With working hour”...
- Page 40 21D-429C Basic operation Flow of Basic operation(“Without Tact reserve function” and “With working hour”) 1. Setting the present time→Set the present time Key No. “4” → {Optional numerals} → “ENT” ↓ 2. Setting working pattern→Select working pattern from 1-6. Key No. “6” → Select from “1” - “6” → “ENT”...
-
Page 41: Setting The Internal Clock Key [4]
21D-429C Basic operation 6-1. Setting the Internal clock Key [4] Setting the internal clock ①Press [4] key, and the internal clock setting screen appears. {4}Clock [**:**] [*]present data Input : Input the present time in the order of hour and minute. -
Page 42: Setting The Working Hour Pattern Key [6]
21D-429C Basic operation 6-2. Setting the Working hour pattern Key [6] The machine has six working hour patterns and you have to set the machine to operate at which working hour pattern. ①Press [6] key, and the working hour pattern setting screen appears. -
Page 43: Setting The Working Hour Key [5]
21D-429C Basic operation 6-3. Setting the Working hour Key [5] Set the working hour of your interest. The machine computes the planned quantity of productions at the present by the set working hour to compute the advancement to production actual. - Page 44 21D-429C Basic operation ⑥At last, press [0][0][0][0] and [ENT] keys on the “START” screen of even input numbers to set the working hours of your interest.
- Page 45 21D-429C Basic operation *If you need to change only optional “START” or “FINISH”, scroll the screen with [+]/[-] key to change it. [00]STAT [**:**] Input [ : ] ↑[-] [+]↓ [01]FINS [**:**] Input [ : ] ↑[-] [+]↓ [02]STAT [**:**]...
-
Page 46: Setting The Tact Key [0]
21D-429C Basic operation 6-4. Setting the Tact Key [0] Setting tact in seconds (the time required for production per product) ①Press [0] key , and the tact setting screen appears. {0}Tact [****.*] [*]present data Input [ . ] The screen is for tact precision (0.1)sec ②Input the Tact (man-hours) of your interest in seconds within less than 5-digit. -
Page 47: Setting The Target Key [1]
21D-429C Basic operation 6-5. Setting the Target Key [1] Objective type=1**,1*** Setting a target quantity of productions a day ①Press [1] key, and Target setting screen appears. {1}TAGT [*****] [*]present data Input [ ] The screen is for 5-digit type setting TAGT:Target ②Input the number of target of your interest. -
Page 48: Setting The Plans Key [1] Or [2]
21D-429C Basic operation 6-6. Setting the Plans Key [1] or [2] Objective type =5**,152,15** Normally, there is no need to set plans. If an error occurs in the planned quantity of productions due to some reasons, you may set the correct planned quantity of productions. -
Page 49: Setting The Actual Key[2] Or [3]
21D-429C Basic operation 6-7. Setting the Actual Key[2] or [3] Objective type =*2*,152,152* Normally, there is no need to set production actual. If an error occurs in the production actual due to some reasons, you may set the correct actual of productions again. -
Page 50: Setting The Advancement Key [3]
21D-429C Basic operation 6-8. Setting the Advancement Key [3] Objective type=**3 Normally, there is no need to set the Advancement. If an error in advancement occurs due to some reasons, you may set the correct advancement again. ①Press [3] key to go into the Advancement setting screen. -
Page 51: Setting The Accomplishment Rate Key [3]
21D-429C Basic operation 6-9. Setting the Accomplishment rate Key [3] Objective type=**4 Normally, there is no need to set the Accomplishment rate. If an error in Accomplishment rate occurs due to some reasons, you may set the correct Accomplishment rate. -
Page 52: Setting The Clear Time Key [7]
21D-429C Basic operation 6-10. Setting the Clear time Key [7] This is the clear time setting procedure. Once the preset time is reached, the clear function allows the planned quantity/production actual to set into “0” and makes restarting. For this machine, [CL] key should be pressed or the power source should be turned on/off once a day. -
Page 53: Setting The Pre-Scale Key [8]
21D-429C Basic operation 6-11. Setting the Pre-scale Key [8] Set the pre-scale here. The pre-scale function includes the multiple number setting and batch number setting. Once either [Multiple number] or [Batch number] is selected in the Function settings, this function is enabled. If neither of [Multiple number] nor [Batch number] is selected in the Function settings, this function is disabled, thus [8] key cannot be selected. - Page 54 21D-429C Basic operation Multiple number setting range:1-99999 Batch number setting range:1-99999 *”0” cannot be set. *This function cannot be used together with Tact reserve function.
-
Page 55: Setting The Advancement Judging Function Key [9]
21D-429C Basic operation 6-12. Setting the Advancement judging function Key [9] Objective type=**3,1523 The Advancement judging function allows the outputting from “Advancement judging + “terminal and “Advancement judging - “terminal when the absolute value of Advancement has exceeded the judging value of [+] side and [-] side, which was preset. You have to set both for plus side and minus side. -
Page 56: Applied Operation
21D-429C Applied operation 7. Applied operation This article describes the operation methods other than those mentioned in “6. Basic operation”. The contents stated here are mainly the different points from those in Basic operation, but the same points as those in Basic operation are not contained. Accordingly, make settings for those different points according to the Basic operation. - Page 57 21D-429C Applied operation <Confirmation of working setting contents> The [Normal screen] and [Operating status screen] let you confirm the working setting contents, which is set at present. T[12345] 19:31 1 [Normal screen] A[12345]a[+0000] “Working setting” is displayed (flashing) [19:31] CD OUT...
-
Page 58: Working Setting 2,3-Setting The Tact Reservation (With Working Hour)
21D-429C Applied operation 7-1. Working setting 2,3-Setting the Tact reservation (With working hour) This article describes about the Working setting ”2” and “3”. When the Working setting (M=?) is represented by “2” or “3” in the Operating status screen, the Function settings stated in the following table is set. - Page 59 21D-429C Applied operation Tact reserve function cannot be used together with pre-scale function. <e.g.>When there are 4 types of works for one day and the target quantities for each work are as stated below, the contents both of Cumulative display and Individual display are as follows:...
- Page 60 21D-429C Applied operation [“During setup” screen] [Normal screen] displays the time at upper right corner of LCD, however, the setup residual time is displayed in the time column during setup. Also “During setup” signal turns on from I/O terminal in the open collector system.
- Page 61 21D-429C Applied operation <Tact reserving procedures> To reserve the tact, register “Tact”, “Target production quantity” and “Setup time” beforehand.Register the Reserve No. 1-20. Setting Contents range Reserved 20 works work Tact 0.1~9999.9-sec or 0.01-999.99-sec Target production 4-digit-type:0-9999 5-digit-type:0-99999 quantity Setup time 0-998 ①Press [F1] key.
- Page 62 21D-429C Applied operation If [ENT] key is pressed without inputting anything, the Step ① comes back without being registered. ④Input the Setup time of the first work (Reserve No.1). <e.g.>For 15min, input [1] and [5] in this order. F11-01 [***]...
- Page 63 21D-429C Applied operation <Message in registering> When the amount of reserved tact (man-hours), labor hours calculated based on the production reserved quantity and setup time in total exceeds the working hour for one day, the overrun time is displayed. Working hour...
- Page 64 21D-429C Applied operation ②Input [2] key and input “Reserve No.”. <e.g.>To switch to Reserve No 3, input[3]. F12 Rsv No. [**] [Reserve No. switch screen] Input(04) [ 3] [*]present data The“04”of [Input(04)] in the screen indicates the registered work quantity.
- Page 65 21D-429C Applied operation <Tact switching timing> The tact switching timing is the time when target production quantity is consistent with the production actual. Processing is carried out within working hour setting for the range between the reserve No. registered as “1” and the reserve No. ahead of either [999] in setup time or [0] in tact or [0] in production actual.
-
Page 66: Working Setting A - Operation When "No" For Working Hour Setting Is Set
21D-429C Applied operation 7-2. Working setting A - Operation when “No” for working hour setting is set(Without Tact reserve function) This article describes about the Working setting“A”. When Working setting (M=?)is displayed as “A”in the Operating status screen, the Function setting is carried out as stated in the following table. - Page 67 21D-429C Applied operation For this operation, the functions of I/O terminals are changed as follows: Input Output ■ ■ ■ ■ ■ ■ ■ ■ ■ ■ ■ ■ ■ ■ ■ ■ Actual input Increases the production actual Subtraction input...
- Page 68 21D-429C Applied operation <Clear processing> Plan/Actual is cleared and calculation is started from the present time [Clear] terminal according to the preset tact. Plan/Actual is cleared and calculation is started from the present time [CLR] key according to the preset tact.
-
Page 69: Working Setting B,C - Operation When "No" For Working Hour Setting Is Set
21D-429C Applied operation 7-3. Working setting B,C - Operation when “No” for working hour setting is set(With Tact reserve function) This article describes about the Working setting“B” /“C”. When the Working setting (M=?)is displayed as “B” or “C”in the Operating status screen, the Function setting is carried out as described in the following table. -
Page 70: Handling Precautions
21D-429C Maintenance 8. Handling precautions [1] If you use the setting of using working hour, the machine maintains the displayed data after the working hours are over. Thus, you need to turn off power once or press the [CLR] key before the start of working hours. -
Page 71: Warranty
21D-429C Warranty 10. Warranty Provisions of warranty The provisions of warranty are set forth by us for warranty of the product after shipment so that the product can be used with a sense of security after purchased. In case our product is out of order, we will provide repair or replacement under the provisions of warranty. - Page 72 21D-429C Warranty 8. Troubles occurring due to handling against the use instructions or precautions specified in this operation manual. Initial defects The period within 30 days from the date of shipping the product is defined as the initial defect period for the product. The product will be replaced with a new one or repaired...
-
Page 73: Dimensional Drawing
21D-429C Dimensional drawing Dimensional drawing... - Page 76 HERUTU ELECTRONICS CORPORATION 422-1 Higashimikata-cho, Kita-ku, Hamamatsu, Shizuoka, 433-8104 Japan (Sales dept) TEL.+81-53-438-3555 FAX. +81-53-438-3411 Website URL https://www.herutu.co.jp/en/ E-mail info@herutu.co.jp...
Need help?
Do you have a question about the 21D-429C and is the answer not in the manual?
Questions and answers