Technics SL-1500C Owner's Manual
Direct drive turntable system
Hide thumbs
Also See for SL-1500C:
- User manual ,
- Operating instructions manual (224 pages) ,
- Owner's manual (52 pages)

Related Manuals for Technics SL-1500C


Summary of Contents for Technics SL-1500C
- Page 1 SL-1500C Direct Drive Turntable System Owner's Manual Manuel d’utilisation Platine tourne-disque à entraînement direct...
- Page 2 Permettez-nous de vous emmener en voyage pour redécouvrir la musique. Delivering the Ultimate Emotive Musical Experience to All At Technics we understand that the listening experience is not purely about technology but the magical and emotional relationship between people and music.
-
Page 3: Table Of Contents
Introduction Table of contents Thank you for purchasing this product. Please read these instructions carefully before Before use using this product, and save this manual for IMPORTANT SAFETY INSTRUCTIONS .... 04 future use. About descriptions in these operating instructions Accessories ........... -
Page 4: Important Safety Instructions
IMPORTANT SAFETY INSTRUCTIONS Read these operating instructions carefully before using AC power supply cord the unit. Follow the safety instructions on the unit and The power plug is the disconnecting device. the applicable safety instructions listed below. Install this unit so that the power plug can be Keep these operating instructions handy for future unplugged from the socket outlet immediately. - Page 5 (1) This device may not cause harmful interference, and (2) this device must accept any interference received, including interference that may cause undesired operation. Supplier's Declaration of Conformity Trade Name: Technics Model No.: SL-1500C Responsible Party: Panasonic Corporation of North America Two Riverfront Plaza, Newark, NJ 07102-5490 Support Contact: http://shop.panasonic.com/support...
- Page 6 (06) English...
-
Page 7: Accessories
Accessories In order to prevent damage during shipping some of the equipment has been disassembled. Please check and identify the supplied accessories. (Some accessories parts are supplied in a bag.) Turntable (1 pc.) Turntable mat (1 pc.) Dust cover (1 pc.) SL-1500CPP-S : (TYL0375) (RGS0008) (TTFA0457) -
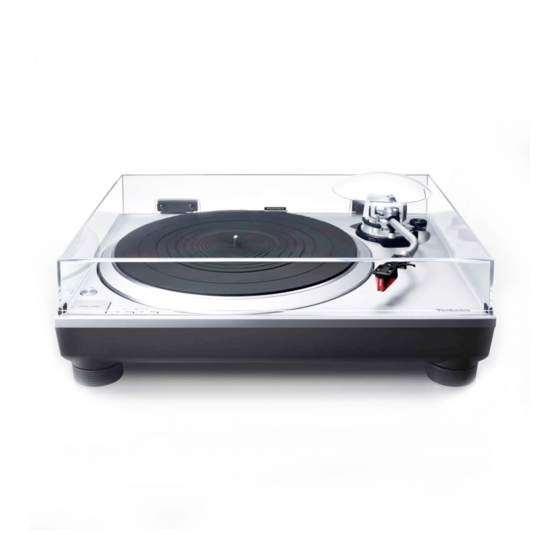
Page 8: Parts Name
Parts Name Numbers such as ( 18) indicate reference pages. Front Arm clamp ( 15) Tone arm ( 11,21) Arm rest ( 15) Locking nut ( 11,21) Cue lever ( 15) Head shell ( 11,21) Balance weight ( ... - Page 9 Back External output switch ( 12) Dust cover fitting part (⇒ 14) Auto lift-up switch ( 19) AC ( ) input terminal ( 12,13) External output terminal ( 12) PHONO output terminal ( 13) PHONO earth terminal ( 13) (09) English...
-
Page 10: Putting The Player Together
Putting the player together In order to prevent damage during shipping, some of the equipment has been disassembled. Put the player together in the following order. Attention Before setting up, put on the stylus guard to protect the stylus tip ( 18), return the tone arm to the arm rest and fix it with the arm clamp. -
Page 11: Before Fitting The Turntable
Before fitting the turntable Attaching the head shell Fit the head shell with the Remove the magnet cover from cartridge into the tone arm. the turntable. Keep the head shell horizontal There is a magnet and its cover on the and tighten the locking nut. -
Page 12: Connections And Installation
Connections and installation Do not simultaneously connect both the PHONO terminal output and external output terminals to a connected device (pre-main amplifier, component system, etc.). Connecting simultaneously may cause noise and/or popping sound. Turn off all units and disconnect the AC power supply cord from the socket before making any connections. -
Page 13: Connecting The Phono Output Terminals
Connecting the PHONO output terminals Turn off the unit and the Set the external output switch to connected device, and disconnect “OFF”. the AC power supply cord from the Connect the AC power supply socket. cord. Connect the PHONO cable and ... -
Page 14: Installation
Connections and installation (continued) Installation Install the unit on a horizontal surface Notes for installation protected from vibrations. Before you move the unit, turn the unit off, Keep this unit as far as possible from speakers. pull out the power plug and disconnect all connected devices. -
Page 15: Adjustment
Adjustment Horizontal balance Stylus pressure Preparation Preparation First, remove the dust cover. Return the tone arm to the arm rest and fix it Remove the stylus cover ( 18), taking care with the arm clamp. not to damage the stylus, then release the Turn the stylus pressure control arm clamp. -
Page 16: Tone Arm Height
Adjustment (continued) Tone arm height Make this adjustment only if the cartridge you Hold the arm-height adjuster and slide it up are using makes it necessary. or down to align the position mark with the index line. 0 to 6 mm are marked on the arm Preparation height adjuster. -
Page 17: Armlift Height
Armlift height After arm height adjustment is Make an adjustment according to your cartridge if necessary. finished, lock the tone arm by turning the arm lock knob. Preparation Be sure to turn the arm lock knob to the Put a record on the turntable. end as shown in the figure below. -
Page 18: Playing Records
Playing records Preparation 1 Put a record (not included) on the turntable. 2 Take off the stylus cover and release the arm clamp. Press [ ] to turn the unit on. Press [START-STOP]. rpm is automatically selected and The turntable starts revolving. the indicator [33] lights. - Page 19 Auto lift-up function Lift the cue lever and move the tone arm over the record. This function automatically lifts up the tone arm after a record finishes playing. It prevents the last groove from playing back repeatedly. (It does not stop the turntable rotation.) This function requires the following setting to become active.
-
Page 20: Maintenance
Maintenance Care of the parts Moving the unit Thoroughly clean dust off the stylus and Repackage the unit in the packaging it came record. Take off the head shell with the cartridge and Keep the packaging materials after taking out clean the stylus using a soft brush. -
Page 21: Replacing The Cartridge
Replacing the cartridge The cartridge can be replaced with one of your preference. Adjust the overhang. Removing the supplied cartridge Be careful not to touch the stylus tip. Attach the stylus cover ( 18) and loosen the locking nut to remove ... -
Page 22: Troubleshooting Guide
Troubleshooting guide Before requesting service, make the below checks. If you are in doubt about some of the check points, or if the remedies indicated in the chart do not solve the problem, contact your dealer. No power. Is the AC power supply cord plugged in? Plug the AC power supply cord in firmly. -
Page 23: Specifications
Specifications General Tone arm section Power supply AC 120 V, 60 Hz Type Static Balance Power 8.0 W (Power ON) Effective length 230 mm (9-1/16“) consumption Approx. 0.2 W (Power OFF) Overhang 15 mm (19/32“) Dimensions 453 x 169 x 372 mm Tracking error Within 2°... -
Page 24: Limited Warranty (Only For U.s.a.)
Limited Warranty (ONLY FOR U.S.A.) Technics Products – Limited Warranty Limited Warranty Coverage THERE ARE NO EXPRESS WARRANTIES EXCEPT AS LISTED UNDER “LIMITED WARRANTY COVERAGE”. (For USA Only) THE WARRANTOR IS NOT LIABLE FOR INCIDENTAL OR If your product does not work properly because of a defect in materials... -
Page 25: Limited Warranty (Only For Canada)
(SL-1500C) This warranty is given only to the original purchaser, or the person for whom it was purchased as a gift, of a Technics brand product mentioned above sold by an authorized Panasonic dealer in Canada and purchased and used in Canada, which product was not sold “as is”, and which product was delivered to you in new condition in the original packaging. - Page 26 Panasonic Corporation of North America Panasonic Canada Inc. Two Riverfront Plaza, Newark, NJ 07102-5490 5770 Ambler Drive, http://www.panasonic.com Mississauga, Ontario, L4W 2T3 www.panasonic.com TQBM0415 © Panasonic Corporation 2019 S0319AK1...
- Page 27 PSG1905001CE Direct Drive Turntable System SL-1500CEB Model No. SL-1500CEG SL-1500CPP Product Color: (S)...Silver (K)...Black (For EB, EG) TABLE OF CONTENTS PAGE PAGE 1 Safety Precautions----------------------------------------------- 3 6 Disassembly and Assembly Instructions--------------- 19 6.1. Types of Screws------------------------------------------ 20 1.1. General Guidelines---------------------------------------- 3 1.2.
- Page 28 7.3. Automatic Adjustment----------------------------------- 31 8 Block Diagram --------------------------------------------------- 32 9 Wiring Connection Diagram --------------------------------- 33 10 Exploded View and Replacement Parts List ----------- 34 10.1. Electrical Replacement Parts List -------------------- 34 10.2. Mechanical Replacement Part List ------------------ 35 10.3. Cabinet Parts Location 1 ------------------------------- 37 10.4.
-
Page 29: Safety Precautions
1 Safety Precautions 1.1. General Guidelines 1. IMPORTANT SAFETY NOTICE There are special components used in this equipment which are important for safety. These parts are marked by in the Schematic Diagrams, Circuit Board Layout, Exploded Views and Replacement Parts List. It is essential that these critical parts should be replaced with manufacturer’s specified parts to prevent X-RADIATION, shock, fire, or other hazards. -
Page 30: Caution For Ac Cord (For Eb)
1.2. Caution For AC Cord (For EB) A 10-ampere fuse is fitted in this plug. (10 ampere) Figure 1-2 1.3. Safety Parts Information Safety Parts List: There are special components used in this equipment which are important for safety. These parts are marked by in the Schematic Diagrams, Exploded View &... -
Page 31: Warning
2 Warning 2.1. Prevention of Electrostatic Discharge (ESD) to Electrostatically Sensi- tive (ES) Devices Some semiconductor (solid state) devices can be damaged easily by static electricity. Such components commonly are called Elec- trostatically Sensitive (ES) Devices. The following techniques should be used to help reduce the incidence of component damage caused by electrostatic discharge (ESD). - Page 32 Service caution for repair work using Lead Free Solder (PbF) • The lead free solder has to be used when repairing the equipment for which the lead free solder is used. (Definition: The letter of “PbF” is printed on the PCB using the lead free solder.) •...
-
Page 33: Specifications
3 Specifications General Power supply AC 110 V to 240 V, 50/60 Hz (EB/EG) AC 120 V, 60 Hz (PP) Power consumption 8.0 W (Power ON) Approx 0.2 W (Power OFF) Dimensions (W x H x D) 453 mm x 169 mm x 372 mm (17 - ”... -
Page 34: Location Of Controls And Components
4 Location of Controls and Components Front Arm clamp Tone arm Arm rest Locking nut Cue lever Head shell Balance weight Centre spindle Stylus pressure START-STOP button control ON/OFF (power) [ Auxiliary weight mounting location Arm lock Anti- skating control Speed select buttons Arm-height control ring... -
Page 35: Troubleshooting Guide
5 Troubleshooting Guide 5.1. No Power No power AC power supply cord Plug the cord in firmly. plugged in? Is AC INLET AC power supply cord part damaged? damaged? Replace AC CORD. Replace SMPS PCB. (No clicking, Not return back, etc.) Is Power Botton operating normally? - Page 36 No power (from the previous section) Is the correct voltage presented between CK2111 (+24V) and Replace MAIN PCB. CK2113 (GND) on MAIN PCB to confirm Power button operation? CK2111 CK2113 (+22.8 to +25.2 V) (GND) MAIN PCB CK2113 Pin 3 of IC2105 Pin 3 of IC2102 (GND) (+4.6 to +5.0 V)
-
Page 37: Led Blinking
5.2. LED Blinking LED Blinking of LED Blinking of 2 times LED Blinking of 33 LED 45 LED both 33 and 45 LED Abnormal speed or Abnormal FG signal or Abnormal +24 V. reverse rotation Abnormal Hallsensor signal Replace MAIN PCB. Is the pulse signal (0-5V) output between... -
Page 38: No Sound (Large Humming Noise)
5.3. No sound (Large humming noise) 5.3.1. No sound from PHONO OUT Terminal No sound from PHONO OUT Terminal Back of main unit (Large humming noise) PHONO EARTH AUTO LIFT UP Set the external output switch PHONO OUT LINE OUT to "OFF". - Page 39 5.3.2. No sound from LINE OUT Terminal No sound from LINE OUT Terminal Back of main unit (Large humming noise) PHONO EARTH AUTO LIFT UP Set the external output switch PHONO OUT LINE OUT to "ON". External output switch When connecting the external output terminals, do not connect the PHONO earth lead.
- Page 40 No sound from LINE OUT Terminal CK2023:-12V CK2021:+12V (Large humming noise) CK2022:GND (from the previous section) Connector P2102 Is the correct voltage presented at following points? MAIN PCB Normal: CK2021-CK2022(GND) : +11.5 to +12.5V CK2023-CK2022(GND) : -11.5 to -12.5V Disconect Connector P2102. Is the correct voltage presented at following points? Normal: CK2021-CK2022(GND) : +11.5 to +12.5V...
-
Page 41: Turntable Does Not Operate (No Rotation)
5.4. Turntable Does Not Operate (No rotation) Turntable does not operate (No rotation) Does turntable rotate smoothly NO (Not rotated smoothly) when rotated with hand in power OFF condition? Is the turntable correctly YES (rotated) attached? Replace MAIN PCB. Attach the turntable correctly. Does the turntable rotate when the power is turned ON after the connector... -
Page 42: Led No Illumination
5.5. LED No Illumination 5.5.1. LEDs for speed select buttons (both [33] and [45]) --- No Illumination X1001 : 17.6904MHz Strobe light --- No Illumination Is the clock (X1001) for microcomputer (IC1001) oscillated? Replace MAIN PCB. MAIN PCB IC1001 microcomputer Pin 1 (Probe) Pin 2 (GND) X1001 : 17.6904MHz... - Page 43 5.5.2. LED for speed select button ([33] or [45]) --- No Illumination LED for 33 or 45 --- No Illumination Is the clock (X1001) for microcomputer Replace MAIN PCB. (IC1001) oscillated? Note: Refer to “Chap. 5.5.1. LEDs for speed select buttons (both [33] and [45]) --- No Illumination” for check/measurement point.
-
Page 44: Auto Lift-Up Function Does Not Operate Correctly
5.6. Auto lift-up function does not operate correctly Auto lift-up function does not operate correctly Back of main unit Auto lift-up switch AUTO LIFT UP Does the auto lift-up switch on the rear side set to “ON”? LINE OUT Measure distance between the Set the auto lift-up switch to “ON”. -
Page 45: Disassembly And Assembly Instructions
6 Disassembly and Assembly Instructions Caution Note: • This section describes the disassembly and/or assembly procedures for all major printed circuit boards & main compo- nents for the unit. (You may refer to the section of “Main components and P.C.B Locations” as described in the service manual) •... -
Page 46: Types Of Screws
Note for assembly and disassembly • Replace the PCB, etc. from the bottom cover side. • When turning the unit over, be sure to close the dust cover or put a cardboard as a base, and place the unit on a soft thick cloth or cushion, etc, to prevent cracking. -
Page 47: Disassembly Flow Chart
6.2. Disassembly Flow Chart T/T Rubber Mat and Turntable Ass’y Insulator Unit Bottom Chassis Ass’y Main P.C.B. DC Motors Phono Out P.C.B. SMPS P.C.B. Panel P.C.B. Tone Arm All Unit Ass’y, Queuing Knob and Armrest Ass’y 6.3. Main Components and P.C.B. Locations... -
Page 48: Disassembly Of T/T Rubber Mat And Turntable Ass'y
6.4. Disassembly of T/T Rubber Mat 6.5. Disassembly of Insulator Unit and Turntable Ass’y • Refer to “Disassembly of T/T Rubber Mat and Turntable Ass’y”. Step 1 Remove T/T Rubber Mat and Turntable Ass’y as arrow Step 1 Place the Dust Cover Unit on Cloth. shown. -
Page 49: Disassembly Of Dc Motors
6.7. Disassembly of DC Motors Step 4 Detach 3P Wire at connector (P4001) on Phono Out P.C.B.. • Refer to “Disassembly of T/T Rubber Mat and Turntable Step 5 Remove 3 screws. Ass’y”. Step 6 Remove RCA Shield. • Refer to “Disassembly of Insulator Unit”. •... -
Page 50: Disassembly Of Tone Arm All Unit Ass'y, Queuing Knob And Armrest Ass'y
6.9. Disassembly of Tone Arm All Step 7 Remove screw. Step 8 Remove Lock Plate. Unit Ass’y, Queuing Knob and Armrest Ass’y • Refer to “Disassembly of T/T Rubber Mat and Turntable Ass’y”. • Refer to “Disassembly of Insulator Unit”. •... - Page 51 6.9.1. Removing the Queuing Knob Note: When attaching and removing the Armrest Ass’y, use a Driver Bit (No. 2) or small type of Monkey Wrench, etc. to Step 1 Remove the Queuing Knob as arrow shown. remove the screw because of the narrow gap (max 25 mm) of the fixing screw part of the Armrest Ass’y.
-
Page 52: Disassembly Of Main P.c.b
6.10. Disassembly of Main P.C.B. 6.11. Disassembly of SMPS P.C.B. • Refer to “Disassembly of T/T Rubber Mat and Turntable • Refer to “Disassembly of T/T Rubber Mat and Turntable Ass’y”. Ass’y”. • Refer to “Disassembly of Insulator Unit”. • Refer to “Disassembly of Insulator Unit”. •... -
Page 53: Disassembly Of Panel P.c.b
6.12. Disassembly of Panel P.C.B. • Refer to “Disassembly of T/T Rubber Mat and Turntable Ass’y”. • Refer to “Disassembly of Insulator Unit”. • Refer to “Disassembly of Bottom Chassis Ass’y”. Step 1 Remove 5 screws. Step 2 Lift up the Panel P.C.B.. Step 3 Detach 11P Wire at connector (P200) on Panel P.C.B.. -
Page 54: Measurements And Adjustments
7 Measurements and Adjustments Use the Service Mode to adjust this unit (Auto lift-up function Adjustment and Automatic Adjustment). • Auto lift-up function Adjustment:: Perform this adjustment when TONE ARM UNIT, MAIN PCB or MOTOR is replaced. • Automatic Adjustment: Perform this adjustment when the DC Motor Unit or MAIN PCB is replaced. -
Page 55: Auto Lift-Up Function Adjustment
7.2. Auto lift-up function Adjustment This function automatically lifts up the tone arm after a record finishes playing. It prevents the last groove from playing back repeat- edly. Perform this adjustment when TONE ARM UNIT, MAIN PCB or MOTOR is replaced. Measure a detection point of the record end and then set auto lift-up point according to the detection point. - Page 56 4. Set auto lift-up point according to the distance. Distance : 51.5 mm to 56.5 mm ---- position 1 Distance : 57.0 mm to 60.5 mm ---- position 2 To confirm setting 1 or 2, press Speed select button [33] briefly. [33]LED flashing shows which postion is setting for 3 seconds as follows. Position 1 : 1 sec.
-
Page 57: Automatic Adjustment
7.3. Automatic Adjustment This adjustment is automatically performed based on the learning function of the microcomputer. The following items of measurement/adjustment are automatically performed. • Rotation accuracy (The reference voltage value) • Start-up time • FG Wow and flutter • Stop angle •... -
Page 58: Block Diagram
8 Block Diagram TONE ARM SMPS PCB MAIN PCB PHONO OUT PCB RESISTANCE DIVISION JK4001 FUSE 2A P2101 P1730 SOLENOID S4001 P600 PHOTOINTERRUPTER PCB P4001 PHONO FUSE 0.3A -12V P4002 JK4002 MUTE AC IN DC/DC RESISTANCE DIVISION DC MOTOR P1005 P1006 P1002 Motor PWM+ /PWM- Driver MICROCOMPUTER... -
Page 59: Wiring Connection Diagram
9 Wiring Connection Diagram PANEL P.C.B. P200 TO TONE ARM ALL UNIT ASS’Y P1005 MAIN P.C.B. P3101 P2102 P1001 P2101 P1730 SMPS P.C.B. DC MOTORS P4001 WHITE BLUE TO TONE ARM PHONO OUT P.C.B. ALL UNIT ASS’Y BROWN PIPE BLACK TO EARTH WIRE P1700... -
Page 60: Exploded View And Replacement Parts List
10 Exploded View and Replacement Parts List 10.1. Electrical Replacement Parts List Safety Ref. Part No. Part Name & Qty Remarks Description PRINTED CIRCUIT BOARDS PCB1 TNPA7005AB MAIN P.C.B. PRINTED CIRCUIT BOARDS PCB2 TNPA7011AA PANEL P.C.B. PRINTED CIRCUIT BOARDS PCB3 TNPA7014AB PHONO OUT P.C.B. -
Page 61: Mechanical Replacement Part List
10.2. Mechanical Replacement Part List Safety Ref. Part No. Part Name & Qty Remarks Description Safety Ref. Part No. Part Name & Qty Remarks TZTKF01BC3E GROUND PLATE Description WITH TERMINAL CABINET TZTKF02BE7E TOP PANEL ASS'Y EB-K CHASSIS (BLACK) EG-K L6YZYJ000004 DC MOTORS TZTKF01BC2E TOP PANEL ASS'Y... - Page 62 Safety Ref. Part No. Part Name & Qty Remarks Description TPCE30501 PACKING CASE EG-K TPCE30801 PACKING CASE PP-S TPCE30601 PACKING CASE EB-S TPDA34201 TOP CUSHION TPEH964-1 (450X550MM) TPEH965-1 (600X600MM) TPEH966 PROTECTION SHEET (450X750MM) TPEH980 PE BAG (MIRAMAT 600X500) TPH0284 CUSHION UNIT TPDA34211 PICK UP CUSHION ACCESSORIES...
-
Page 63: Cabinet Parts Location
10.3. Cabinet Parts Location 1 21-1 21-2 21-3 (SMPS P.C.B.) (PANEL P.C.B.) (PHONO OUT P.C.B.) (MAIN P.C.B.) SL-1500CEB/EG/PP CABIENT DRAWING... - Page 64 10.4. Cabinet Parts Location 2 SL-1500CEB/EG/PP CABIENT DRAWING...
-
Page 65: Packaging
10.5. Packaging (FOR EB ONLY) (FOR PP ONLY) (FOR EG ONLY) *1 : P7 SL-1500C *1 : P7 FRONT POLYFOAM *1 : P7 REAR POLYFOAM SL-1500CEB/EG/PP *2 : THIS PART IS NOT SUPPLIED. PACKAGING DRAWING MMH1905...
Need help?
Do you have a question about the SL-1500C and is the answer not in the manual?
Questions and answers