Steinbach Comfort 50 Original Owner's Manual
Hide thumbs
Also See for Comfort 50:
- Original owner's manual (485 pages) ,
- Manual (35 pages) ,
- Owner's manual (24 pages)
Table of Contents
Advertisement
Quick Links
Originalbetriebsanleitung / Original owner's manual / Notice originale / Istruzioni originali / Manual original / Původní
návod k používání / Eredeti használati utasítás / Izvirna navodila / Pôvodný návod na použitie / Instrukcja oryginalna /
Instrucțiuni originale / Originalne upute / Оригинална инструкция / Orijinal kullanım talimatları
Filteranlage
Comfort 50
Comfort 75
Filteranlage......................................................... 6
de
Système de filtration......................................... 74
fr
Instalación de filtrado.................................... 144
es
Szűrő berendezés...........................................212
hu
Filtračné zariadenie....................................... 281
sk
Instalație de filtrare........................................ 350
ro
Филтърна система........................................417
bg
Filter system....................................................... 41
en
Impianto filtro................................................. 109
it
Filtrační zařízení............................................. 179
cs
Filtrska naprava..............................................247
sl
Urządzenie filtrujące...................................... 315
pl
Sustav filtriranja..............................................384
hr
Filtre sistemi.................................................... 454
tr
Advertisement
Table of Contents

Related Manuals for Steinbach Comfort 50


Summary of Contents for Steinbach Comfort 50
- Page 1 / Eredeti használati utasítás / Izvirna navodila / Pôvodný návod na použitie / Instrukcja oryginalna / Instrucțiuni originale / Originalne upute / Оригинална инструкция / Orijinal kullanım talimatları Filteranlage Comfort 50 Comfort 75 Filteranlage............6 Filter system............41 Système de filtration.........
-
Page 2: Package Contents/Components
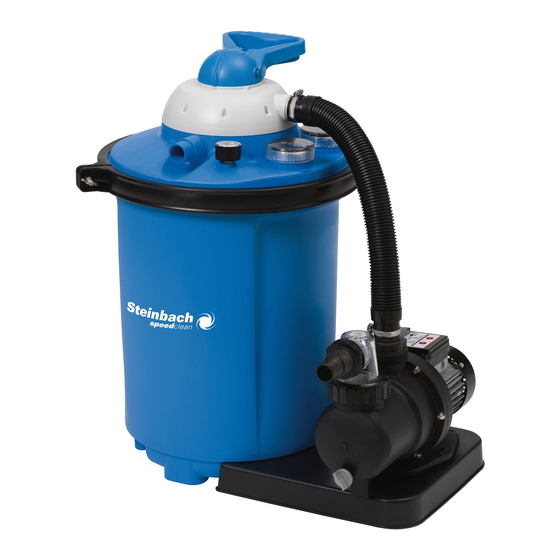
Package contents/components Valve head Pressure hose Locking ring Hose reducer (2x) Filter vessel seal Hose clamp (2x) Locking ring bolt O-ring seal, large (Ø 79 mm) Wing nut O-ring seal, medium (Ø 54 mm) Filter vessel O-ring seal, small (Ø 45 mm) Divider Flat gasket for inlet and outlet hose (2x) Screen... - Page 3 Spirit level Optionally available UV disinfection system for screwing into the valve head...
-
Page 4: Table Of Contents
Contents Overview........................2 Package contents/components..................39 General Information....................43 Explanation of Symbols....................43 Safety.......................... 44 Unpacking and checking the package contents............47 Preparation......................... 48 Initial cleaning of the device..................48 Choosing the location....................48 Filter shaft........................49 Description of the filter system..................49 Modes of the filter system................... - Page 5 Technical data......................65 Comfort 50........................65 Comfort 75........................65 Spare parts........................67 Comfort 50........................67 Comfort 75........................69 Declaration of Conformity................... 70 Disposal........................71...
-
Page 6: General Information
7-way valve and the return line. Use exclusively quartz filter sand that meets the DIN EN 12904 directive as filter medium. Alternatively, use Steinbach Filter Balls. Please refer to the section "Technical data" for the required quantities. -
Page 7: Safety
Products marked with this symbol meet all the applicable Community regulations of the European Economic Area. Never use a sharp knife or other pointed object to open the packaging. You may damage the contents. Safety The following signal words are used in these operating instructions. This signal symbol/word denotes a hazard with an WARNING! average risk level that could lead to death or severe... - Page 8 - Do not open the device; leave repairs to an expert. Contact the service address on the back of the instruction manual for this purpose. All liability and warranty claims will be void in the case of arbitrary repairs, improper connection or wrong operation. - Never touch the power cable with wet hands.
- Page 9 Safety instructions for persons WARNING! Danger to children and persons with reduced physical, sensory or mental capacities (such as partially disabled persons/older persons with reduced physical and mental capacities) or persons lacking experience and knowledge (such as older children). Improper handling of the device can lead to severe injury or damage to the device.
-
Page 10: Unpacking And Checking The Package Contents
- Do not operate the device under the influence of drugs, alcohol or medication or if you are tired. NOTICE! Improper handling of the device can damage the device. - Select a location for the device that is protected from the weather. -
Page 11: Preparation
NOTICE! There is a higher risk of damage to the device if it is stored or transported without the packaging. - Do not dispose of the packaging. - In the case of damage, substitute the packaging with an at least similar box. -
Page 12: Filter Shaft
040100 Modell: 040100 686 mm 385 mm 635 mm 040200 432 mm 635 mm 385 mm Filter shaft A filter shaft is required if the pool is partially or entirely installed in the ground so you can place the pump of the filter system below the pool's water level. - Page 13 The filter medium does not come into contact with the applied chemicals this way. BACKWASH Do not backwash when using Steinbach Filter Balls. If the filter throughput decreases, we recommend washing the filter balls by hand. If necessary, exchange the filter balls.
-
Page 14: How The Timer Works
WASTE NOTICE! Risk of damage! - The pool can only be drained up to the minimum water level at the height of the suction line. Make sure to switch the pump off once this level is reached to prevent the pump from running dry. Use this mode to clean the pool in the case of heavy soiling. -
Page 15: Filtering Time
Example: 6 hours running time 1. Connect the pump's power plug to the power supply. The running time display is lit. 2. Press the timer button several times, until the LED "6" is lit. 3. Press the ON/OFF button to switch on the pump The pump now runs for 6 hours nonstop. -
Page 16: Before First Use
1. Switch the pump off by pulling the power plug. 2. Press and hold down the valve lever the valve head 3. Set the valve lever to the "FILTER" position and release it. In the case of very dirty water, you can select the "WASTE"... -
Page 17: Initial Start-Up Of The Timer
3. Insert the vessel seal . Check for any foreign objects in the groove and for the correct fit of the seal. 4. Align the notch on the outer edge of the valve head with the adjustment lug of the filter vessel. 5. -
Page 18: Preparing The Pump
12. Screw a hose adapter clockwise into the pump outlet until hand-tight. With the Comfort 50 filter system, the hose adapter is installed at the pressure hose. The pump is ready for operation. You can now connect it to the lines. -
Page 19: Mounting The Pump On The Base Plate
Mounting the pump on the base plate 1. Insert the threaded screws of the screw set for fastening the pump from below into the two hexagonal holes in the base plate 2. Place the pump on the base plate so that the threads protrude through the fastening opening in the pump base. - Page 20 Connecting the pressure line Comfort 75 Comfort 50 1. Push one end of the pressure hose onto the pump outlet 2. Place a hose clamp over the pressure hose. Using a Phillips screwdriver PH1 , turn the screw on the hose clamp clockwise to tighten the hose clamp over the connection.
- Page 21 1. Screw the adapter for INTEX pools clockwise onto the prefilter cover 2. Screw one hose end of the suction line clockwise onto the adapter for INTEX pools. The suction line is connected. Connecting the return line Connecting the return line When using push-on hoses.
-
Page 22: Bleeding And Checking The Filter System
1. Screw the INTEX pools return line adapter clockwise onto the return line on the valve head 2. Screw one hose end clockwise onto the adapter of the return line. 3. Connect the second end to the connection on the injection nozzle of the pool. -
Page 23: Operation
Operation CAUTION! Risk of injury! A damaged device or damaged accessories may cause injuries. - Check the device and the accessories (see section "Testing"). Selecting the mode 1. Press the ON/OFF button to switch off the pump 2. Press and hold down the valve lever on the valve head 3. -
Page 24: Care Instructions
Backflushing regenerates the filter and the filter sand. The filter sand must cleaned prior to the initial start-up and in regular intervals while in use. Do not backwash when using Steinbach Filter Balls. If the filter throughput decreases, we recommend washing the filter balls by hand. If necessary, exchange the filter balls. -
Page 25: Exchanging The Filter Medium
Exchanging the filter medium The applied filter medium (quartz filter sand or Steinbach filter balls) should be exchanged every 2 to 3 years, depending on the operating period and the degree of soiling of the device. 1. Press the ON/OFF button to switch off the pump 2. -
Page 26: Winter Storage
5. Remove the battery. 6. Replace the battery. You can find the battery type needed in the "Technical data" section. 7. Replace the cover. 8. Screw in the screws clockwise. The timer battery is exchanged. Winter storage Always store the dried filter medium separately from the filter vessel in the winter. -
Page 27: Test
Test Check the following before each use: - Is there visible damage on the device? - Is there visible damage on the control elements? - Are the accessories in flawless condition? - Are all lines in flawless condition? - Are the ventilation slots unobstructed and clean? Do not start up a damaged device or damaged accessories. -
Page 28: Technical Data
Defective screens in the Check the screens for damage and filter vessel. replace if necessary. If the problem cannot be solved, contact the customer service listed on the last page. Technical data Comfort 50 Model Comfort 50 Item number 040200 Pump model SPS 75-1 T;... - Page 29 Battery for timer Button battery lithium 3V CR 2032 Circulation rate 8,000 l/h Max. pumping height 10.0 m Type of pump Self-priming with prefilter and integrated timer Max. water temperature 35°C Power supply 230 V~ 50/60 Hz Output 550 W Design 7-way valve with manometer Vessel Ø...
-
Page 30: Spare Parts
Spare parts Comfort 50... - Page 31 040818 - Valve lever 040820 - 7-way valve, blue 040828 - Spider gasket for 7-way valve 040816 - Disk (eliminator) 040813 - Locking ring, right 040811 - Bolt 040812 - Locking ring, left 040814 - Filter vessel seal 040810 - Wing nut 040804 - Filter vessel 040806 - Divider 040801 - Screen...
-
Page 32: Comfort 75
Comfort 75... -
Page 33: Declaration Of Conformity
040906 - Screw top with seal 040909 - Manometer 1/8" for Comfort series Declaration of Conformity Steinbach International GmbH hereby declares that the filter pump meets the following directives: - EMC Directive (2014/30/EU) - EN55014-1: 2017; EN55014-2: 2015; EN61000-3-2: 2014; EN61000-3-3: 2013 - AfPS GS 2019:01 PAK - EN 60335-2-41: 2003 / A2:2010;... -
Page 34: Disposal
Disposal Disposing of the packaging Sort the packaging before you dispose of it. Dispose of paperboard and cardboard with the recycled paper service and wrappings with the appropriate collection service. Disposing of used appliances Used appliances do not belong in the household waste! If the device can no longer be used, each consumer is obligated by law to drop off used appliances separate from the household waste at a municipal collection point.