
Related Manuals for Noam NUTV5 Series


Summary of Contents for Noam NUTV5 Series
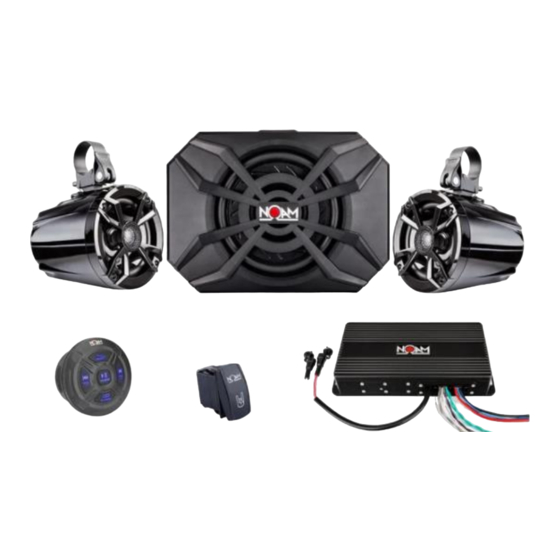
- Page 1 NUTV5 Series OWNER'S MANUAL This manual will explain how to install your unit as a whole. Detailed instructions for each : HS4 amplifier, controller and N5/NSUB speakers can be found separately inside your NUTV5 / NUTV5-S/ NUTV5 QUAD package.
-
Page 2: Table Of Contents
Table of Contents READ BEFORE INSTALLATION ......................4 NUTV5/ NUTV5-S INSTALLATION ....................7 NUTV5 QUAD INSTALLATION ...................... 10 NUTV5-S QUAD INSTALLATION.....................13 WIRING DIAGRAM ........................17 TROUBLSHOOTING ........................18... - Page 3 Our aim is to allow anyone who feels they are up to it, to install a NOAM system by themselves, and save a few bucks on a professional installation.
-
Page 4: Read Before Installation
We desgined our amplifier to be very powerful. If its gains are set too high (clockwise), it may cause irreversible damage to the speaker’s voice coils. Exactly for that reason we pre tuned each and every amplifier to optimaly power the various NUTV5 series audio systems. Under or overpowering your speakers might cause them... - Page 5 If you have any doubts or questions, please contact us at support@noamaudio.com Installation Applications: The NUTV5 series was designed to operate on 12 volts, negative-ground electrical systems. Using this product with positive ground and/or voltages other than 12V systems may damage the product and will void the warranty.
- Page 6 Battery considerations Amplifiers will put an increased load on the vehicle’s battery and charging system. We recommend checking your alternator/stator and battery condition to ensure that the electrical system has enough capacity to handle the increased load of your stereo system. Stock batteries which are in good condition should be able to handle the extra load of the HS4 amplifier without problems, although the life can be reduced slightly.
-
Page 7: Nutv5/ Nutv5-S Installation
NUTV5/ NUTV5-S Two N5 speakers, HS4 amplifier, Bluetooth remote and NSUB subwoofer Installation Procedure/Connections If you feel unsure about installing this system yourself, we strongly advise to have it installed by a qualified technician. Before installation, Disconnect the NEGATIVE battery post connection and secure the disconnected cable to prevent accidental reconnection during installation. - Page 8 HS4 Wire Color Speaker 1 Speaker 2 NSUB Terminals Terminal Terminal Green (Rear left (+)) Red (+) Green & Black (Rear left (-)) Purple (Rear Right (+)) Purple & Black (Rear Right (-)) Black (-) White (Front Left (+)) Red (+) White &...
- Page 9 NUTV5 / NUTV5-S: Amplifier's gains and crossover settings Your HS4 amplifier’s control panel was already preset to optimally power the N5 Full-range speakers you have purchased. Since the HS4 is a very powerful amplifier we suggest keeping these factory settings as is. Under or overpowering your speakers might cause them thermal (burnt voice coil) and/or mechanical failure are not covered by your warranty...
-
Page 10: Nutv5 Quad Installation
NUTV5 QUAD Four N5 speakers, HS4 amplifier and Bluetooth remote Installation Procedure/Connections If you feel unsure about installing this system yourself, we strongly advise to have it installed by a qualified technician. Before installation, Disconnect the NEGATIVE battery post connection and secure the disconnected cable to prevent accidental reconnection during installation. - Page 11 HS4 Wire Color Speaker 1 Speaker 2 Speaker 3 Speaker 4 terminal Terminal Terminal Terminal Green (Rear left (+)) Red (+) Green & Black (Rear left (-)) Black (-) Purple (Rear Right (+)) Red (+) Purple & Black (Rear Right (-) Black (-) White (Front Left (+)) Red (+)
- Page 12 Rear and Front’s crossover are set on FULL (full range) for tower speakers In case you decide that you do need to change any of these settings, please make sure you know what you are doing or have a professional set them for you. The amplifier’s settings and contr ols are located on the front panel beneath a protective gasket cover.
-
Page 13: Nutv5-S Quad Installation
NUTV5-S QUAD Four N5 speakers, NSUB, HS4 amplifier and Bluetooth remote Installation Procedure/Connections If you feel unsure about installing this system yourself, we strongly advise to have it installed by a qualified technician. Before installation, Disconnect the NEGATIVE battery post connection and secure the disconnected cable to prevent accidental reconnection during installation. - Page 14 Front Right + (solid grey) Each pair of RED and Black Y splitters will be connected to a pair of N5 speakers Each speaker has a red wire (Positive +) and a black wire (Negative -) Connect 2 of your N5 speakers to the Front Right channels the following way: Connect 2 of your remaining N5 speakers to the Rear channels the following way: *Make sure you position your speakers in accordance with the amplifier's channel they are connected to.
- Page 15 4. DO NOT be tempted to bridged the HS4 to power two N5 speakers. It will lead to burnt voice coils and will void the warranty. 5. Now that everything is hooked up as it should, let's test your system. Turn your controller on, the amplifier's power indicator light will first turn RED and If all connections are OK, within 2-5 seconds the light will turn BLUE.
- Page 16 In case you decide that you do need to change any of these settings, please make sure you know what you are doing or have a professional set them for you. The amplifier’s settings and controls are located on the front panel beneath a protective gasket cover.
-
Page 17: Wiring Diagram
1 – Wiring diagram Appendix HS4 wire colors scheme Wire # Wire Color Function +12V Black Ground Blue Remote Solid Green Rear left/ Sub (+) Green & Black Rear left (-) Solid Purple Rear Right (+) Purple & Black Rear Right (-) / Sub (-) Solid White Front Left (+) White &... -
Page 18: Troublshooting
Troubleshooting Problem Cause Solution Make sure you connected your Speaker are connected to the wrong output speakers as explained in the manual It just doesn’t sound right Open the gasket and make sure your Control panel settings are wrong gains as crossover settings are set to factory settings Head unit wasn’t turned ON and didn’t Make sure the amplifier’s REM-IN... - Page 19 We want to thank you again for choosing NOAM for your ride. If you have any questions or require any assistance, please do not hesitate to contact us at: support@noamaudio.com – for any technical issue service@noamaudio.com for any non-technical related issue Furthermore, we encourage you to register for our 1-year warranty here: https://www.noamaudio.com/pages/warranty-registration...
Need help?
Do you have a question about the NUTV5 Series and is the answer not in the manual?
Questions and answers