Table of Contents
Advertisement
Advertisement
Table of Contents

Related Manuals for Noam NUTV5

Summary of Contents for Noam NUTV5
- Page 2 At NOAM we plan and design our products so you can install it by yourself 3. If you are using your phone or MP3 player to stream music to your NR controller, tune and save the extra dollars for a professional installation.
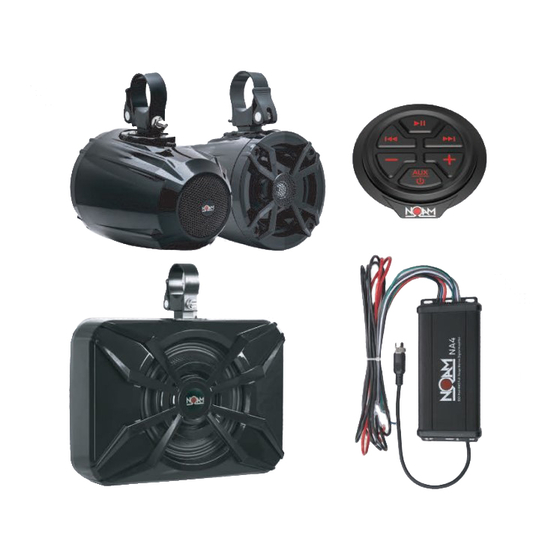
- Page 3 As mentioned, Your NA4 amplifier’s control panel was preset to fit the N5 Full-range The pair of N5 speakers features front 5.25” Water-proof Speaker and 20 mm PEI speakers and NSUB subwoofer supplied with the NUTV5/NUTV5-S stereo system. Unless Diaphragm tweeter. On the back, you’ll find a passive radiator for increased bass experience.
- Page 4 A. Installation Applications: The NA4 amplifier is state of the art Class D amplifier designed to The NUTV5 / NUTV5-S is designed for operation with 12 volts, negative-ground electrical systems. Using this product in systems with positive ground and/or voltages other than 12V may result in damage to the product and will void the warranty.
-
Page 5: Troubleshooting
Refer to section D Power/Protect Indicator: This indicator will light up RED upon initial amp start up. If all connections are OK, within 3-5 seconds the light will turn to BLUE. If a condition of protect (short circuit, over/under voltage) occurs the light will turn to RED until the condition of protect is resolved. TROUBLESHOOTING Problem Cause... - Page 6 This is your default control panel settings: battery post. These settings are true for both NUTV5 and NUTV5-S models. Even if you bought the Blue / Remote Turn-On wire is not required for installing or running your NA4 NUTV5 without the NOAM NSUB, your amplifier’s REAR channels are still set to the amplifier.
- Page 8 Thank you for choosing NOAM N5 Marine speakers. 5.25” Tower speaker 150W/75W RMS Power Handling the creation of these speakers. all while great sound and ease of use are on our mind to lead the way. Power Rating: 150 W MAX /75 W RMS...
- Page 9 Step 3.1: Push the smart handle Step 1: After choosing the mounting band to a closed position to tight the desired location, place the rubber mounting band on to the speaker’s insert around the bar while its open rubber insert mounting base.
- Page 10 Importnt featurs of the N5 Please read before first use Speaker Wiring: The N5 has a long 12 feet wiring, well protected in a wiring sleeve. The Smart Handle - You can cut the wires to a desired length for a clean installation. The smart handle is a first of its kind.
- Page 12 Thank you for choosing NOAM NSUB Marine subwoofer. We invested a lot of thought, time and e ort into the creation of this subwoofer. all while great sound Power Rating: 250 W MAX / 125 W RMS and ease of use are on our mind to lead the way.
- Page 13 M8(13mm) WRENCH mounting band Step 1: After choosing the Step 3.1: Push the smart handle desired location, place the rubber to a closed position to tight the rubber insert insert around the bar while its open mounting band on to the speaker’s part is at the bottom.
- Page 14 Importnt featurs of the NSUB Please read before first use Speaker Wiring: The NSUB has a long 12 feet wiring, well protected in a wiring sleeve. The Smart Handle - You can cut the wires to a desired length for a clean installation. The smart handle is a first of its kind.
- Page 15 Visit us at www.noamaudio.com and sign up to our newsletter to stay tuned. we are always working new exciting products just for you! Bluetooth Receiver www.noamaudio.com...
- Page 16 QC before being packed. The NR controller has a DIN If at any given time you have any plug. This plug can be connected directly to the NOAM NA2 & NA4 questions or concerns, please feel free amplifiers. Remote power triggering: to contact us at: sales@noamaudio.com...
-
Page 17: Aux Input
On phone select (NOAM NR) to pair device. plate Once a device is paired each time this device is seen by the NOAM NR it will outomatically reconnect to the device. If no device is present the NOAM NR outomatically goes into pairing mode and will present itself as discoverable for the next device present. - Page 18 The NR controller has 3 mounting options: 1. Dash or Flush (Rear) mount 2. Surface mount 3. Handlebar mount (not available in the NUTV5 and NUTV5-S units) STEP3: Place the NR on a perfectly flat surface. Dash or Flush (Rear) mount: This method will allow the controller to sit flush to the mounting surface.
Need help?
Do you have a question about the NUTV5 and is the answer not in the manual?
Questions and answers