
Subscribe to Our Youtube Channel
Related Manuals for VIEWEG DA35

Summary of Contents for VIEWEG DA35
- Page 1 DA35 Instruction Manual DA35 AUTOCAN EXTRUDER Controller, valve, wiper plate and braided hose must be ordered separately - 1 -...
- Page 2 DA35 Instruction Manual THIS PAGE INTENTIONALLY LEFT BLANK - 2 -...
-
Page 3: Table Of Contents
DA35 Instruction Manual Table of Contents 1. Warnings …………………………………….……..……… 4 Equipment Misuse Hazard ………….…...……..4 1-1. Pressurized Equipment Hazard ….…………...…… 5 1-2. Moving Parts Hazard ……………………...……...… 5 1-3. 2. Diagram ……………………………..………………….….. 6 3. Installation ……………………………………..………..…. 7 Pump Location …………………………………..…. 7 3-1. -
Page 4: Warnings
Comply with all applicable local, state, and national fire, electrical and safety regulations. Power consumption DA35: 115 - 230 V~, 50-60 Hz, rated input current 20 mA. FUSE: 250V T32mAL (φ5mm x 20mm glass fuse) When replacing the fuse, always use a fuse with the ratings listed above ... -
Page 5: Pressurized Equipment Hazard
DA35 Instruction Manual 1-2. Pressurized Equipment Hazard Spray from the gun/valve, hose leaks, or ruptured components can splash fluid in the eyes or on the skin and can also cause serious injury. Do not stop or deflect leaks with your hand, body, glove or rag. -
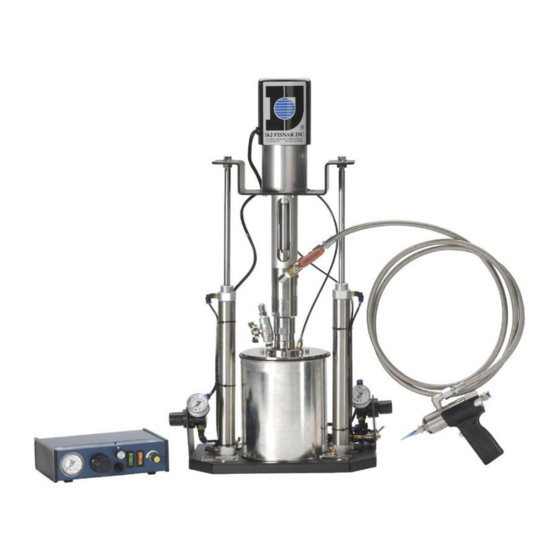
Page 6: Diagram
DA35 Instruction Manual 2. Diagram 16. PUMP BODY 1. FLUID OUTLET VALVE 15. AIR ASSIST TUBE 2. AIR ASSIST INLET 14. MAIN AIR FITTING INLET FITTING 3. WIPER PLATE BLEED 13. RAM AIR VALVE (PRESSURE RELIEF) REGULATOR 12. RAM 4. PUMP... -
Page 7: Installation
DA35 Instruction Manual 3. Installation Please open the windows for air ventilation before you operate the equipment in your working room. This equipment must be set 50cm x 50cm (20” x 20”) away from the wall or table corner. -
Page 8: Operation
DA35 Instruction Manual 4. Operation 4-1. Starting and Adjusting the Ram 4-1-1. Set the ram air regulator (13) to zero. 4-1-2. Close the wiper plate bleed valve (3). 4-1-3. Be sure all air regulators and bleed-type air valves are closed. -
Page 9: Priming The Pump And Pumping Fluid
DA35 Instruction Manual 4-1-14. When the wiper plate enters the can, reduce the setting of the ram air regulator (13). NOTE: If the wiper plate does not enter the can easily, increase the ram pressure by adjusting the ram air regulator (13); once it enters the can, immediately reduce the pressure. -
Page 10: Changing Fluid Cans
DA35 Instruction Manual 4-3. Stopping the Pump and Removing the Fluid Can 4-3-1. To stop the pump, set the pump pressure regulator (4) to zero by turning the pump pressure regulator (4) counterclockwise. 4-3-2. Close the wiper plate bleed valve (3). -
Page 11: Shutdown And Care Of The Pump
DA35 Instruction Manual 4-4. Shutdown and Care of the Pump (Cleaning) 4-4-1. Always flush the pump with a compatible solvent before the fluid dries in the pump. 4-4-2. Set the ram air regulator (13) to zero to make the ram unit move downward. Allow the ram to go to the lowest position. -
Page 12: Troubleshooting
DA35 Instruction Manual 5. Troubleshooting Before servicing this equipment always make sure to relieve the air pressure. Check all possible problems and solutions before disassembling the pump. Problem Cause Solution Clear the air lines; see “Technical Pump does not operate Restricted air line, clogged air passages, or Data”... -
Page 13: Technical Data
DA35 Instruction Manual 6. Technical Data Category Data Maximum fluid output pressure 850 psi (60 bar) Air input pressure range 35-100 psi (2.4-7.0 bar) Maximum fluid viscosity 600,000 cps Volume per stroke (dispenses on down-stroke only) 5.0 cc (0.17 oz.) -
Page 14: Setup Example
DA35 Instruction Manual 7. Setup Example - 14 -... - Page 15 DA35 Instruction Manual THIS PAGE INTENTIONALLY LEFT BLANK - 15 -...
-
Page 16: Warranty
"PREPAID" to the factory during the warranty period of the equipment. This warranty is only valid if the defective DA35 Autocan Extruder is returned as a complete assembly without physical damage. The manufacturer's written liability, as stated herein, cannot be altered or enlarged except by a written statement signed by an officer of the company.
Need help?
Do you have a question about the DA35 and is the answer not in the manual?
Questions and answers