
Related Manuals for Tamerica TPI-4900E

Summary of Contents for Tamerica TPI-4900E
- Page 1 USER MANUAL Tamerica Products, Inc. 9157 Rochester Ave., Rancho Cucamonga, CA 91730 Tel: 800.822.6555 Fax: 909.484.5260 www.tamericaproducts.net...
-
Page 2: Table Of Contents
Contents Safety Precautions …………………………...………………………………………………………………………………. 3 Assembly …………………..…………………….………………………………………………………………………………...4 Operating functions ………………………………………………………………………………….………………………..5 Machine Operation ……………………………………………………………………………………....6 Programming in Manual Mode ………………………………………………………………………………………..7 Programming in Quick Mode ….…...………………………………………………………………………………..8 Programming in Auto Mode …………………………………………………………………………………………...9 Programming in Repeat Mode ………………………………………………………………………………….10-11 Programming in Calculator Mode ………………………………………………………………………………...12 Settings ………………………………………………………………………………………………………………………...14-15 Blade Adjustment …………………………………………………………………………………….………………………..16 Blade Replacement .…………………………………………………………………………………....17 Cutting Stick Adjustment &... -
Page 3: Safety Precautions
IMPORTANT Safety Precautions It will be beneficial to first get yourself acquainted with the features of your TPI-4900E be- fore attempting to use. Keep in mind all operational instructions, tips, and safety reminders every time you use your TPI-4900E to best achieve desirable results. -
Page 4: Assembly
Assembly Instructions Assemble the cabinet stand following the illustration below ensuring all connections are tight and secure. After assembly, position your TPI-4900E on top of the cabinet. This will require 2-3 peo- ple. - 4 -... -
Page 5: Operating Functions
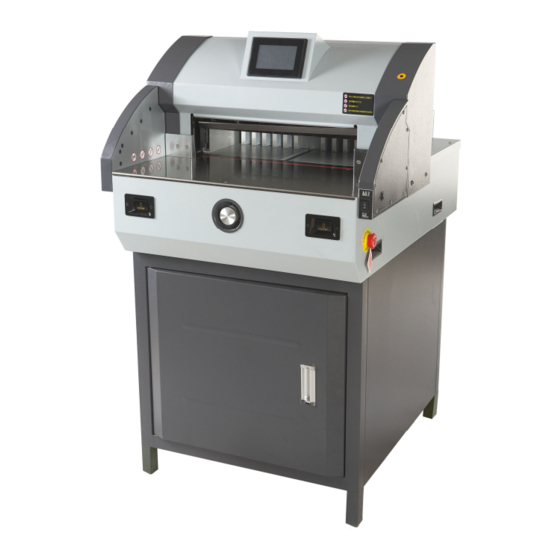
Operating Functions 1 Control Panel 7 Back Gauge 2 Safety Sensor 3 Blade 8 Sensor Bypass 4 Cutting Stick 9 Paper Clamp Up/Down 5 Cut Switch 6 Hand Wheel 10 Emergency Stop 1. Control Panel — use the touch screen to input cut sizes and make other programming adjust ments 2. -
Page 6: Machine Operation
Machine Operation 1. Securely attach the supplied power cord to the back of the machine and plug the other end into a properly grounded power outlet. 2. In order to operate the cutter, make sure the emergency stop switch is in the ON position by moving the knob according to the direction of the arrows (clockwise). -
Page 7: Programming In Manual Mode
2. After inputting the cut size, align your document making sure it is square against the left-hand side of your TPI-4900E and the back gauge. 3. Press the 2 cut buttons simultaneously to operate the blade letting go only after both the blade and the clamp have retracted after the cut cycle. -
Page 8: Programming In Quick Mode
1. First check the position of the back gauge to see if it is at 11.00”. In this example, it is cur- rently at 19.29”. Press the first value to make the TPI-4900E adjust to the correct size then press the 2 cut buttons to operate the blade. -
Page 9: Programming In Auto Mode
Programming in Auto Mode This program is used to store up to 99 projects into the memory bank by doing the following: 1. Press MEMORY or the value next to it then enter the number from 1-99. 2. Enter your cut sizes for each step. In this example, we entered 6 values: 14.50; 11.00; 7.50; 5.00;... -
Page 10: Programming In Repeat Mode
Programming in Repeat Mode This program is used for repeat cuts with minimal inputs required on the TPI-4900E. In this exam- ple, we are cutting 12” x 18” cardstock to make full-bleed business cards. NOTE: These meas- urements are used as an example only and are not meant to be used as a template. - Page 11 Programming in Repeat Mode 5. Press EDIT followed by MEMORY then enter the number 2 to store your values to cut on the short side. 6. Trim your document in order to be able to get 2 rows again keeping in mind the cutter cannot be programmed to cut smaller than 1.57”.
- Page 12 This program can be used to directly add or subtract any number to the actual/real size of the TPI-4900E and then trim the document at that measurement. 1. In this example, we are cutting the long side of a legal size document 8.5” x 14” to turn it to letter size 8.5”...
-
Page 13: Settings
Settings The Settings tab can be used to review fixed, factory settings as well as adjust some of them. 1. Press Machine Info to view basic information such as Manufacturing Date as well as the TPI- 4900E’s serial number. - 13 -... - Page 14 Settings 2. Press the Status key to monitor the current state of the TPI-4900E’s sensors and operating func- tions. If any of the sensors on the left column are OFF, this will indicate that either the specific sensor is faulty or it is turned off like in the case of the Safety Sensors that have a switch assigned to it.
- Page 15 Settings 4. The TPI-4900E offers two measurement options — inches or mm. Since the U.S. uses the Impe- rial System of measurement, the cutter will default to “Inch” which will be indicated by way of the illuminated key until you change your measurement selection. NOTE: You will have to re- start the cutter when changing the unit measurement via the main switch or emergency stop switch to effect the change.
-
Page 16: Blade Adjustment
Blade Adjustment The TPI-4900E is designed to cut paper and the lifespan of the blade will typically last up to 3,000 cuts. This will vary especially if the cutter is used to cut thick stacks of paper or pasteboard all the time which will dull out the blade quickly. -
Page 17: Blade Replacement
Blade Replacement 1. Use a Phillips head screwdriver to remove the screws that hold the upper cover in order to ac- cess the cutting blade. 2. Remove the 2 screws (M6 fasten screws) where the Blade Holders will go on the blade carrier. 3. -
Page 18: Cutting Stick Adjustment & Replacement
Maintenance & Care 1. Designate a specific time to lubricate and clean your TPI-4900E which should be done once every month. If you schedule it with regularity, the chances of you forgetting to do so will greatly be minimized. - Page 19 Lubricate these parts on a regular basis to help ensure hassle-free use of the cutter. Use only Lithium grease for bearings and MOLY grease for parts that rub each other. - 19 -...
-
Page 20: Schematics
Schematics - 20 -... -
Page 21: Troubleshooting
Troubleshooting Error Symptom Solution Adjust the angle of the back gauge Uneven or inaccurate cut Cutting inconsistent versus the cutting mark Align or replace sensor Blade will not retract or All other functions will not work Replace main board operate erratically Blank display or errone- Check all connections on both the main board... - Page 22 Duration: The warranty period for the TPI-4900E is 1 year from the date of original delivery of the product after purchase from an authorized dealer or reseller of Tamerica and it covers parts, labor and accompanying accessory items. The origi- nal delivery date shall be determined from the delivery receipt and/or tracking information to prove purchase and receipt of this product.
- Page 23 Verification of the claimed defect by Tamerica Products authorized personnel will be required prior to issuance of proper credit, exchange, or repair. Kindly contact your dealer for loaner machines for this is something that we do not provide.
- Page 24 Adjustable blade depth • Protective metal back cover • 5” touch screen. • Technical Details Model : TPI-4900E Max. Cutting Length : 490mm (19.28”) Max. Cutting Thickness : 80mm (3.14”) Table Depth : 490mm(19.28”) Minimum Cutting Size : 40mm (1.57”)
- Page 25 MANUAL DE USUARIO Tamerica Products, Inc. 9157 Rochester Ave., Rancho Cucamonga, CA 91730 Tel: 800.822.6555 Fax: 909.484.5260 www.tamericaproducts.net...
- Page 26 Contenido Precauciones de seguridad …………………………………………………………………………. 3 Montaje ……………..………………………………………………………………………………………..4 Funciones operativas ………………………………………………………………………….……...5 Funcionamiento de la guillotina………………………………………………………………..6 Programación en Manual ………………………………………………………………………...7 Programación en Quick ….…...…………………………………………….………………...8 Programación en Auto ……………………………………………………………………………..9 Programación en Repeat ……………………………………………………………………..10-11 Programación en Calc …………………………………………………………………………..12 Programación en Settings …………………………………………………………………….13-14 Ajuste de cuchilla …………………………………………………………………………………….…..15 Reemplazo de cuchilla .……………………………………………………………………………..16 Ajuste y reemplazo de regleta ……………..…………………………………………………...17 Mantenimiento y cuidado ………………………………………………………………………...17-18...
-
Page 27: Precauciones De Seguridad
Precauciones de seguridad importantes Será beneficioso familiarizarse primero con las características de su TPI4900E antes de co- menzar el uso. Tenga en cuenta todas las instrucciones de operación, consejos y recordato- rios de seguridad cada vez que use su TPI4900E para obtener los mejores resultados. Esta guillotina de papel está... -
Page 28: Montaje
Montaje Ensamble el gabinete siguiendo la ilustración a continuación, asegurándose de que todos los en- sambles estén correctos y seguros. Coloque la guillotina en la parte superior del gabinete después del ensamblaje, tomando en cuenta que es bastante pesada y requerirá de 2-4 personas para le- vantarla. -
Page 29: Funciones Operativas
Funciones Operativas 1 Panel de control 2 Sensores de 7 Guía de papel seguridad 3 Cuchilla 8 Derivación de sensor 4 Regleta 9 Interruptor de pison 5 Botón de corte 6 Perilla de ajuste fino 10 Botón de emergencia 1. Panel de control - Use la pantalla táctil para ingresar tamaños de corte y realizar otros ajustes de programación. -
Page 30: Funcionamiento De La Guillotina
Funcionamiento de la guillotina 1. Conecte firmemente el cable de alimentación incluido a la parte posterior de la máquina y co- necte el otro extremo a una toma de corriente con conexión a tierra adecuada. 2. Para operar la guillotina, asegúrese de que el botón de emergencia esté en la posición ON (ENCENDIDO) moviendo la perilla según la dirección de las flechas (En el sentido de las agujas del reloj). -
Page 31: Programación En Manual
Programación en manual Al encender, la guillotina se establecerá de manera predeterminada en medida 19.29". Para pro- gramar manualmente un tamaño de corte, simplemente haga lo siguiente: Ingrese el valor en el teclado y luego presione “OK”. El tamaño ingresado se mostrara en “Input Size”... -
Page 32: Programación En Quick
Programación en Quick La función “Quick” se utiliza para cortar convenientemente un documento grande a tamaños de papel populares en USA., Como Carta (8.5 "x11"), Legal (8.5 "x 14"), Tabloide (11 "x 17") y Libro mayor-LEDGER (17 "x 11 ”) Sin necesidad de ingresar ningún valor. Por ejemplo, si desea recortar su documento a tamaño Carta, simplemente presione la tecla designada. -
Page 33: Programación En Auto
Programación en Auto Programación en Auto La función “Auto” se utiliza para almacenar hasta 99 proyectos en el banco de memoria haciendo lo siguiente: 1) Presione “Memory” y el valor al lado, luego ingrese un número de 1-99. 2) Ingrese sus tamaños de corte para sus cortes deseados. En este ejemplo, ingresamos 6 valores: 14.50;... -
Page 34: Programación En Repeat
Programación en Repeat La función “Repeat” se utiliza para hacer cortes repetidos sin tener que ingresar muchos valores iguales. En este ejemplo, estamos cortando tarjetas de 12 "x 18" para hacer tarjetas de presenta- ción “full bleed”. NOTA: Estas medidas se usan solo como ejemplo y no están diseñadas para ser usadas como plantilla. - Page 35 Programación en Auto (Continuado) (... continuado de la página anterior) 6) Presione “Edit” seguido de “Memory”, luego ingrese el número 2 para almacenar sus valores para comenzar el corte en el lado corto. 7) Recorte su documento para poder obtener 2 filas nuevamente, tomando en cuenta que la gui- llotina no puede programarse para cortar menor que 1.57".
-
Page 36: Programación En Calc
Programación en Calculator 14.00 – 3.00 La función “Calc” se utiliza para agregar o restar directamente cualquier número al tamaño re- al / real de la guillotina y luego recortar el documento en ese tamaño. 1) En este ejemplo, estamos cortando el lado largo de un documento de tamaño legal de 8.5 "x 14"... -
Page 37: Programación En Settings
Programación en Settings La función “Settings” se utiliza para revisar datos de la guillotina y ofrece ajustes/soluciones téc- nicas. 1) La TPI4900E ofrece dos opciones de medida (Inch-pulgadas o mm). En la pagina principal de settings, usted notara los siguientes dos cuadros de medida. Como el manual esta explicado en pulgadas, tenemos “inch”... - Page 38 4) Options y Troubleshooting— Al hacer clic en estas opciones, el programa le solicitara una cla- ve especial. La clave solo la maneja el departamento Tecnico de Tamerica Products o un Tecnico de nuestro distribuidor. Esto es debido a que estas opciones ofrecen cambios/soluciones técnicas avanzadas que al no usarse correctamente, pueden dañar la guillotina.
-
Page 39: Ajuste De Cuchilla
Ajuste de cuchilla La guillotina está diseñada para cortar papel y la vida útil de la cuchilla generalmente durará has- ta 3,000 cortes. Esto variará especialmente si la guillotina se usa para cortar pilas gruesas de pa- pel o cartón todo el tiempo, que es lo que desgasta la cuchilla rápidamente. Afilar la cuchilla pro- fesionalmente en un taller de maquinaria local es aceptable, pero se recomienda tener una cuchi- lla de repuesto original instalada en la guillotina en caso de que comience a desarrollar problemas de calidad y precisión de corte. -
Page 40: Reemplazo De Cuchilla
Reemplazo de cuchilla 1) Utilice un destornillador Phillips para quitar los tornillos que sujetan la cubierta superior para acceder a la cuchilla de corte. 2) Retire los 2 tornillos (métricos de 6mm) donde se colocarán los soportes de la cuchilla. 3) Coloque los soportes de la cuchilla y apriételos firmemente a mano. -
Page 41: Ajuste Y Reemplazo De Regleta
Ajuste y reemplazo de regleta Siga las instrucciones a continuación sobre cómo girar la regleta. Tome en cuenta que es necesario girar la regleta cuando la marca de corte o la hendidura sean demasiado profundas. De lo contra- rio, su guillotina puede tener problemas de calidad de corte incluso con una cuchilla afilada insta- lada. - Page 42 Mantenimiento y cuidado (continuado) Lubrique estas piezas regularmente para ayudar a garantizar un uso sin problemas en su guillotina. - 18 -...
-
Page 43: Diagrama Esquemático
Diagrama esquemático - 19 -... -
Page 44: Resolución De Problemas
Resolución de problemas Error Síntoma Solución Ajuste el ángulo de la guía de papel Corte desigual o inexacto Corte inconsistente contra la marca de corte Todas las demás funciones no funcio- Alinee o reemplace el sensor / La cuchilla no se retrae o Reemplace la tarjeta principal opera erráticamente Todas las demás funciones no funcio-... - Page 45 Duración: El período de garantía para el TPI-4900E es de 1 año a partir de la fecha de entrega original del producto después de la compra en un distribuidor o revendedor autorizado de Tamerica y cubre piezas, mano de obra y los accesorios que lo acompañan.
-
Page 46: Garantía
Esta garantía limitada expresa la obligación total de TAMERICA PRODUCTS, INC. A menos que lo prohíba la ley, ni esta garantía ni ninguna otra garantía expresa o implícita, incluidas las garantías implícitas de comercialización, se exten- derán durante este período de garantía. - Page 47 Características Pison automático con motor separado. • Sistema de papel de guía totalmente programable con rueda de ajuste fino • Línea de corte láser • Cuchilla retráctil automática • Profundidad de la cuchilla ajustable • Cubierta protectora de metal. • Pantalla táctil de 5 ".
Need help?
Do you have a question about the TPI-4900E and is the answer not in the manual?
Questions and answers