Table of Contents
Advertisement
Quick Links
Advertisement
Table of Contents

Related Manuals for Buchi Rotavapor R-250 Pro

Summary of Contents for Buchi Rotavapor R-250 Pro
- Page 1 Rotavapor® R-250 Pro Operation Manual...
- Page 2 CH-9230 Flawil 1 E-Mail: quality@buchi.com BUCHI reserves the right to make changes to the manual as deemed necessary in the light of experience, especially with respect to structure, illustrations and technical details. This manual is copyrighted. Information from it may neither be reproduced, distributed, or used for competitive purposes, nor made available to third parties.
-
Page 3: Table Of Contents
Büchi Labortechnik AG Table of contents Table of contents About this document...................... 6 Mark-ups and symbols ...................... 6 Trademarks ........................... 6 Connected devices ........................ 6 Safety............................ 7 Proper use .......................... 7 Use other than intended ...................... 7 Staff qualification ........................ 7 Personal protective equipment .................... 8 Warning notices in this document.................. 8 Warning symbols ........................ 9 Residual risks ........................ 9 2.7.1 Dangerous vapors .................... 10... - Page 4 5.5.1 Installing the vacuum pump holder (option).............. 29 5.5.2 Installing a BUCHI vacuum pump (option).............. 29 5.5.3 Installing a non BUCHI vacuum pump (option)............ 30 5.5.4 Installing the vacuum connection glass assembly R (option) ........ 30 5.5.5 Installing the vacuum connection glass assembly D (option) ........ 32 Installing the cooling water supply..................
- Page 5 Büchi Labortechnik AG Table of contents Cleaning and servicing ..................... 49 Regular maintenance work.................... 49 Replacing the vacuum seal .................... 49 Replacing the evaporation flask seal................... 50 Installing the vapor duct....................... 50 Setting max. heating bath temperature ................ 51 Help with faults ........................ 52 10.1 Troubleshooting........................ 52 10.2 Error messages ........................ 52...
-
Page 6: About This Document
BÜCHI Labortechnik AG accepts no liability for damage, faults and malfunctions resulting from not following this operation manual. If you have any questions after reading this operation manual: Contact BÜCHI Labortechnik AG Customer Service. https://www.buchi.com/contact Mark-ups and symbols NOTE This symbol draws attention to useful and important information. -
Page 7: Safety
— Use of the instrument with solvents containing peroxides. — Use of the instrument in overpressure situations. — Use of the instrument with other than original BUCHI glassware. — Use of the instrument with explosive gas mixtures. — The use of the instrument for drying hard, brittle substances that could damage the glassware. -
Page 8: Personal Protective Equipment
— Safety-related incidents that occur while using the device should be reported to the manufacturer (quality@buchi.com). BUCHI service technicians Service technicians authorized by BUCHI have attended special training courses and are authorized by BÜCHI Labortechnik AG to carry out special servicing and repair measures. -
Page 9: Warning Symbols
Büchi Labortechnik AG Safety | 2 Warning symbols The following warning symbols are displayed in this operation manual or on the instrument. Symbol Meaning General warning Device damage Dangerous electrical voltage Hot surface Hand injuries Fig. 1: Location of the warning symbols on the instrument Residual risks The device has been developed and manufactured using the latest technological advances. -
Page 10: Dangerous Vapors
Büchi Labortechnik AG 2 | Safety 2.7.1 Dangerous vapors Distillation can produce dangerous vapors that are capable of causing life- threatening toxic effects. Do not inhale any vapors produced during distillation. Ensure that vapors are removed by a suitable fume hood. Only use the device in well ventilated areas. -
Page 11: Modifications
Unauthorized modifications can effect safety and lead to accidents. Use only genuine BUCHI accessories, spare parts and consumables. Carry out technical changes only with prior written approval from BUCHI. Only allow changes to be made by BUCHI service technicians. BUCHI accepts no liability for damage, faults and malfunctions resulting from unauthorized modifications. -
Page 12: Product Description
Büchi Labortechnik AG 3 | Product description Product description Description of function The instrument is a rotary evaporator with the aid of which single-stage distillation can be carried out quickly without unduly stressing the product. The basis of the process is the evaporation and condensing of solvents in a rotating evaporating flask under vacuum. -
Page 13: Configuration
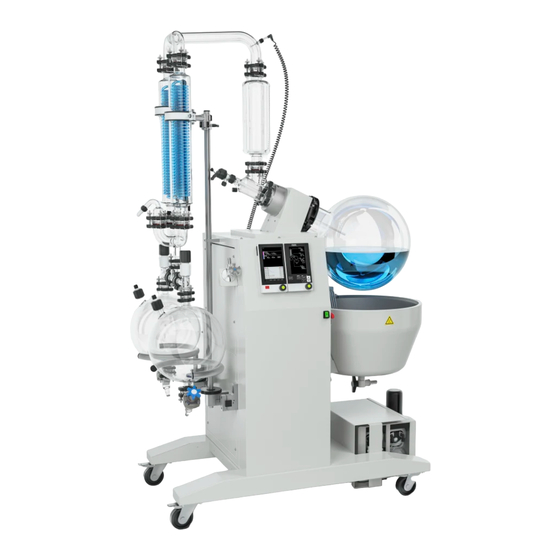
Büchi Labortechnik AG Product description | 3 Configuration 3.2.1 Front view Fig. 2: Front view (example glassware) U-tube Distribution piece Gear box Snap flange coupling Evaporation flask Heating bath Castor wheels Holder vacuum pump (option) Drain valve heating bath 10 Heating bath lift 11 Hex key for snap flange coupling 12 On/Off master switch 13 Drain valve receiver... -
Page 14: Rear View
Büchi Labortechnik AG 3 | Product description 3.2.2 Rear view Fig. 3: Rear view (example glassware) Expansion vessel Vapor temperature sensor Condenser Support rod Yoke Receiver aeration valve Cooling water flow sensor Vacuum valve (option) (option) Aeration valve 10 Heating bath replenishment 11 Connections on the rear side. -
Page 15: Connections On The Rear Side
BUCHI standard communication port (COM)(option for BUCHI vacuum (marked R /SERVE INPUT) pump) (marked COM) BUCHI standard communication port Cooling water valve (COM) (option for BUCHI vacuum (marked CW VALVE) pump) (marked COM) Foam sensor 10 Power supply (marked FOAM DET.) -
Page 16: Scope Of Delivery
Büchi Labortechnik AG 3 | Product description 13 Vacuum valve (non BUCHI vacuum 14 Aeration valve pump only) (marked AERATE) (marked VACUUM VALVE) 15 Cooling water flow sensor 16 Level sensor 1 (marked CW FLOW) (marked LEVEL 1) 17 Vapor temperature sensor 18 Type plate (marked VAPOR TEMP.) -
Page 17: Technical Data
Büchi Labortechnik AG Product description | 3 Technical data 3.5.1 Rotavapor® R-250Pro Dimensions (W x D x H) 1420 x 850 x 1550 mm (without glass) Dimensions (W x D x H) 1450 x 850 x 2300 mm (with glass) Minimum clearance on all sides 400 mm Weight... -
Page 18: Ambient Conditions
Büchi Labortechnik AG 3 | Product description 3.5.2 Ambient conditions For indoor use only. Max. altitude above sea level 2000 m Ambient and storage temperature 5 ‒ 40 °C Maximum relative humidity 80% for temperatures up to 31 °C decreasing linearly to 50 % relative hu- midity at 40 °C 3.5.3 Materials... -
Page 19: Transport And Storage
Büchi Labortechnik AG Transport and storage | 4 Transport and storage Storage Remove the heating bath medium. Remove the cooling water from the condensers. Make sure that the ambient conditions obey the technical data. See Chapter 3.5 "Technical data", page 17. Store the instrument in its original packaging. After storage, check the instrument, all glass components, seals and tubing for damage and replace if necessary. - Page 20 Büchi Labortechnik AG 4 | Transport and storage Loosen the transportation lock screws. Remove the transportation lock. 20/78 Operation Manual Rotavapor® R-250 Pro...
-
Page 21: Installation
Büchi Labortechnik AG Installation | 5 Installation Before installation NOTICE Instrument damage due to switching it on too early. Switching on the instrument too early after transportation can cause damage. Climatize the instrument after transportation. Establishing electrical connections WARNING Death or serious burns by electric current. Have the installation carried out by an electrician or a person with similar expert knowledge. -
Page 22: Installing The Glassware
Büchi Labortechnik AG 5 | Installation Secure the support rod in place with a headless screw. Installing the glassware NOTE Glassware is delivered as per the purchase order, order confirmation and delivery note. 5.4.1 Glassware assembling instructions Assembling instruction EasyClamp DN40 Attach the two glass pieces. - Page 23 Büchi Labortechnik AG Installation | 5 Secure the connection in place with the easy clamp. Assembling instruction glass bracket Attach the glass bracket to the condenser. Assembling instruction bracket Attach the expansion vessel to the distribution piece. Secure the expansion vessel in place with the easy clamp.
-
Page 24: Installing The Inlet Valve (Example)
Büchi Labortechnik AG 5 | Installation Assembling instruction receiving vessel support Put the receiving vessel support on the instrument. Assembling instruction shut off tap NOTICE! Tighten the shut off tap with your hands. Attach the shut off tap to the glassware using the white handle. -
Page 25: Installing The Glass Assembly R (Option)
Büchi Labortechnik AG Installation | 5 5.4.4 Installing the glass assembly R (option) Installation order: Fig. 6: Installation order Condenser R See Chapter "Assembling instruction See Chapter "Assembling instruction glass bracket", page 23 bracket", page 23 See Chapter "Assembling instruction See Chapter "Assembling instruction glass bracket", page 23 bracket", page 23 See Chapter "Assembling instruction... -
Page 26: Installing The Glass Assembly D (Option)
Büchi Labortechnik AG 5 | Installation 5.4.5 Installing the glass assembly D (option) Installation order: Fig. 7: Installation order glass assembly D See Chapter "Assembling instruction See Chapter "Assembling instruction EasyClamp DN40", page 22 EasyClamp DN40", page 22 See Chapter "Assembling instruction See Chapter "Assembling instruction glass bracket", page 23 glass bracket", page 23 See Chapter "Assembling instruction... -
Page 27: Installing The Double Receiver
Büchi Labortechnik AG Installation | 5 5.4.6 Installing the double receiver Installation order: Fig. 8: Installation order double receiver See Chapter "Assembling instruction See Chapter "Assembling instruction receiving vessel support", page 24 receiving vessel support", page 24 See Chapter "Assembling instruction See Chapter "Assembling instruction EasyClamp DN25", page 22 EasyClamp DN25", page 22 See Chapter "Assembling instruction... -
Page 28: Installing The Single Receiver (Option)
Büchi Labortechnik AG 5 | Installation 5.4.7 Installing the single receiver (option) Installation order Fig. 9: Installation order single receiver See Chapter "Assembling instruction See Chapter "Assembling instruction receiving vessel support", page 24 EasyClamp DN25", page 22 See Chapter "Assembling instruction See Chapter "Assembling instruction shut off tap", page 24 EasyClamp DN25", page 22 5.4.8... -
Page 29: Installing The Vacuum Supply
Attach the rear screws. 5.5.2 Installing a BUCHI vacuum pump (option) Precondition: R The BUCHI vacuum pump is prepared. See related documentation If possible, locate the vacuum pump at the vacuum pump location of the instrument. See Chapter 3.2 "Configuration", page 13 Attach the vacuum hose to the Aeration valve. -
Page 30: Installing A Non Buchi Vacuum Pump (Option)
Büchi Labortechnik AG 5 | Installation 5.5.3 Installing a non BUCHI vacuum pump (option) Precondition: R The vacuum meets the technical specifications. See Chapter 3.5 "Technical data", page 17 If a vacuum pump is used, prepare the vacuum pump. See related documentation. - Page 31 Büchi Labortechnik AG Installation | 5 Attach the vacuum hose to Y piece Attach the condenser vacuum hoses to the Y piece. Attach the vacuum hoses to the condensers. Attach the hose barb to the condenser. Attach the vacuum hose for the VacuBox onto the condenser Attach the hose barb to the VacuBox.
-
Page 32: Installing The Vacuum Connection Glass Assembly D (Option)
Büchi Labortechnik AG 5 | Installation Attach the vacuum hose to the VacuBox. 5.5.5 Installing the vacuum connection glass assembly D (option) Attach the vacuum hoes to the Aeration valve. Attach the vacuum hose to the condenser. Attach the hose barb to the condenser. Attach the vacuum hose to the condenser. -
Page 33: Installing The Cooling Water Supply
Büchi Labortechnik AG Installation | 5 Installing the cooling water supply 5.6.1 Installing the cooling water supply with a recirculating chiller (option) Precondition: R The recirculating chiller is prepared. See related documentation. R The inlet water hose for the condenser is prepared. -
Page 34: Installing The Cooling Water Supply Without A Recirculating Chiller (Option)
Büchi Labortechnik AG 5 | Installation Attach the outlet condenser hoses to the Y- piece. Secure the hoses in place with a hose clamp. Attach the outlet water supply hose to the chiller. 5.6.2 Installing the cooling water supply without a recirculating chiller (option) Precondition: R The water supply meets the technical... -
Page 35: Heating Bath Installations
Büchi Labortechnik AG Installation | 5 Attach the hose to the outlet connection. Attach the outlet water supply hose to the Y- piece. Attach the outlet condenser hoses to the Y- piece. Secure the hoses in place with a hose clamp. Put the other end of the hose in a sink. -
Page 36: Installing The Heating Bath Replenishment (Option)
Büchi Labortechnik AG 5 | Installation 5.7.2 Installing the heating bath replenishment (option) NOTE If oil is used as heating medium do not install the heating bath replenishment. Attach the water supply to the heating bath replenishment. Secure the hose in place with a hose clamp. 5.7.3 Installing the drain connection at the heating bath NOTE... -
Page 37: Installing The Sensors
Büchi Labortechnik AG Installation | 5 Installing the sensors NOTE Glassware is delivered as per the purchase order, order confirmation and delivery note. 5.8.1 Installing the vapor temperature sensor According to the configuration there are two locations where the sensor can be installed: —... -
Page 38: Installing The Foam Sensor (Option)
Büchi Labortechnik AG 5 | Installation Install the cooling water temperature sensor in the cooling water outlet of the condenser. Connect the sensor cable to the related connection on the instrument. See Chapter 3.2 "Configuration", page 13 5.8.3 Installing the foam sensor (option) Precondition: R The distribution piece has the option to install a foam sensor. -
Page 39: Installing The Level Sensor (Option)
Büchi Labortechnik AG Installation | 5 Connect the sensor cable to the related connection on the instrument. See Chapter 3.2 "Configuration", page 13 Activate the sensor in the sensor menu. See Chapter 5.8.6 "Setting up the sensors", page 39 Calibrate the cooling water flow sensor. See Chapter 10.5 "Adjusting the cooling water flow sensor", page 57 5.8.5... -
Page 40: Preparing The Instrument For Remote Control (Option)
Büchi Labortechnik AG 5 | Installation Precondition: R Make sure that the sensors you wish to active are connected to the instrument. Push and hold the up button. Set the On /off master switch to On. ð The instrument shows the status for the cooling water flow sensor. - Page 41 Büchi Labortechnik AG Installation | 5 Install the cover in place. Connect the connection cable to the BUCHI standard communication port (COM) on the interface. Connect the other end of the connection cable to the BUCHI standard communication port (COM) on the instrument. See Chapter 3.2 "Configuration", page 13...
-
Page 42: Layout Of The Interface
Büchi Labortechnik AG 6 | Layout of the interface Layout of the interface Fig. 10: Interface Cooling temperature Vapor temperature Bath temperature According to the current operation: — Rotation speed — Error code UP button Down button According to the current operation: According to the current operation: —... -
Page 43: Preparing For An Evaporation
Büchi Labortechnik AG Preparing for an evaporation | 7 Preparing for an evaporation Installing and removing the evaporation flask NOTE Removing is done in reverse sequence. Move the heating bath in a lower position. Put the evaporation flask and the flask handler (option) an the instrument. -
Page 44: Operating The Inlet Valve
Büchi Labortechnik AG 7 | Preparing for an evaporation Remove the flask handler. Operating the inlet valve Attach the solvent hose to the inlet valve. Put the solvent hose into the solvent. Set the flow rate. Preparing the heating bath CAUTION Risk of skin burns from oil splashes Do not put water into hot oil. -
Page 45: Draining Distillate
Büchi Labortechnik AG Preparing for an evaporation | 7 Make sure, that the drain valve is closed. Fill heating medium until the max. filling level. Max. filling level see Chapter 3.2 "Configuration", page 13 Draining distillate Precondition: R A distillate collection is available. Close the shut off tap. - Page 46 Büchi Labortechnik AG 7 | Preparing for an evaporation Secure the splash protection in place. 46/78 Operation Manual Rotavapor® R-250 Pro...
-
Page 47: Carrying Out An Evaporation
Büchi Labortechnik AG Carrying out an evaporation | 8 Carrying out an evaporation NOTE Using the control system. See operation manual "Interface I-300 Pro ". Preparing the instrument Precondition: R All commissioning operations have been completed. See Chapter 5 "Installation", page 21 R Make sure that no defective sealings or glass parts are used. -
Page 48: Shutting Down The Instrument
Büchi Labortechnik AG 8 | Carrying out an evaporation Shutting down the instrument Switch the On/Off master switch to off. 48/78 Operation Manual Rotavapor® R-250 Pro... -
Page 49: Cleaning And Servicing
Any servicing and repair work which involves opening up the casing may only be carried out by BUCHI service technicians. Use only genuine BUCHI consumables and spare parts in order to ensure correct operation of the device and preserve the warranty. -
Page 50: Replacing The Evaporation Flask Seal
Büchi Labortechnik AG 9 | Cleaning and servicing Remove the sealing holder from the instrument. REmove the sealing from th sealing holder. Replacing the evaporation flask seal NOTE Installing is done in reverse sequence. Remove the snap flange coupling with the provided tool. -
Page 51: Setting Max. Heating Bath Temperature
Büchi Labortechnik AG Cleaning and servicing | 9 Apply a light force and turn the vapor duct until the shaft starts turning. Setting max. heating bath temperature Push and hold the SET button. Set the On /off master switch to On. Select the maximum heating bath temperature. -
Page 52: Help With Faults
The display is black No power. Establish an electrical connection. Check the fuse. Display lights only in Display unit is defect. Contact BUCHI Customer part Service. Heating bath does Temperature is set too low. Raise the temperature. not heat up Heater is switched off. - Page 53 Wait until the heating bath temperature is less than 40 °C. The bath temperature sen- Start the instrument again. sor is defective. Contact BUCHI Customer Service. The lift motor is defective. Switch off the instrument. Check for causes of the The lift motor is blocked.
- Page 54 Short circuit at the vacuum Disconnect the cooling water valve. valve. Start the instrument again. Replace the cooling water valve. Contact BUCHI Customer Service. The Cooling medium flow is Increase the cooling water insufficient. flow. Press the Aerate button. Adjust the cooling water flow sensor.
- Page 55 Disconnect the cooling water water temperature sensor. temperature sensor. Start the instrument again. Replace the cooling water temperature sensor. Contact BUCHI Customer Service. The mechanical safety Switch off the instrument. switch is activated. Wait until the heating bath temperature is less than 40 °C.
-
Page 56: Resetting The Overtemperature Protection
Solution Load limit exceeded by ex- Unplug the external consumer. ternal electrical consumers Replace external defective (30 V). consumer. Contact BUCHI Customer Service. Load limit exceeded by ex- Unplug the external consumer. ternal electrical consumers Replace external defective (24 V). -
Page 57: Adjusting The Cooling Water Flow Sensor
Büchi Labortechnik AG Help with faults | 10 10.5 Adjusting the cooling water flow sensor Precondition: R The cooling water flow sensor is installed on the instrument. See Chapter 5.8.4 "Installing the cooling water flow sensor (option)", page 38 R The instrument is switched on. R The display does not show an error. - Page 58 Büchi Labortechnik AG 10 | Help with faults Precondition: R The sensor is connected to the instrument. See Chapter 5.8.3 "Installing the foam sensor (option)", page 38 Remove the protective cover. Put the sensor 1 cm in the product. Adjust the adjustment screw so that the LED light is on when the sensor is near to the liquid.
-
Page 59: Taking Out Of Service And Disposal
When disposing, observe the disposal regulations of the materials used. Materials used see Chapter 3.5 "Technical data", page 17 11.3 Returning the instrument Before returning the instrument, contact the BÜCHI Labortechnik AG Service Department. https://www.buchi.com/contact Operation Manual Rotavapor® R-250 Pro 59/78... -
Page 60: Schematics
12.1.1 Vacuum Autodest Foam sensor Sensor (option) (option) Other vacuum Vacuum source Valve Aeration (option) Condenser valve BUCHI vacuum pump (option) Vapor temperature VacuBox sensor Fig. 11: Vacuum connection 12.1.2 Cooling water circuit Cooling temperature Condenser water out sensor (option) Autodesk sensor... -
Page 61: Spare Parts And Accessories
Büchi Labortechnik AG Appendix | 12 12.2 Spare parts and accessories 12.2.1 Spare parts glass ware Spare parts glass assembly R 003577 003577 005155 005155 003577 027289 003577 041159 041155 027289 003577 041159 027289 041131 041155 041131 027277 041060 041348 003577 041336 041338... - Page 62 Büchi Labortechnik AG 12 | Appendix Order no. Image Glass clamp 160 mm, complete 041120 EasyClamp, DN25 041130 EasyClamp, DN40 041131 Pivoting clamp, complete 041151 Glass clamp 100 mm, complete 041155 Cooler, 3-coil, closed PLG 041159 Set of bolts for EasyClamp, DN25 041240 Set of bolts for EasyClamp, DN40 041241...
- Page 63 Büchi Labortechnik AG Appendix | 12 Order no. Seal PTFE 005155 PTFE hose connection SVL 22 027338 Tubing. PTFE, Ø8/10 mm, white, per m 027277 Use: Vacuum, feeding (industrial Rotavapor®). Spare parts glass assembly RB 041436 041436 003577 003577 005155 003577 003577 027289...
- Page 64 Büchi Labortechnik AG 12 | Appendix Order no. Image Glass clamp 160 mm, complete 041120 EasyClamp, DN25 041130 EasyClamp, DN40 041131 Pivoting clamp, complete 041151 Glass clamp 100 mm, complete 041155 Cooler, 3-coil, closed PLG 041159 Set of bolts for EasyClamp, DN25 041240 Set of bolts for EasyClamp, DN40 041241...
- Page 65 Büchi Labortechnik AG Appendix | 12 Order no. Seal PTFE 005155 PTFE hose connection SVL 22 027338 Tubing. PTFE, Ø8/10 mm, white, per m 027277 Use: Vacuum, feeding (industrial Rotavapor®). Spare parts glass assembly D 041076 041131 041131 041334 003577 041131 027289 003577...
- Page 66 Büchi Labortechnik AG 12 | Appendix Order no. Image Screwed fitting Svl 22 027289 Cooler, 3 coil PLG 027308 Vapor temperature sensor, complete 041076 EasyClamp, DN25 041130 EasyClamp, DN40 041131 Pivoting clamp, complete 041151 Glass clamp 100 mm, complete 041155 Cooler, 3-coil, closed PLG 041159 Set of bolts for EasyClamp, DN25...
- Page 67 Büchi Labortechnik AG Appendix | 12 Order no. Image Extension 041270 Order no. PTFE hose connection SVL 22 027338 Seal PTFE 005155 Tubing. PTFE, Ø8/10 mm, white, per m 027277 Use: Vacuum, feeding (industrial Rotavapor®). Spare parts glass assembly D3 041076 041134 041334...
- Page 68 Büchi Labortechnik AG 12 | Appendix Order no. Image Screw cap SVL 22 003577 Screwed fitting Svl 22 027289 Cooler, 3 coil PLG 027308 Vapor temperature sensor, complete 041076 EasyClamp, DN25 041130 EasyClamp, DN40 041131 Pivoting clamp, complete 041151 Glass clamp 100 mm, complete 041155 Cooler, 3-coil, closed PLG 041159...
- Page 69 Büchi Labortechnik AG Appendix | 12 Order no. Image Inlet valve, complete 041348 Extension 041270 Order no. PTFE hose connection SVL 22 027338 Seal PTFE 005155 Tubing. PTFE, Ø8/10 mm, white, per m 027277 Use: Vacuum, feeding (industrial Rotavapor®). Spare parts single receiver 041062 041480 041475...
- Page 70 Büchi Labortechnik AG 12 | Appendix Order no. Image EasyClamp, DN25 041130 Industrial tap, small 041062 Angle seat drain valve 041405 Receiving flask 20 lt. PLG 041446 Branching piece R-250 PLG 041475 Ventilation duct, complete 041480 70/78 Operation Manual Rotavapor® R-250 Pro...
- Page 71 Büchi Labortechnik AG Appendix | 12 Spare parts double receiver 041062 041130 041048 041130 041062 041445 041130 041480 041048 041446 041130 041480 041130 041405 041446 041130 041405 Order no. Image Branching piece 1 PLG 041048 EasyClamp, DN25 041130 Industrial tap, small 041062 Angle seat drain valve 041405...
-
Page 72: 12.2.2 Further Spare Parts
Büchi Labortechnik AG 12 | Appendix Order no. Image Receiving flask 20 lt. PLG 041446 Ventilation duct, complete 041480 12.2.2 Further spare parts Order no. Image O-ring 130x5.0 Fpm70 027378 EasyClamp element, DN70 041135 PTFE coated silicon gasket for DN25 (set of 5) 11056381 PTFE coated silicone gasket for DN40 (set of 5) 11065382... -
Page 73: 12.2.3 Inlet Valve
Büchi Labortechnik AG Appendix | 12 Order no. Image Reducer ½“ x ¾“ 041448 12.2.3 Inlet valve Order no. Image PTFE bellow 041388 Glass body 041346 Set of 5 SVL 15 seals 041946 Screw Cap SVL 15 003549 Connection, PTFE 041354 Operation Manual Rotavapor®... -
Page 74: 12.2.4 Accessories
Büchi Labortechnik AG 12 | Appendix Order no. Image Screw ring SVL 30 003223 Seal SVL 30 000398 Support ring inlet valve 041147 12.2.4 Accessories Order no. Image Vacuum Pump V-600 11V600800 Chemically resistant 3-stage diaphragm pump. It impresses with its silent and economical operation. Capacity and final vacuum: 3.1 m³/h, 1.5 mbar Vacuum Pump V-600 11V600810... - Page 75 Pump V-600 with secondary condenser Stopper, PE, 120 mm 11057349 To close the evaporating flask Communication cable. BUCHI COM, 15 m, 6p 11064090 Enables connection between Rotavapor®, Interface, Vac- uum Pump, Recirculating Chiller, VacuBox and LegacyBox. IQ/OQ R-250 Pro...
-
Page 76: 12.2.5 Hoses
Büchi Labortechnik AG 12 | Appendix Order no. Image Drying flask 50 ltr. 041394 Flask crane 041494 For the safely secured transport of a 50 liter flask. Incl. the 50 liter manual flask handler. 12.2.5 Hoses Order no. Image Softaflex, ID 19 mm 037617 Y-piece, 12 mm / 16 mm 041473... -
Page 77: 12.2.6 Gear Box
Büchi Labortechnik AG Appendix | 12 12.2.6 Gear box Order no. Image Seal tool 020075 Vapor duct 041084 Seal holder 041094 Vacuum seal 041095 Evaporating flask seal, complete 041121 Set of 5 distribution head sealings 041231 Operation Manual Rotavapor® R-250 Pro 77/78... - Page 78 T +971 4 313 2860 T +52 55 9001 5386 F +66 2 862 08 54 F +971 4 313 2861 latinoamerica@buchi.com bacc@buchi.com middleeast@buchi.com www.buchi.com/es-es www.buchi.com/th-th www.buchi.com We are represented by more than 100 distribution partners worldwide. Find your local representative at: www.buchi.com...
Need help?
Do you have a question about the Rotavapor R-250 Pro and is the answer not in the manual?
Questions and answers