
Related Manuals for Maclean Energy MCE502


Summary of Contents for Maclean Energy MCE502
- Page 1 EN I Electric Glass Panel Heater with WiFi Control Instruction Manual MCE502 Please read the manual carefully prior to use...
-
Page 2: Safety Instructions
Safety Instructions Read the manual before you use the heater. Keep the manual and ensure it stays with the heater if you give it to a new owner. Before use, check that the heater and all supplied accessories are complete and intact. -
Page 3: Installation Instructions
Do not use the heater in the immediate surroundings of a bath, shower or swimming pool. Children of less than 3 years should be kept away unless continuously supervised. Children aged from 3 years to 8 years shall only switch on/off the appliance provided that it has been placed or installed in its intended normal operating position and they have been given supervision or instruction concerning use of the appliance in a safe way and understand the hazards involved. -
Page 4: Wall Mounted Installation
Wall Mounted Installation 4 Hook Type Bracket 1. Take out 4 brackets, 6 expansion screws and 6 screws out from the box, and fix 2 brackets onto the wall according to the distances between holes of the bracket, as depicted in the picture below. - Page 5 3. Hold the side of the product, look at the position of the wall hole of the rear cover, and slide the wall to the top of the slot, that is, the installation of the wall is completed, as depicted in the picture below.
-
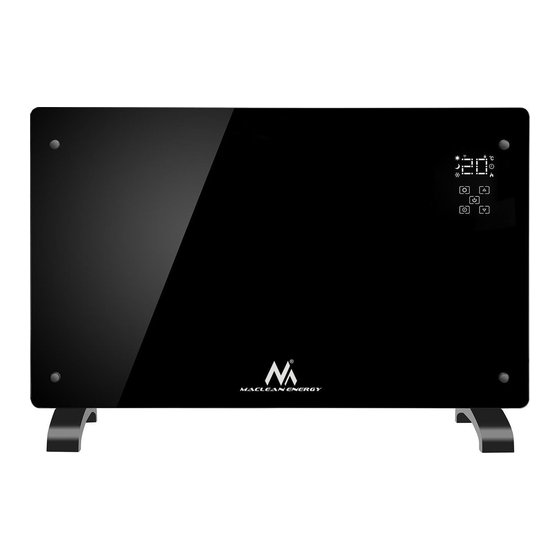
Page 6: Using The Heater
Using the Heater Control Pad Display Screen Keyboard Lock WiFi Connection Current Temperature Comfort Mode Timer Eco Mode Working Status – Anti-Frost Mode heating if icon displayed, not heating if not displayed Displays temperature or timer settings... -
Page 7: Heater Control Panel
Heater Control Panel •The heater will beep as it power on. The heater starts on standby mode, displaying the WiFi icon and the current temperature of the room in • press the ON/OFF button. You will see the heating icon and the ECO mode icon . - Page 8 Connecting to WiFi 1. To connect your heater to the WiFi, the first step is to download the Smart Life app onto your smart phone or tablet. You can find the app by scanning the QR code below or searching “Smart Life” in the Google Play or Apple app store. 2.
- Page 9 5. The app will then display its connecting screen. NOTE if the heater is failing to connect, press and hold the button for three further seconds. It will then switch to its secondary connection mode. The heater connection modes: one where the icon flashes slowly (once per second) and one where the icon flashes fast (three times per...
- Page 10 Using the Smart Life App You can use the app to control multiple devices. The status of your devices is shown on the device list: Offline (device is turned off at wall / rocker switch) Turned Off (device is in standby mode) ...
- Page 11 You can change the heater’s current mode by tapping the mode buttons. You can adjust the mode’s temperature using the + and – buttons when you’re on that mode. Scheduling your Heating You can program your heating by creating a schedule of “events”, where the heater switches on or off.
-
Page 12: Smart Features
Smart Features The "Smart" section of the SmartLife app allows you to add functions that make your heating easier and more intuitive to control. The Smart section can be reached be pressing the Smart icon at the bottom of the app. ... - Page 13 Automation allows you to set up actions that are triggered by external events. Triggers include the weather, temperature, humidity, sunset, sunrise and your location. You can add multiple actions and multiple triggers for each automation event, so you could, for example, set all your heaters to come on at 21 °C if you arrive home when it's snowing! To create new scenarios, press the button while on the Scenario screen.
-
Page 14: Erp Label
ERP LABEL Item Symbol Value Unit Item Unit Heat output Type of heat input, for electric storage local space heaters only (select one) manual heat charge control, with Nominal heat output Pnom integrated thermostat Minimum heat output manual heat charge control with room Pmin 1.00 (indicative) -
Page 15: Cleaning And Care
Cleaning and care Maintenance Always disconnect the appliance and let it completely cool before any maintenance. Use a vacuum cleaner to remove dust on grilles. Clean the outside of the unit with a damp cloth and then dry it with a dry cloth. Never immerse the unit in water, nor let water drip into the unit. Storing Always disconnect the appliance, let it completely cool and clean it before storing.
Need help?
Do you have a question about the MCE502 and is the answer not in the manual?
Questions and answers