2DI TV2 Installation And Use Manual
Wireless sensors
Hide thumbs
Also See for TV2:
- User manual (3 pages) ,
- User manual (4 pages) ,
- Care and use manual (43 pages)

Related Manuals for 2DI TV2


Summary of Contents for 2DI TV2
- Page 1 Two Dimensional Instruments, LLC • P O Box 159 • Crestwood, KY 40014 (877) 241-0042 • (502) 243-0039 fax • (502) 243-0042 international...
- Page 2 Humidity sensors have an accuracy rate of ±3%. (See the chart on page 4). Display Power: The TV2 display is powered via a USB cable from a computer or the wall plug. An optional DC connector is also available which will accept 5-30 volt dc. Backup batteries (AA) are installed in the TV2 and will keep it running for about 40 hours if USB power is missing.
-
Page 3: Table Of Contents
Quick Start pg 6 Sensor Setup pg 7 Setting the Alarms pg 8 Installation Tips pg 9 TV2 Status Screen pg 10 LED & Reset controls pg 10 Navigating with Easy Touch pg 12 Main Menu pg 14 Operational Modes... -
Page 4: Component And Packing List
5. A CD 6. A Quick Start Guide If any of these items are missing please contact the factory or the distributor/reseller from whom you ordered the TV2 for a replacement. Sensor types used by the TV2 Type of sensor... -
Page 5: Quick Start
Quick Start Your TV2 can be installed and operating in just a few minutes by following these simple steps. 1. Connect the TV2 to a power supply and touch the LCD. This display will appear. 2. Touch ‘Up’ or 'Down' to select C° or F° and touch ‘Enter’. -
Page 6: Sensor Setup
Setting up sensors 1. Install a 9-volt battery in each sensors. 2. After a few seconds, the TV2 will recognize the sensor and change the display to the Sensor Setup menu. The hour area of the sample data field will be highlighted. -
Page 7: Setting The Alarms
Setting the sensor alarms Set the Alarm by highlighting the ‘Set Alarm’ button and touching ‘Enter’. 8. . Enable the alarm by touching 'Up' and then 'Enter'. Set the trigger-alarm-time to any value between 0:00 and 99:00. This controls how long the alarm and the relay will be activated. -
Page 8: Installation Tips
Installation tips 1. Planning - Position the TV2 display close to an AC power source or your computer. The TV2 receives its power via a USB cable, which can be plugged into a computer or a wall transformer. If you can power the TV2 from your computer you will be able to auto- download data from the TV2. -
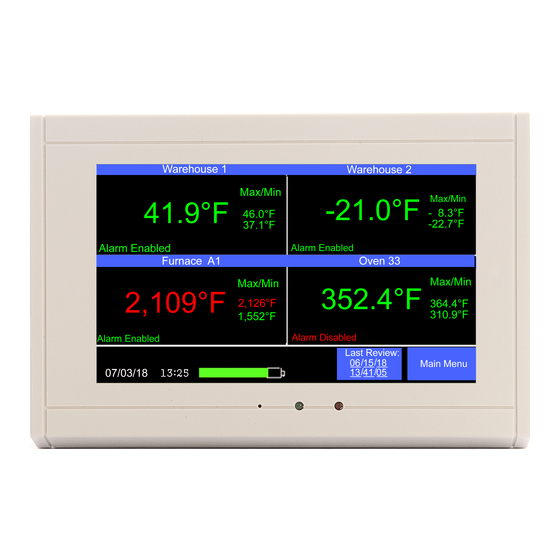
Page 9: Tv2 Status Screen
Appears in red if the reading is above the alarm once a minute. threshold. Since the TV2 has an easy touch screen, additional information can be viewed by touching various 'hot spots'. For example: 1. Touch a temperature to see the history chart for that sensor. -
Page 10: Led & Reset Controls
The LEDs and reset button at the bottom of the display The green LED blinks once a second, indicating the display is collecting data and working normally. Even during a power outage this LED will continue to blink, indicating that it is collecting and storing temperatures from the sensors The Red LED blinks when the display is operating on batteries. - Page 11 Touch 'Main Menu' to change settings. Touch a Max/Min temperature to reset it Two Dimensional Instruments, LLC • P O Box 159 • Crestwood, KY 40014 (877) 241-0042 • (502) 243-0039 fax • (502) 243-0042 international...
-
Page 12: Main Menu
The Main Menu Touch 'Main Menu' at the bottom of the Status Screen to enter the menu system. When the Main Menu opens, the System Setup field will be highlighted. Touch ‘Enter’ to enter the System Setup Menu. Two Dimensional Instruments, LLC • P O Box 159 • Crestwood, KY 40014 (877) 241-0042 •... - Page 13 On the System Setup menu you can change the temperature scale, the date and time, activate a password to restrict access to the menu system, and reset all values to the factory default. To make a change: 1. Make sure the proper field is highlighted. To highlight a field, touch 'Left' or 'Right' until it moves to the desired field.
-
Page 14: Operational Modes
Note: It is possible a max or min temperature was too high or low but an alarm was not triggered. This would happen if the violation was shorter than the delay time. 2. If a sensor is not linked to the TV2 a message stating "Sensor Not Installed' will be displayed in that quadrant. - Page 15 Note: The TV2 stores a lot of data but eventually it fills up. Once it does, the newer data rolls over the oldest data. If you are sampling data every 10 minutes the last 1.5 years of data will be stored and can be viewed.
- Page 16 Touching anywhere in body of the chart adds four navigation buttons so you can adjust the display. Touching the bottom blue triangle doubles the amount of data displayed on the chart (see zoom in FAQ). The top blue triangle zooms into the display, so less data is displayed. The green triangle on the left scrolls backward, showing older data, while the green triangle on the right shows more recent data To return to the status screen touch 'Escape'.
-
Page 17: Trace Mode
Trace Mode TRC 68.2°F 8:57 3/04/14 In the trace mode, touching either green triangle will move the white vertical line back and forth to highlight individual temperatures. The temperature beneath the vertical line is shown, along with the day and time it was taken, at the bottom of the display. (If the display is zoomed out both the high and low temperatures will be shown). -
Page 18: Sleep Mode
Sleep Mode Intentionally Blank 1. In Sleep Mode, the display is blank. The TV2 automatically enters sleep mode after power has been missing for 20 seconds, to preserve the battery. The TV2 will still collect data and perform all other functions during the sleep mode. TV2 can be ‘awakened’ for twenty seconds by touching the screen. -
Page 19: Calibration
Calibrating sensors To calibrate a sensor access the sensor setup menu by touching 'Main Menu' and 'Right' until the sensor setup area is highlighted. Touch 'Left' to highlight Calibrate Sensor and touch 'Enter". The calibration table for that sensors will be shown. Calibration Table Two Dimensional Instruments, LLC •... - Page 20 Calibration data entered here will be stored in TV2 so if a sensor is moved to a different TV2 you will need to reenter the calibration data. Each sensor can have up to three different calibration points. When the calibration screen opens, only one point is listed, but you can add two additional points or remove points.
-
Page 21: Tview Software
Copying data from the display Downloading, or copying data from a TV2 to a computer is done via the USB cable. If you are powering your display with a wall adaptor you will need to plug the display into your computer with a USB cable Two Dimensional Instruments, LLC •... - Page 22 When you open the software a small popup window will ask for a user name and password. You may skip this step if you do not intend to save any of the files you copy from TV2. However, if you intend to save your data to your computer, you should enter a username and password to encrypt your files to prevent anyone else from accessing them.
- Page 23 Once you have identified all of your TV2s, you are ready to copy data from them. 1. To copy data from a TV2 you must first select it. Click the small arrow on the right side of the box entitled 'Select Device to Download'. All known TV2s will be listed.
- Page 24 This can be tricky and may not work the way you think it should if the date on the TV2 is different than the one on the PC. c. Select either all ports or only the port you want to download by clicking on the small arrow to the right of the port selection area.
- Page 25 Working with Charts 1. When TView is opened, a blank chart is displayed. It is listed as Chart 1 on the tab at the top of the chart and as the title of the chart. You can rename this by double-clicking on the tab and typing a description in the text box.
- Page 26 Drop-Down Tabs 1. The ‘File’, ‘Setup’, 'View, 'Current Readings', and ‘Help’ tabs: File i. New Chart. This creates an empty chart with an additional tab to the right of any already displayed tabs. The tab and chart description can be changed by double clicking on the tab and typing the new name in the text box.
- Page 27 Setup tab: i. Manage TV2s. Used to rename a TV2 and determine which port it is attached to. You can view the available ports on your computer with Device Manager found in the hardware section of Properties of the 'My Computer' program.
- Page 28 TView program. The update file will be coded for your TV2 and is non-transferable. a. Click on this field and browse to the file sent to you by 2di. Click on the file and wait while the new firmware is uploaded to your TV2.
- Page 29 TV2 to which the sensor is attached. A popup will list the sensors attached to that TV2. Select one of them by clicking on it . The last 100 readings will be displayed in the chart along with the current temperature. You can add additional sensors to this page.
- Page 30 All activity of the TView software is archived. You have the option of saving this information to be emailed to a 2di. 4. 'TView Communications Diagnostics' Menu archives all communications between TView and TV2s support and troubleshooting. 5. 'Save Diagnostics file to send to 2di'.
-
Page 31: Frequently Asked Questions
“a” at the time the alarm was silenced or expired. How can I tell if the sensors are linked to the TV2? If the display shows a temperature that sensor is linked to the base station. If it is not linked a message indicating that will be displayed instead of a temperature. - Page 32 2. Press the reset button on the sensor. A red light on the sensor will blink indicating that the sensor is sending a signal to the TV2. Once the TV2 receives this signal, you will asked of you want to link the sensor. Highlight yes by touching 'Right' and touch 'Enter'.
- Page 33 Can the wireless sensors be calibrated? Yes. The calibration data is however, stored in the TV2 to which the sensor is linked, so if you unlink a sensor and link it to a different display you will need to reenter the calibration data.
- Page 34 13. How much data can be exported to Excel? When you open a file in Excel that has been saved from the TV2 with more than 65000 data points, Excel will only load the first 65000 data points. (This is a limitation of the Excel program not the TV2 or TView).
- Page 35 Down. Touch 'Enter'. The monitor will go into a deep sleep mode during which the clock will continue to run but nothing else will occur. Once TV2 is repositioned and power supplied, touch the screen and it will reboot. Your previously collected data will still be there and will display properly.
-
Page 36: Appendix
5. If the TV2 firmware is modified in any way it will be rendered inoperable and non-responsive. It is not possible for firmware that has been changed to be upgraded in the field. In this case the TV2 display must be returned to Two Dimensional Instruments, LLC for reprogramming for which service additional charges may be incurred. -
Page 37: Warranty
Warranty The TV2 line of Instruments is warranted by the manufacturer to be free from defects in material and workmanship for a period of twelve months after delivery. In the event of a claim under this warranty, the product or part must be returned to the factory for repair or replacement (shipping prepaid) with a Return Authorization Number. -
Page 38: Fcc & Ce Mark Certifications
FCC Verifications This equipment has been tested and found to comply with the limits for a Class B digital device, pursuant to Part 15 of the FCC Rules. This equipment conforms with the Australian and New Zealand EMC requirement for generic products to be used in residential, commercial and light industrial environments.
Need help?
Do you have a question about the TV2 and is the answer not in the manual?
Questions and answers